S088-R3_S77-T.qxd 6/11/2012 10:00 AM Page 1 SINCE 1941, THE JEEP BRAND ® H A S B E E N A SY M B O L O F F R E E D O M A N D C A PA B I L I T Y. D E S I G N E D F O R PEAK PERFORANCE IN RUGGED CONDITIONS. JEEP BRANDED ® P R O D U CT S A R E C R E AT E D FO R LIVING LIFE WITHOUT LIMITS. Wrangler Sport Jogging Stroller Instructions Hoja de instrucciones de la carriola de Jogging Wrangler Sport Instructions relatives à la poussette Wrangler Sport Consumer Service: 1.800.453.7673 www.kolcraft.
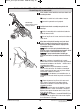
S088-R3_S77-T.qxd 6/11/2012 10:00 AM Page 2 WARNING Avoid serious injury from falling or sliding out. Always use restraint system. Your child's safety depends on you. Proper stroller use cannot be assured unless you follow these instructions. DO NOT USE STROLLER UNTIL YOU READ AND UNDERSTAND THESE INSTRUCTIONS. IMPORTANT SAFETY INFORMATION: How to Keep Your Child Safe While Using this Stroller • Adult assembly required. • Never leave your child unattended while in stroller.
S088-R3_S77-T.qxd 6/11/2012 10:00 AM Page 3 • DO NOT put child in basket. • DO NOT lift by tray/bar or toys. • Keep wheels at the recommended tire pressure as specified on the tire wall. • Only use replacement parts supplied by the manufacturer. If you have a flat air filled tire, you may use a standard bicycle tire repair kit or take it to a bicycle shop to be repaired (select models).
S088-R3_S77-T.qxd 6/11/2012 10:00 AM Page 4 ADVERTENCIA Evite daños serios causados por caídas o al deslizarse del asiento. Siempre use el sistema de cinturones. La seguridad de su hijo/a depende de usted. No se puede asegurar un uso apropiado de la carriola a menos que usted siga estas instrucciones. NO USE LA CARRIOLA HASTA QUE USTED HAYA LEÍDO Y COMPRENDIDO ÉSTAS INSTRUCCIONES.
S088-R3_S77-T.qxd 6/11/2012 10:00 AM Page 5 • Para evitar herida grave de que la rueda se salga, asegúrese de instalar apropiadamente la rueda delantera. • No ponga su niño en la canasta. • No levante la carriola por la charola/barra o los juguetes. • Mantenga las ruedas a la presión recomendada según se especifica en la cara de la rueda. • Use únicamente piezas de reemplazo del fabricante.
S088-R3_S77-T.qxd 6/11/2012 10:00 AM Page 6 MISE EN GARDE Pour éviter que l’enfant ne se blesse grièvement en tombant ou en glissant, toujours utiliser la ceinture de sécurité. La sécurité de votre enfant dépend de vous. Suivez ces instructions afin d’utiliser la poussette convenablement. N’UTILISER LA POUSSETTE QU’APRES AVOIR LU ET COMPRIS CES INSTRUCTIONS. INFORMATIONS IMPORTANTES SUR LA SÉCURITÉ : Comment garantir la sécurité de votre enfant avec cette poussette • Doit être assemblé par un adulte.
S088-R3_S77-T.qxd 6/11/2012 10:00 AM Page 7 • Pour éviter des blessures graves dans le cas où les roues se détacheraient, assurez-vous de bien situé sur la roue avant. • Ne mettez pas l'enfant dans un panier. • Ne pas soulever par le plateau/barre ou en tirant sur les jouets. • Garder la pression des roues recommandée comme indiqué sur le flanc du pneu. • N’utiliser que des pièces de rechange fournies par le fabricant.
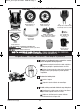
S088-R3_S77-T.qxd 6/11/2012 10:00 AM Page 8 Parts List - Lista de partes - Liste des pièces Front Wheel (1) Rueda delantera (1) Roue avant (1) Rear Wheels (2) Ruedas traseras (2) Roues arrière (2) Front Wheel Assembly Montaje de la rueda frontal Assemblage de la roue avant Stroller Frame Estructura de la carriola Cadre de la poussette iBaby™ Parent Tray iBaby™ Charola para adultos iBaby™ Plateau de l’adulte Front Bar Barra frontal Barre avant 0.5” Screws (2) 0.5” Tornillos (2) 0.
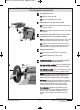
S088-R3_S77-T.qxd 6/11/2012 10:00 AM Page 9 To Assemble Rear Wheels - Para ensamblar las ruedas traseras - Assemblage des roues arrières 1 Lay stroller on its side. ES: Ponga la carriola de lado. FR: Couchez la poussette sur le côté. 2 Slide wheel pins into axle hole as shown. ES: Meta los pasadores de la rueda en el agujero del eje, como se muestra. 2 FR: Enfilez les boulons de roue dans le trou de l'essieu tel qu'illustré. 3 Push down on wheel until you hear a click.
S088-R3_S77-T.qxd 6/11/2012 10:00 AM Page 10 To Assemble Front Wheel Tube - Para ensamblar la rueda delantera - Assemblage de la roue avant 1 Place stroller so the handle bar and rear wheels are touching the floor. ES: Ponga la carriola hacia atrás sobre el mango. FR: Basculer la poussette sur la poignée. 2 Side Housing Almacenamiento lateral Enveloppe latérale 2 Position front wheel assembly over plastic side housings. ES: Sitúe el ensamblaje de la rueda frontal sobre los tubos del marco frontal.
S088-R3_S77-T.qxd 6/11/2012 10:00 AM Page 11 4 Secure Front Wheel Tube to the front frame tubes using screws. The screws should be aligned into the 2 holes located on the underside of plastic side housing. Secure with a Phillips screwdriver on both sides. ES: Asegure el ensamblaje de la rueda frontal a los tubos del marco frontal usando tornilloes de 1”. Los tornillos deben estar alineados en los 2 agujeros más cercanos a los botones con muelle. Asegúrelos en ambos lados con un destornillador Phillips.
S088-R3_S77-T.qxd 6/11/2012 10:00 AM Page 12 2 a) Ensure that the tab on the tear drop shaped washer is aligned with the hole on the front fork as shown. b)While holding one silver nut in place with your first wrench, use the other wrench to tighten the silver nut on the opposite side. c) Tighten until the front wheel fork is touching the inner black nut and the tear drop shaped washer. d) Repeat for other side.
S088-R3_S77-T.qxd 6/11/2012 10:00 AM Page 13 To Attach Front Bar - Para instalar las barras frontales - Fixation de la barre avant WARNING ADVERTENCIA MISE EN GARDE Para evitar que su niño se lesione, Pour prévenir les blessures à votre To prevent injury to your child, take care when inserting tray/bar into frame. tenga cuidado al insertar la bandeja/barra en la estructura. bébé, insérer soigneusement le plateau ou la barre sur le cadre.
S088-R3_S77-T.qxd 6/11/2012 10:00 AM Page 14 To Install Batteries into iBaby™ (select models) - Para instalar las pilas en la charola para adultos iBaby™ (modelos selectos) - Installation des piles dans le plateau-parent iBaby™ (modèles sélectionnés) Requires 4 “AAA” Batteries (Not Included). ES: Requiere 4 Pilas “AAA” (No Incluídas). FR: Exige des piles 4 “AAA” (Non Comprises). 1 1 Use a Phillips screwdriver to remove the battery door.
S088-R3_S77-T.qxd 6/11/2012 10:00 AM Page 15 Install iBaby™ Sound System (select models) - Para situar la charola para adultos iBaby™ (modelos selectos) - Fixer le plateau-parent iBaby™ (modèles sélectionnés) WARNING ADVERTENCIA MISE EN GARDE • Loud volume can damage your • Si el volumen está demasiado alto, • Les sons forts peuvent endommager puede dañar los oídos de su bebé. l'ouie de votre enfant. En allumant child’s hearing.
S088-R3_S77-T.qxd 6/11/2012 10:00 AM Page 16 HOW TO PROPERLY USE YOUR NEW STROLLER CÓMO USAR SU NUEVO CARRIOLA CORRECTAMENTE INSTRUCTIONS POUR UNE UTILISATION CORRECTE DE VOTRE NOUVELLE POUSSETTE To Operate Foot Brake - Para operar el freno de pie - Fonctionnement du frein à pied 1 TO LOCK BRAKE: Push 1-Touch brake bar down to lock wheels. Unlock Quitar Deverrouiller Lock Poner Verrouiller ES: PARA PONER EL FRENO: Presione la barra del freno una vez hacia abajo para frenar las ruedas.
S088-R3_S77-T.qxd 6/11/2012 10:00 AM Page 17 3 Hook shoulder straps to waist belt. ES: Abroche las cintas de los hombros al cinturón. 4 FR: Fixer les sangles passant aux épaules à la ceinture (à la taille). fasten restraint system buckles - push together. Be 4 To sure both buckles are fastened to secure child safely. ES: Para abrochar la hebilla del sistema de cinturones ensártela en el otro extremo del cinturón. Asegure que las dos hebillas estén abrochados para segurar el niño.
S088-R3_S77-T.qxd 6/11/2012 10:00 AM Page 18 To Recline Seat - Para reclinar el asiento - Pour incliner le siege WARNING ADVERTENCIA MISE EN GARDE Para evitar heridas en los dedos, Pour éviter que l’enfant ne se To avoid finger entrapment or pinching, do not adjust the seat back while child is in the stroller. no ajuste el respaldo del asiento coince les doigts, ne pas incliner con el niño adentro. le siège lorsque l’enfant est dans la poussette. 1 To recline seat back, loosen belt.
S088-R3_S77-T.qxd 6/11/2012 10:00 AM Page 19 To Install Car Seat - Para instalar la silla para autos - Installation du siège auto WARNING ADVERTENCIA MISE EN GARDE Al usar este producto, evite daños Lorsque vous utilisez ce produit, When using this product, to avoid serious injury from falling or sliding out, infant must always be secured in the infant car seat with the car seat harness. Refer to infant car seat instructions for proper adjustment.
S088-R3_S77-T.qxd 6/11/2012 10:00 AM Page 20 3 Place car seat in seating area of stroller so that child ü 3 X is facing handle of stroller. Make sure the car seat is resting against front bar and that the car seat is level. Your child’s head should be slightly above their knees. Do not let infant car seat sit on top of bar. NOTE: Your infant car seat may have a level indicator. It is not necessary for use with this stroller and the indicator may fall outside the recommended area.
S088-R3_S77-T.qxd 6/11/2012 10:00 AM Page 21 5 a) Tighten belt as much as you can to secure infant car seat. b) To fasten car seat restraint belts - open up loop of the restraint belt. Adjust belt until the buckles almost touch. 5a c) Pull end tab of restraint belt to set. Push buckles together to secure. ES: a) Apriete el cinturón lo más fuerte posible para asegurar el asiento de auto. b) Para abrochar los cinturones del asiento de auto, abrá el lazo del cinturón de ajuste.
S088-R3_S77-T.qxd 6/11/2012 10:00 AM Page 22 7 To unsnap Restraint Belt - press tabs. 7 ES: Para desabrochar la hebilla del cinturón del asiento, presione las lengüetas. FR: Pour défaire la courroie de maintien, appuyez sur les tirants. To Operate Swivel Wheel Lock - Para asegurar la rueda giratoria - Actionner le blocage de roue orientable 1 LOCK FRONT SWIVEL: Adjust front wheel so that wheel is straight and lock is behind the wheel.
S088-R3_S77-T.qxd 6/11/2012 10:01 AM Page 23 To Attach the Tether - Para colocar la correa - Pour fixer la sangle 1 1 Lay the tether strap over the cushioned handle so that both ends are hanging with equal lengths. ES: Colóquela sobre la manija acolchonada de manera que las partes colgantes de ambos extremos tengan la misma medida. FR: Déposer la sangle sur la poignée rembourrée de manière à ce que les deux extrémités suspendues soient d'égales longueurs.
S088-R3_S77-T.qxd 6/11/2012 10:01 AM Page 24 To Operate iBaby™ (select models) - Para hacer funcionar el iBaby™ (modelos selectos) - Fonctionnement du système de son iBaby™ (modèles sélectionnés) ™ headphone jack of your 1 Connect the iBaby plug to the ®** ®** personal sound system (iPod , iPhone or MP3 player). ES: Conecte el enchufe al tomacorriente de los auriculares de su sistema de audio personal (iPod®**, iPhone®** o reproductor de MP3).
S088-R3_S77-T.qxd 6/11/2012 10:01 AM Page 25 **iPod® and iPhone® are registered trademark of Apple Computer, Inc. Apple Computer, Inc. is not associated with Kolcraft® Enterprises, Inc. or Jeep® and no approval by them is to be implied. **iPod® y iPhone® es una marca registrada de Apple Computer, Inc. Apple Computer, Inc. no están associadas con Kolcraft® Enterprises, Inc. o Jeep® y no debe suponerse que han aprobado el producto. **iPod® et iPhone® est une marque déposée d’Apple Computer, Inc.
S088-R3_S77-T.qxd 6/11/2012 10:01 AM Page 26 3 On the back of the seat locate the slot for higher position and push buckle through slot as shown. Repeat for second side. ES: En la parte posterior de la silla localice la ranura para lograr una posición más elevada y empuje la hebilla a través de la ranura como se muestra. Repita el mismo procedimiento con el segundo lado. 3 FR: Repérez la fente de réglage en position élevée située à l'arrière du siège; poussez la boucle à travers la fente comme illustré.
S088-R3_S77-T.qxd 6/11/2012 10:01 AM Page 27 To Fold Stroller - Para plegar la carriola - Pliage de la poussette 1 Lock foot brake. ES: Asegure el freno de pie. FR: Verrouillage du frein à pied. 2 Recline seat. ES: Recline el asiento. FR: Inclinaison du siège. 4 3 Close canopy. ES: Cierre el toldo. FR: Fermeture de l'auvent. 4 Locate two trigger fold latches on frame below parent tray. Pull up latches on frame to fold. ES: Localice el gatillo para plegar la estructura bajo la charola para padres.
S088-R3_S77-T.qxd 6/11/2012 10:01 AM Page 28 CARE & MAINTENANCE • • • • • • • Clean metal parts with a damp cloth and wipe dry. Clean woven fabric or vinyl parts with mild soap and water solution. Dry wet stroller with a soft cloth to prevent rusting. When storing stroller, never stack other items on top of it; this may damage the stroller. Periodically check for worn parts, loose screws, torn materials or stitching. Keep wheels at the recommended tire pressure as specified on the tire wall.
S088-R3_S77-T.qxd 6/11/2012 10:01 AM Page 29 LIMITED WARRANTY Jeep® is a registered trademark of Chrysler Group LLC and is used under license by Kolcraft®. © Chrysler Group LLC 2012. Kolcraft® warrants this product to be free of defects in materials and workmanship, as follows: For a period of ONE YEAR from the date of purchase, Kolcraft will repair or replace, at its option, the defective product.
S088-R3_S77-T.qxd 6/11/2012 10:01 AM Page 30 GARANTÍA LIMITADA Jeep® es una marca registrada de Chrysler Group LLC y es utilizada, bajo licencia por Kolcraft®. © Chrysler Group LLC 2012. Kolcraft® garantiza que este producto estará libre de defectos en materiales y fabricación de la siguiente manera: Por un período de UN AÑO después de la fecha de compra, Kolcraft reparará o reemplazará, a su opción, el producto defectuoso.
S088-R3_S77-T.qxd 6/11/2012 10:01 AM Page 31 GARANTIE LIMITÉE Jeep® est une marque déposée de la Chrysler Group LLC et est utilisé sous licence par Kolcraft®. © Chrysler Group LLC 2012. Kolcraft® garantit cet article contre tout défaut de fabrication, selon les décrets suivants: Kolcraft s’engage à réparer ou remplacer, à sa convenance, l’article défectueux pendant UN AN à partir de la date d’achat.
S088-R3_S77-T.qxd 6/11/2012 10:01 AM Page 32 REPLACEMENT PARTS LIST - LISTA DE PIEZAS DE REPUESTO - LISTE DES PIÈCES DE RECHANGE TO ORDER PARTS: • 1-800-453-7673 in U.S.A. & Canada 1-910-944-9345 outside U.S.A. & Canada • Visit “Order Replacement Parts” page on www.kolcraft.com • Email customerservice@kolcraft.com PARA PEDIR REPUESTOS: • Llame al 1-800-453-7673 en EE. UU. y Canadá, y al 1-910-944-9345 fuera de EE. UU. y Canadá • Visite la página “Pedir repuestos” en www.kolcraft.