S45J-R7.qxd 2/17/2006 3:46 PM Page 1 Jeep® Liberty® 3-Wheel Stroller Series Instructions Hoja de instrucciones de la carriola de 3 ruedas serie Jeep® Liberty® by ©2006 Kolcraft® Enterprises, Inc. All Rights Reserved.
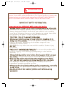
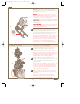
S45J-R7.qxd 2/17/2006 3:46 PM Page 2 WARNING Avoid serious injury from falling or sliding out. Always use Restraint System. Your child's safety depends on you. Proper stroller use cannot be assured unless you follow these instructions. DO NOT USE STROLLER UNTIL YOU READ AND UNDERSTAND THESE INSTRUCTIONS. IMPORTANT SAFETY INFORMATION: How to Keep Your Child Safe While Using this Stroller • NEVER LEAVE YOUR CHILD UNATTENDED WHILE IN STROLLER. Accidents can happen quickly while your back is turned.
S45J-R7.qxd 2/17/2006 3:46 PM Page 3 What to Avoid While Using this Stroller • Always balance the weight of the stroller evenly. To prevent the stroller from becoming unstable or tipping: • Do not place parcels or accessory items on the stroller canopy, seat, or over the handle. • Do not put more than 10 lbs. (4.54 kg) in the basket. • Do not put more than 3 lbs. (1.36 kg) in each cargo bag (select models). • Do not allow children to play with or hang onto the stroller.
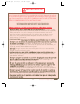
S45J-R7.qxd 2/17/2006 3:46 PM Page 4 ADVERTENCIA Evite daños serios causados por caídas o al deslizarse del asiento. Siempre use el sistema de cinturones. La seguridad de su hijo/a depende de usted. No se puede asegurar un uso apropiado de la carriola a menos que usted siga estas instrucciones. NO USE LA CARRIOLA HASTA QUE USTED HAYA LEÍDO Y COMPRENDIDO ÉSTAS INSTRUCCIONES.
S45J-R7.qxd 2/17/2006 3:46 PM Page 5 Qué evitar mientras utiliza ésta carriola • Siempre mantenga el peso de la carriola repartido por igual. Para evitar que la carriola esté inestable o se voltée: • No coloque paquetes ni accesorios sobre el toldo, los asientos o la manija. • No ponga objetos que pesen más de 10 libras (4.54 kg) en la canasta. • No ponga más de 1.362 kg (3 libras) de peso en cada alforja (modelos selectos). • No permita que los niños jueguen con la carriola o se cuelguen de ella.
S45J-R7.
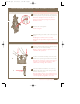
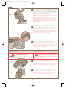
S45J-R7.qxd 2/17/2006 3:47 PM Page 7 How to Assemble Your Stroller / Cómo ensamblar su carriola To Open Stroller Para abrir la carriola any cardboard inserts or plastic ties 1 Remove used to protect the product during shipment. Remueva cualquier inserción de cartón o plástico puesto para proteger el producto durante el envío. 2 2 Release the locking latch. Suelte el seguro. making sure both side locks snap into 3 Unfold, place. Despliegue la carriola como se indica.
S45J-R7.qxd 2/17/2006 3:47 PM Page 8 Lay stroller on its side. Slide wheel onto axle. 4 Ponga la carriola de lado. Deslize la rueda sobre el eje. Push down on wheel until you hear a click. Pull up on wheel to make sure it is properly secured. If wheel pulls off, push wheel onto axle again but push metal clip in at the same time. Make sure wheel is secure. 5 4 Haga presión sobre la rueda hasta oir un click. Jale la rueda hacia arriba para asegurar que está en su sitio.
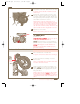
S45J-R7.qxd 2/17/2006 3:47 PM Page 9 NOTE: Make sure that spring loaded buttons pop through frame. If your spring loaded button becomes out of place, take pliers and feed button into hole. NOTA: Asegúrese de que los botones con muelle salen a través del marco. Si el botón con resorte se sale de su sitio, vuelva a meter el botón en su sitio con unas pinzas. CAUTION: If spring loaded buttons DO NOT pop through, front wheel assembly could fall off during use.
S45J-R7.qxd 2/17/2006 3:47 PM Page 10 Align bosses on footrest to the two holes on 4 the metal frame. If bosses DO NOT line up, the footrest is not correctly installed. Repeat steps 1-3. If you are still having trouble, call customer service for assistance. 4&5 Alinée los topes del apoyapiés con los dos agujeros del marco de metal. Si los topes NO se alinea, el apoyapiés no esta puesta correctamente. Repita pasos 1-3. Si toda via tiene problemas llame al servicio de clientes para assistencia.
S45J-R7.qxd 2/17/2006 3:47 PM Page 11 To Attach Front Tray Para instalar la charola tray between plastic tabs onto metal 1 Align tubing as shown. Alinee la charola en el tubo de metal entre las cejillas de plástico come se muestra. 1 tab in place. 2 Snap Asegure las lengüetas en su sitio. for second side. 3 Repeat Repita los pasos en el segundo lado.
S45J-R7.qxd 2/17/2006 3:47 PM Page 12 To Install Batteries in Electronic Toys (select models) Para instalar las pilas en los juguetes electrónicos (modelos selectos) insert batteries, use a Phillips head 1 To screwdriver to unfasten battery cover. Insert batteries as shown. Requires 2 “AA” batteries (Not Included). Secure battery cover. ON OFF Para insertar las pilas, use un destornillador con punta de cruz para quitar la tapa del compartimiento de pilas. Insertar las pilas como se ve en el dibujo.
S45J-R7.qxd 2/17/2006 3:47 PM Page 13 To Attach Music On The Move® Parent Tray (select models) Para situar la charola para adultos Music On The Move® (modelos selectos) WARNING • Loud volume can damage your child’s hearing. When turning on music, gradually adjust the volume to a comfortable listening level so child is not startled. • Do not place more than 3 lbs. (1.36 kg) in this tray to avoid tipping! • Do not place hot liquids in this tray. Hot liquids can burn your child.
S45J-R7.qxd 2/17/2006 3:47 PM Page 14 To Attach Parent Tray (select models) Para instalar la charola para adultos (modelos selectos) WARNING DO NOT place more than 3 lbs. (1.36 kg) in this tray to avoid tipping! DO NOT place hot liquids in this tray. Hot liquids can burn your child. ADVERTENCIA NO ponga más de 1.36 kg (3 libras) de peso en esta charola para evitar volcaduras. NO coloque liquidos calientes en esta charola. Los líquidos calientes pueden quemar a su niño.
S45J-R7.qxd 2/17/2006 3:47 PM Page 15 fasten restraint system buckles - push 4 To together. Be sure both buckles are fastened to secure child safely. 4 Para abrochar la hebilla del sistema de cinturones ensártela en el otro extremo del cinturón. Asegure que las dos hebillas estén abrochados para segurar el niño. To unsnap restraint system buckles - press 5 tabs to release. Para desabrochar la hebilla del sistema de cinturones, presione las lengüetas.
S45J-R7.qxd 2/17/2006 3:47 PM Page 16 To Recline Seat Para reclinar el asiento WARNING To avoid finger entrapment or pinching, do not adjust the seat back while child is in the stroller. To avoid head entrapment, always fasten the canopy to the seat back when using the stroller in the reclined position. ADVERTENCIA Para evitar heridas en los dedos, no ajuste el respaldo del asiento con el niño adentro.
S45J-R7.qxd 2/17/2006 3:47 PM Page 17 Uso y almacenamiento de la bomba de aire (modelos selectos) Air Pump Use and Storage (select models) Keep air pump stored in basket when not in use. Mantenga la bomba de aire guardada en la cesta cuando no la esté utilizando. CAUTION: Keep wheels at a recommended tire pressure of 35 p.s.i. (241 kPa). PRECAUCIÓN: Mantenga las ruedas a la presión recomendada de 241 kPa (35 p.s.i.). 2 Air Tube Tubo de aire 1 Remove air tube from pump.
S45J-R7.qxd 2/17/2006 3:47 PM Page 18 To Operate Music On The Move® Parent Tray (select models) 1 Para operar la charola para adultos Music On The Move® (modelos selectos) Connect the Music On The Move plug to the headphone jack of your personal sound system (iPod®**, radio, cassette, CD, MP3 or mini disk player). Conecte el conector de Music On The Move al conector de su sistema personal de sonido (iPod®**, radio, casette, CD, MP3 o reproductor de mini discos).
S45J-R7.qxd 2/17/2006 3:48 PM Page 19 Para doblar a carriola To Fold Stroller 1 Lock brakes. Asegure los frenos. 2 Recline seat. Recline el asiento completamente. 4b 1-Hand Fold 3 Close canopy. Cierre el toldo. 4a 4 (A) Push and hold red button to left with (B) then thumb to unlock position squeeze large red lever on handle to fold stroller. (A) Mantenga oprimido el botón rojo con el dedo pulgar para destrabar la posición (B) y luego empuje la palanca roja en el mango para doblar la carriola.
S45J-R7.qxd 2/17/2006 3:48 PM Page 20 Care & Maintenance / Cuidado & Manteniniento • To keep your stroller running smoothly and avoid squeaking wheels use a silicone or graphite based lubricant. It is important to get it into the axle and the wheel assembly. • Clean metal parts with a damp cloth and wipe dry. • Clean woven fabric or vinyl parts with mild soap and water solution. • Dry wet stroller with a soft cloth to prevent rusting.
S45J-R7.qxd 2/17/2006 3:48 PM Page 21 Limited Warranty / Garantía limitada Jeep® is a registered trademark of DaimlerChrysler Corporation, and is used under license by Kolcraft®. © DaimlerChrysler Corporation 2006. Kolcraft® warrants this product to be free of defects in materials and workmanship, as follows: For a period of ONE YEAR from the date of purchase, Kolcraft will repair or replace, at its option, the defective product.
S45J-R7.qxd 2/17/2006 3:48 PM Page 22 Personal Record Card / Tarjeta de registro personal Once in a while, we are less than perfect and one of our products reaches a customer with a problem. In most cases, we can solve your problem with replacement parts. Please contact us before you return one of our products to the store. Once a product is returned, it cannot be resold. The materials and the energy used to make it are wasted.
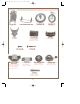
S45J-R7.qxd 2/17/2006 3:48 PM Page 23 Replacement Parts List / Lista de piezas de repuesto Marque con un círculo el repuesto que necesita Circle the Part You Need Replacement parts may look slightly different than what is shown below. Brake Assembly with Rear Axle Montaje de freno con eje trasero $11.00 Las piezas de recambio se pueden ver ligeramente diferentes de como se muestran abajo. Cargo Bag Bolsa de carga (Select Models) (Modelos selectos) $8.00 Footrest Apoyapiés $10.
S45J-R7.qxd 2/17/2006 3:48 PM Page 24 Replacement Parts Order Form / Formulario para ordenar piezas de repuesto Complete the following form. Your model number and date of manufacture must be included on the form to ensure proper replacement parts. Complete el siguiente formulario. Debe incluir en el formulario el número de su modelo y fecha de fabricación para asegurarse de que obtiene las piezas de repuesto adecuadas. Model Number - No.