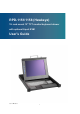
RPD-1151/1158 (Hawkeye) 1U rack mount 15" TFT monitor/keyboard drawer with optional 8-port KVM User’s Guide User’s Manual I
Contact Info: Quanmax Inc. 4F, No. 415, Ti-Ding Blvd. Sec. 2NeiHu District, Taipei 114Taiwan Tel: +886-2-2799-2789 Fax: +886-2-2799-7399 Visit our site at: www.quanmax.com © 2008 Quanmax Inc. All rights reserved. The information in this user’s guide is provided for reference only. Quanmax does not assume any liability arising out of the application or use of the information or products described herein.
RPD-1151/1158 User Manual PACKING LIST The complete RPD-1151/ 1151T package consists of: One 1U 19” rack mount console Rear mounting kit ¾ 2 x short L brackets ¾ 2 x long L brackets ¾ 2 x expending brackets ¾ 2 x supporting bracket 2 x PS/2 cables & 1 x VGA cable One power cord One user manual 1 x serial cable (for the RPD-115T) 1 x touch screen utility diskette (for the RPD-115T) The complete RPD-1158 package consists of: One 1U 19” rack mount console Rear mounting kit ¾ 2 x shor
RPD-1151/1158 User Manual SAFETY INSTRUCTIONS 1. Please read these safety instructions carefully. 2. Please keep this User’s Manual for later reference. 3. Please disconnect this equipment from AC outlet before cleaning. Don’t use liquid or sprayed detergent for cleaning. Use moisture sheet or clothe for cleaning. 4. For pluggable equipment, the socked-outlet shall be installed near the equipment and shall be easily accessible. 5. Please keep this equipment from humidity. 6.
RPD-1151/1158 User Manual The Power Cord or plug is damaged. Liquid has penetrated into the equipment. The equipment has been exposed to moisture. The equipment has not worked well or you can not get it work according to User’s Manual. The equipment has dropped and damaged. If the equipment has obvious signs or breakage. 16. Never open the equipment. For safety reason, qualified service personnel should only open the equipment.
RPD-1151/1158 User Manual INDEX OF CONTENTS PACKING LIST ............................................................................................................0 SAFETY INSTRUCTIONS ...........................................................................................1 INDEX OF CONTENTS................................................................................................3 CHAPTER 1 GENERAL INFORMATION..................................................................6 1.1 Overview ....
RPD-1151/1158 User Manual 2.2.10 OSD V-Position ..............................................................................17 2.2.11 Switch Color ...................................................................................17 2.2.12 Set User Color ..................................................................................18 2.2.13 Memory Recall ..................................................................................18 2.2.14 Exit OSD ...........................................
RPD-1151/1158 User Manual 5.2.4 5.3 5.4 5.5 Front View........................................................................................30 Hot Plugging..............................................................................................30 5.3.1 Powering Off and Restarting ............................................................31 5.3.2 Port Selection...................................................................................31 Port ID Numbering ............................
RPD-1151/1158 User Manual CHAPTER 1 1.1 GENERAL INFORMATION Overview The Hawkeye is an ideal solution for network administration with multiple servers / platforms. Their 15-inch large size TFT LCD color display and ultra-low-profile compact industrial keyboard / trackball provide the user-friendliest and most reliable environment for network administrators.
RPD-1151/1158 User Manual 1.
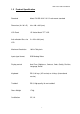
8 The RPD-1158 1 2 3 4 5 6 7 8 MENU AUTO Num Caps Scroll Pad SYSTEM 8 AC/IN 90V~264V SYSTEM 7 SYSTEM 5 SYSTEM 6 POWER ON/OFF AC/IN 90V~264V SYSTEM 4 SYSTEM 3 SYSTEM 8 SYSTEM 7 SYSTEM 6 SYSTEM 5 POWER ON/OFF SYSTEM 1 SYSTEM 2 SYSTEM 4 SYSTEM 3 SYSTEM 2 SYSTEM 1 The RPD-1151/ 1151T MENU AUTO AC/IN 90V~264V POWER ON/OFF TOUCH PANEL VGA MOUSE KEYBOARD AC/IN 90V~264V POWER ON/OFF TOUCH PANEL VGA MOUSE KEYBOARD RPD-1151/1158 User Manual
RPD-1151/1158 User Manual 1.3 Hardware Requirement Computers Your PC must have a VGA, SVGA, or Multi sync video card and video driver already installed for the monitor. If you need to install a video card or a video driver, refer to your computer documentation for instructions. Your Macintosh will require a “mac adapter” for video.
RPD-1151/1158 User Manual 1.4 Mounting the unit to your cabinet The unit is designed for standard 750mm and 900mm cabinets*. You may find the rear mounting kit in the carton. Please use the following combination to fit in different cabinets.
RPD-1151/1158 User Manual 1.4.1 Mounting the HawkEye into 750 mm cabinets 1. Fasten the supporting brackets with the chassis. 2. Fasten the extended brackets with the supporting brackets and the chassis. 3. Screw the L brackets with the extended brackets. Adjust the lengh of L brackets according to your needs.
RPD-1151/1158 User Manual 4. Mount the brackets to the cabinet loosely. 5. Fasten the front screws and the rear ones. 1.4.2 Mounting the HawkEye into 900 mm cabinets Follow the same procedure as mounting the HawkEye into the 900 mm cabinet, but exchange the short L-brackets with the long L-brackets.
RPD-1151/1158 User Manual CHAPTER 2 15” MATRIX LCD FLAT PANEL 2.1 2.1.1 Introduction Specifications LCD Screen Type TFT LCD Display Area 304.128mm(H) × 228.096mm(V) Contrast Ratio 350:1 Viewing Angle Up/down: 100 degree Left/right:120 degree Number of pixels 1024 × 768 Pixel pitch (H x W) 0.297mm × 0.297mm Response Time Rising/ Falling: 20 ms Brightness 260cd/m2 Panel Color 16.
RPD-1151/1158 User Manual 2.1.2 Factory Preset Timing for Reference Preset mode VGA 640×350 @ 70Hz VGA 640X400@70Hz VGA 720×400 @ 70Hz VGA 640×480 @ 60/ 72/ 75Hz SVGA 800×600 @ 56/ 60/ 72/ 75Hz XGA 1024×768 @ 60/ 70/ 72/ 75Hz 2.2 Panel Controls and OSD Functions Controls Description Power On/Off switch Soft power on/off button. Auto Auto-synchronize and scale down display to any valid factory preset timings. Press to scroll the function you want to adjust.
RPD-1151/1158 User Manual 2.2.3 Contrast 1. 2. Press the “menu” bottom. Use the ▼ and ▲ bottom to scroll. 3. 4. Press the “menu” bottom to enter. Use the ▼ and ▲ bottom to adjust the contrast of the display. 5. Press the “auto” button to exit. 2.2.4 Clock 1. Press the “menu” bottom. 2. Use the ▼ and ▲ bottom to scroll. 3. Press the “menu” bottom to enter. 4. Use the ▼ and ▲ bottom to adjust the video distortion. It will appear horizontal noise on the screen while adjust the clock. 5.
RPD-1151/1158 User Manual 5. Press the “auto” button to exit. 2.2.6 Horizontal Position 1. Press the “menu” bottom. 2. Use the ▼ and ▲ bottom to scroll. 3. 4. Press the “menu” bottom to enter. Use the ▼ and ▲ bottom to move the display picture left or right. 5. Press the “auto” button to exit. 2.2.7 Vertical Position 1. Press the “menu” bottom. 2. Use the ▼ and ▲ bottom to scroll. 3. Press the “menu” bottom to enter. 4. Use the ▼ and ▲ bottom to move the display picture up or down. 5.
RPD-1151/1158 User Manual 2.2.9 OSD H-Position 1. Press the “menu” bottom. 2. Use the ▼ and ▲ bottom to scroll. 3. 4. 5. Press the “menu” bottom to enter. Use the ▼ and ▲ bottom to move the OSD position left or right. Press the “auto” button to exit. 2.2.10 OSD V-Position 1. Press the “menu” bottom. 2. Use the ▼ and ▲ bottom to scroll. 3. 4. 5. Press the “menu” bottom to enter. Use the ▼ and ▲ bottom to move the OSD position up or down. Press the “auto” button to exit. 2.2.11 Switch Color 1.
RPD-1151/1158 User Manual 4. Use the ▼ and ▲ bottom to choose the color temperature mode. 5. Press the “auto” button to exit. 2.2.12 Set User Color 1. Press the “menu” bottom. 2. Use the ▼ and ▲ bottom to scroll. 3. 4. Press the “menu” bottom to enter. Use the ▼ and ▲ bottom to adjust the color temperature for user mode. 5. Press the “auto” button to exit. 2.2.13 Memory Recall 1. Press the “menu” bottom. 2. Use the ▼ and ▲ bottom to scroll. 3. Press the “menu” bottom to enter.
RPD-1151/1158 User Manual 4. Restore the default value (factory mode). Press ‘’ Menu’’ to executing. 5. Press the “auto” button to exit. 2.2.14 Exit OSD 1. Press the “menu” bottom. 2. Use the ▼ and ▲ bottom to scroll. 3. Press the “menu” bottom to enter. 4. Exit the OSD menu and save the values. Press ‘’ Menu’’ to execute.
RPD-1151/1158 User Manual CHAPTER 3 INSTALLATION 3.1 Installing the Video Card and Video Driver Before connecting the RPD-1151 and RPD-1158, make sure your computer has a video card already installed for the monitor. After you connect the drawer, install the video software driver. The video driver is supplied by the video card manufacturer and may be found on the CDROM that came with your computer.
RPD-1151/1158 User Manual 3.2 Connecting the Drawer To connect an RPD-1151 and RPD-1158 monitor/keyboard drawer to a computer, perform the following steps: AC/IN 90V~264V POWER ON/OFF TOUCH PANEL VGA MOUSE KEYBOARD The rear view of the RPD-1151/ 1151T 1. 2. 3. 4. 5. Turn off your computer. You should always turn off your computer before connecting or disconnecting a device. Connect the KVM cable to the “System 1” connector on the monitor/keyboard drawer.
RPD-1151/1158 User Manual 3.4 Testing the Drawer To test that the drawer is working properly, perform the following steps: 1. Power up the monitor/keyboard drawer, and then turn on your computer. 2. Make sure the video image is centered within the screen area. Use the OSD controls to adjust the image (see note below) or press the Auto button on the right hand side of the monitor.
RPD-1151/1158 User Manual CHAPTER 4 TOUCH SCREEN (RPD-1151T) 4.1 Installation of RPD-1151T 4.1.1 Software installation for Win95/98 i. Insert the Onetouch utility diskette (described in the packing list) into your floppy disk drive. ii. Choose [Run] from the [Start] menu iii. Type [A:\win98\setup]. iv. The [Onetouch Setup Utility Dialog Box] should appear. v. The software installation for Win NT is the same as Win 95/98.
RPD-1151/1158 User Manual responds correctly then your touch panel is accurately aligned to your monitor. 12. Touch [OK] button to exit and the [Reboot Message Dialog Box] will appear. 13. Remove the setup diskette from the floppy disk and click [Reboot] button after [Installation Driver OK] appear. 14. If you choose [Right Button ON] when you complete installing the Software Driver, you will find the Right Button Icon appeared on the right-down hand of the screen. 15.
RPD-1151/1158 User Manual 4.1.2 Software installation for DOS and Win 3.1 1. Insert the utility diskette (described in the packing list) into your floppy disk drive. 2. At the DOS prompt [C:>], type [A: INSTALL] then press [Enter]. 3. Type in the [Source Disk Driver] (type A if it’s in A drive) 4. At the prompt [Now Connect COM Port:], type your COM port number and press [enter]. 5. At the prompt [Install Windows Directory:], type the directory in which Windows is installed. Press [Enter]. 6.
RPD-1151/1158 User Manual ** Note: 640 x 480 (step 12) refers to your monitor screen resolution. If you change these settings you will have to run the position alignment program again. You can change the COM Port or Mouse Device Driver in the Autoexec.bat file with the DOS Edit program. The COM port or Mouse drive can be changed with the Edit program in AUTOEXEC.BAT The AUTOEXEC.
RPD-1151/1158 User Manual 4.2 4.2.1 Basic Touchscreen Operation Opening menu To open a menue, such as the Start menue on the Windows desktop touch the Start button once, lightly and rapidly. Other menus are opened in the same way. 4.2.2 Single tapping This technique is used to select an object or item from a menu, or to open a menu, as described above. For most applications, single-tapping is equivalent to single clicking the left mouse button. 4.2.
RPD-1151/1158 User Manual CHAPTER 5 KVM Switch (RPD-1158 only) 5.
RPD-1151/1158 User Manual 5.2.2 Single Station Installation In a Single Stage installation, there are no additional KVM switch daisy chained down from the RPD-1158. To set up a single stage installation, do the following: 1. Use connector cable sets (as described in the Hardware Requirements section), to connect any available monitor, keyboard and mouse ports of the computer you are installing. 2. Plug the adapter cable into the RPD-1158's power jack, then plug the power adapter into an AC power source.
RPD-1151/1158 User Manual 5.2.4 Front View 1. Port LEDs On Line:Lights ORANGE to indicate that the computer attached to the corresponding port is up and running. If the LED is flashing, it indicates that the Port is being used for Cascading to another Master View switch. Selected:Lights GREEN to indicate the currently selected port. The LED is steady under normal conditions, but flashes when its port is accessed under Auto Scan mode. 1 1 2 3 5 4 6 7 8 ONLINE SELECTED 2 2.
RPD-1151/1158 User Manual 5.3.1 Powering Off and Restarting If it becomes necessary to Power Off one of the RPD-1158 units, before starting it back up you must do the following: 1. Shut down all the computers that are attached to it. 2. Unplug the power adapter cable. 3. Wait 10 seconds, then plug the RPD-1158 stations back in, starting with the last station in the chain and working back to the station you originally shut down. 4.
RPD-1151/1158 User Manual OSD On Screen Display (OSD), provides a menu driven interface to handle the computer switching procedure. OSD operation is discussed in detail beginning on page 15 5.4 Port ID Numbering 5.4.1 Overview Each CPU Port on a RPD-1158 installation is assigned a unique Port ID.
RPD-1151/1158 User Manual Note: 1. The keys must be on the same side (both left, or both right) 2. You can optionally change the hotkey to LIST:ALL the Scroll Lock key (see F6, PN QV PC NAME below), in which case you would 2-5 ABC + 2-6 XYZ press [Scroll Lock] twice. OSD always starts in List view, with the highlight bar at the same position it was in the last time it was closed.
RPD-1151/1158 User Manual v. vi. 5.5.4 Number keys must be pressed from the regular keyboard; not from the numeric keypad. If you submit an incorrect Port ID, an error message displays, and you are returned to the OSD Main Menu. OSD Main Menu Headings: PN This column lists the Port ID numbers (Station Number - Port Number) for all the CPU Ports on the installation. The simplest method to access a particular computer is to move the Highlight Bar to it, then press [Enter].
RPD-1151/1158 User Manual Note: 1. If the scanning stops on an empty port, or one where the computer is attached but is powered Off, the monitor screen will be blank, and the mouse and keyboard will have no effect. To recover, key in the Hotkey sequence (see Hotkey Selection, above), for any Port ID that has an active computer attached. 2.
RPD-1151/1158 User Manual When a port has been selected, an arrowhead displays in the QV column to indicate so. The arrowhead disappears when a port is deselected. ♦ F5 Edit: To help remember which computer is attached to a particular port, every port can be given a name. The Edit function allows you to create, modify, or delete port names. To Edit a port name: 1. Move the highlight bar to the port you want to edit. 2. Press [F5]. 3. Key in the new Port Name, or modify/delete the old one.
RPD-1151/1158 User Manual F6 Set Pressing [F6] brings up an OSD configuration menu. To change a setting: 1. Move the highlight bar to the choice you want, then press [Enter]. 2. On the submenu that appears next, move the highlight bar to the choice you want and press [Enter]. ♦ An icon of a pointing finger indicates which choice is the currently selected one.
RPD-1151/1158 User Manual Setting Function DEFAULT VALUES* factory defaults. You are asked to confirm before the procedure goes on. Key in Y, then press [Enter] to confirm. While the settings are being cleared, a message appears on the display to indicate so. After the settings have been cleared, another message appears to indicate that the procedure completed successfully. LOCK CONSOLE* To lock or unlock the Console. When the Console is locked, only the current monitor screen displays.
RPD-1151/1158 User Manual If the two entries match, the new password is accepted and the screen displays the following message: SET PASSWORD OK If the entries do not match, the screen displays the message: PASSWORD NOT MATCH in which case you must start again from the beginning. Note:To modify or delete a previous password, access the Password function as in Step 1, then use the backspace or delete key to erase the individual characters.
RPD-1151/1158 User Manual 5.6 Trouble Shooting Symptom Possible Cause Pressing Hot Keys The connection from gets no response the selected port to the target computer has been broken, or the computer is turned OFF. Action Check the Online LED for the selected port. If it is not lit: Manually press one of the Select switches to connect to a computer that is powered ON. Check the cables to make sure they are all properly connected. Improper keyboard reset.