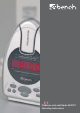
Projection clock with Radio KH 2212 Operating Instructions
Contents 1. Intended use _ _ _ _ _ _ _ _ _ _ _ _ _ _ _ _ _ _ _ _ _ _ _ _ _ _ _ _ 4 2. Technical Data _ _ _ _ _ _ _ _ _ _ _ _ _ _ _ _ _ _ _ _ _ _ _ _ _ _ 4 3. Safety Instructions _ _ _ _ _ _ _ _ _ _ _ _ _ _ _ _ _ _ _ _ _ _ _ _ 4 4. Connecting the clock _ _ _ _ _ _ _ _ _ _ _ _ _ _ _ _ _ _ _ _ _ _ _ 5 5. Controls _ _ _ _ _ _ _ _ _ _ _ _ _ _ _ _ _ _ _ _ _ _ _ _ _ _ _ _ _ _ 6 6. Setting the clock _ _ _ _ _ _ _ _ _ _ _ _ _ _ _ _ _ _ _ _ _ _ _ _ _ 6 7.
1. Intended Use t This device is intended for home use. It is not intended for commercial or industrial use. 2. Technical Data Mains voltage ........................................ : Back-up power ...................................... : Power consumption .............................. : Frequency bands .................................. : Alarm functions ...................................... : 230 V / ~50 Hz 9 V block battery 6W VHF / MW Radio, Alarm sound 3.
b) To avoid risks of fire and injuries: • Set up the appliance in an open and well-ventilated area, so that there are no heat pockets. Never cover the ventilation holes. • Avoid any additional heat build up, e.g. direct sunlight, heaters, other devices, etc. • Do not allow children or elderly persons to play with the appliance unsupervised, as they are not always able to assess the possible dangers correctly.
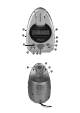
5. Controls t TUNING FM/AM (Band selector) VOLUME (volume control) SLEEP (Sleep timer) ALARM OFF ALARM (alarm) SNOOZE MIN (LED display) HOUR (LED display) TIME (LED display) Function switch ON OFF AUTO BUZZ Projection On/Off FOCUS (for projection) HOUR (Projection display) MIN (Projection display) TIME (Projection display) 6. Setting the clock Separate settings must be made in the clock for the LED and projection displays.
If you can see the time display on the projected area clearly... while you keep the TIME key pressed: Press the HOUR key to set the hours. Press the MIN key to set the minutes. 7. Setting the wake-up time If the time for the LED display is set as explained above: while you keep the ALARM key pressed: Press the HOUR key to set the hours. Press the MIN key to set the minutes. 8. Radio reception Place the function switch in the ON position.
t b) Set the alarm tone Place the function switch in the BUZZ position. The alarm is now switched on. The LED display shows a point to the bottom left, as an indicator. 10. Switching off the alarm Press the SNOOZE key, and the alarm repeats after 9 minutes. Press the ALARM OFF key to put the alarm off until the next day. Place the function switch in the OFF position to switch off the alarm function completely. 11.
12. Cleaning and Care Warning: Danger of electrical shocks. • Pull the plug out of the socket before cleaning. • Never open the casing of the device. There are no operating controls inside. ➪ Clean the instrument only with a soft, dry piece of cloth. ➪ Do not use any cleansing agents or solvents. They can damage the plastic surfaces. 13. Disposal Before disposing of the appliance,... ➪ first of all, remove the batteries as explained in section 4.
Kompernaß Handelsgesellschaft mbH Burgstr. 21 · D-44867 Bochum Id. Nr. KH2212-06/04 www.kompernass.