CV_KH4077_BK1968_LB6.qxd 30.11.2007 10:15 Uhr Seite 1 6 KOMPERNASS GMBH · BURGSTRASSE 21 · D-44867 BOCHUM www.kompernass.com ID-Nr.
CV_KH4077_BK1968_LB6.qxd 30.11.
CV_KH4077_BK1968_LB6.qxd 30.11.
CV_KH4077_BK1968_LB6.qxd 30.11.
CV_KH4077_BK1968_LB6.qxd 30.11.
CV_KH4077_BK1968_LB6.qxd 30.11.
IB_KH4077_BK1968_LB6 30.11.2007 14:47 Uhr CONTENT Seite 1 PAGE Safety instructions 2 Description of the appliance 3 Assembly 3 Removing the halogen lamps. 4 Inserting the halogen lamps 4 Cleaning 4 Troubleshooting 4 Disposal 5 Technical data 5 Service 5 Importer 5 Read these operating instructions carefully before using the appliance for the first time and preserve this maual for later reference. Pass this manual on to whoever might acquire the appliance at a future date.
IB_KH4077_BK1968_LB6 30.11.2007 14:47 Uhr HALOGEN WORK SPOTLIGHTS Seite 2 Danger of injuries • If they have not previously been supervised or instructed in its correct usage, do not allow individuals (including children) to use the appliance whose physical, sensorial or mental abilities or lack of experience and knowledge hinder their safe usage of it if they have not previously been supervised or instructed in its correct usage.
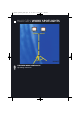
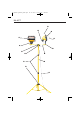
IB_KH4077_BK1968_LB6 30.11.2007 14:47 Uhr Description of the appliance Seite 3 Assemble the protective grill r on to the halogen spotlights e ³ Insert the lower pegs of the protective grill r q ON/OFF Switch w Floodlight lever e Halogen floodlight r Protective grill t Knurled screw y Crossbeam u Telescopic stand i Power cable o Knurled screw a Fixing ring s Distributor box d Knurled screw f Fixing screw g Glass cover into the recesses on the corners before the glass covering g.
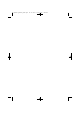
IB_KH4077_BK1968_LB6 30.11.2007 14:47 Uhr Important! Seite 4 Inserting the halogen lamps To adjust the halogen floodlight e, use the knurled screw t, the fixing screw f and the floodlight lever w. 1. Ensure that the Floor Halogen Floodlight is switched-off and completely cooled down. 2. Take the new halogen lamp from its packaging with a dry cloth. Place a ceramic end on the appropriate retainer. 3. Place the other ceramic end on the opposite retainer.
IB_KH4077_BK1968_LB6 30.11.2007 14:47 Uhr Seite 5 Troubleshooting Technical data Symptom: The Stand Halogen Floodlight will not switch on. Mains voltage: 220 - 240 V ~ / 50 Hz Rated output: 2 x 500 Watt Protection rating:IP44 Possible cause and remedy: Check if the Stand Halogen Lamp has been correctly assembled or if it is possibly damaged. Replace the halogen lamps if necessary. Service DES Ltd Units 14-15 Bilston Industrial Estate Oxford Street Bilston WV14 7EG Tel.