
Installation Sheet

+
-
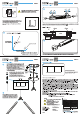
Pull the core wire out and fit it
into the + posive terminal.
Twist the skin of the wire and
fit it into the - negave terminal.
3b
5b
BOTTOM VIEW
4b
pendant light
Z-BAR
triangle
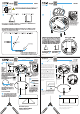
Canopy installation (Multipoint)
Aach LED light bars to the joints and make
sure they are fully inserted with no gaps.
Ensure each joint is posioned so that the
joint’s center opening is always facing inward,
and not upward, downward or outward of the
enre fixture.
Affix the holders to the 2 locaons (other than
the canopy) marked on the ceiling from step #1
with screws. Then screw the cable grippers into
the holders. Wires can be released and
re-adjusted by pressing onto the nozzle.
Tighten two screws from the sides to secure the
face plate.
Using the nut & cable gripper in the bag labeled
“
b”, feed the DC power cord, from the joint in
the container labeled , through the provided
nut, then throught the face plate, and then
through the provided cable gripper as shown.
Connect the DC wires to the DC terminal. Pull
the core wire out and fit it into the + posive
terminal. Twist the skin of the wire and fit it into
the - negave terminal. Affix the wires to the
terminal with a flat head screw driver. Secure
the cable gripper to the face plate by ghtening
the nut to the cable gripper.
Nut & cable gripper
are in the bag
labeled “
b”.
Cable gripper
is in the bag
labeled “
a”.
All wires should be of equal length.
Wires can be released and re-adjusted by
pressing the cable grippers’ “nozzle”.
-
+
N
L
-
+