
- Konica Digital Fax/Copier/Printer Operating Instructions


2.2
Basic operation
Resolution, grayscale
Reviewing resolution and grayscale:
• Normal resolution (“
NORM
” on the control panel) is suitable for most typed
documents and simple drawings.
• Fine resolution (“
FINE
” on the control panel) is ideal for maps, moderately compli-
cated drawings, floorplans or handwritten documents.
• Superfine resolution (“
S
-
FINE
” on the control panel, “S Fine” on the
LCD
)
reproduces the detail of extremely complicated drawings or line art.
• Grayscale mode (“
HALFTONE
” on the control panel; “Gray” on the
LCD
) captures
shades in photos and drawings.
Note: If you send a fax in superfine, certain fax models (especially older models)
receive it only in fine mode. However, you can send a fax in grayscale mode
to virtually any fax machine currently in use.
To change the resolution setting, press
RESOLUTION
repeatedly.
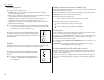
A glowing
LED
indicates the fax is using the setting named by
that
LED
. For example, in the drawing (right), the machine is set
for
FINE
resolution.
Contrast
Setting the contrast allows you to compensate for any excessive lightness or dark-
ness, as the case may be, of document pages you are sending or copying.
To change the contrast setting, press
CONTRAST
repeatedly.
A glowing
LED
indicates the fax is using the setting named by
that
LED
.
Note: To avoid confusing the Light and Dark settings, just
remember — “Light lightens” and “Dark darkens” — to
keep it straight.
Mixing resolution and contrast in a multiple page
When you send the document with more than one page, you can select different res-
olutions and contrasts for each page.
Insert your documents, select resolution and contrast for first page, dial and press
START
. Then follow one of the following two procedures.
When the document is placed in the
ADF
:
Select resolution and contrast before the next page is scanned.
When the document is placed on the platen glass:
1
Remove the previous page and place the next page.
2
Select resolution and contrast. Then press
NEXT DOC
.
Dialing pause
Some long-distance systems require dialing pauses, and pauses can also be useful
when you’re dialing through special telephone exchanges.
To insert a pause, assign
REDIAL
/
PAUSE
to a Soft key (see page 3.16), and then press
REDIAL
/
PAUSE
. (The pause character (
-/
) will appear on the
LCD
.) Each pause
entered lasts for a factory-set two seconds.
For example, pressing 9,
REDIAL
/
PAUSE
, 19725552009 dials 9 [2-second pause] 1 9 7
2 5 5 5 2 0 0 9.
Helpful Tip: You can change the dialing pause length within 2 to 10 seconds.
(see “Changing the pause length,” page 4.5.)
Potential problems with call-waiting and voice mail
Telephone call-waiting signals can stop fax transmission and reception. And any
service — such as voice mail — which may intercept your calls can keep your fax
machine from receiving fax calls.
If you use only one line for both phone and fax, consult your telephone company to
see how you can temporarily disable call-waiting or voice mail while using the fax
machine.
CONTRAST
NORMAL
LIGHT
DARK
HALFTONE
DOCUMENT
S-FINE
FINE
NORMAL
RESOLUTION