
Instruction Manual


[Print Functions] 2-28
2.4 Useful printing functions
2
Registering or editing a watermark
This machine has several factory-set watermarks. However, you can register new watermarks or edit existing
watermarks, if necessary.
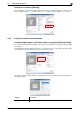
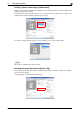
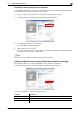
1 In the [Stamp/Composition] tab, select the [Watermark] check box, and click [Edit].
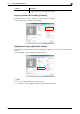
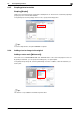
2 Click [Add] and register the watermark data.
% To edit a registered watermark, select the watermark from the [Current Watermark] list, and edit the
data.
% To delete a registered watermark, select the watermark from the [Current Watermark] list, and click
[Delete].
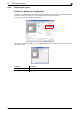
3 Click [OK].
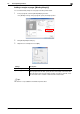
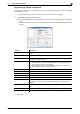
Settings Description
[Watermark Name] Enter the name to be displayed in the watermark list (using up to 30 charac-
ters).
[Watermark Text] Enter the text to be displayed as a watermark (using up to 30 characters).
[Up]/[Down] Click these buttons to reorder items in the list. You can move frequently used
watermarks to upper positions.
[Position] Specify the print position for the watermark.
• [X]/[Y]: Adjust the horizontal and vertical positions of the watermark. The
values change as you move the slide bar.
• [Center]: Click this button to reset the watermark position to the center.
• [Angle]: Adjust the angle of the watermark.
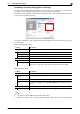
[Font Name] Select the font for the watermark.
[Size] Specify the font size for the watermark.
[Style] Select the font style for the watermark.
[Frame] Select the frame for the watermark.
[Density] Select the density for the watermark.
[Transparent] Select this check box to print the watermark in a translucent tone.
When this check box is cleared, the printed watermark obscures the back-
ground.
[1st Page Only] Select this check box to print the watermark only on the first page of the orig-
inal.
[Repeat] Select this check box to repeatedly print the watermark on each page.
[Sharing] Select this check box to share the watermark with other users.