Hard Disk Drive Security Enabling bizhub HDD Security Features bizhub 500/420/360 bizhub 750/600
1 Enabling bizhub HDD Security - Overview This guide is intended to assist the bizhub Multi-Function Printer (MFP) Administrator with the steps and procedures necessary to ensure that the appropriate HDD Security Features are enabled and functioning.
2 Setting the HDD Lock Password 1 Enter the Administrator Mode on the MFP display, Utility/Counter button > Administrator Settings > Input Admin Password > Security Setting. 2 Touch [HDD Setting]. 3 Touch [HDD Lock Password]. 4 Enter the 20-digit HDD Lock Password from the keyboard and keypad. – Press the [C] key to clear all characters. – Touch [Delete] to delete the last character entered.
If the HDD Lock Password entered does not comply with the Password Rules, a message appears stating that the HDD Lock Password entered cannot be used. Enter the correct HDD Lock Password. For details of Password Rules, see “Password Rules” in Appendix C. 6 To prevent entry of a wrong password, enter the 20-digit HDD Lock Password once again. 7 Touch [OK].
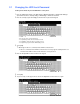
2.1 Changing the HDD Lock Password 1 Enter the Administrator Mode on the MFP display, Utility/Counter button > Administrator Settings > Input Admin Password > Security Setting > HDD Settings > HDD Lock Password. 2 Enter the currently registered 20-digit password from the keyboard and keypad. – Press the [C] key to clear all characters. – Touch [Delete] to delete the last character entered. – Touch [Shift] to show the upper case/symbol screen.
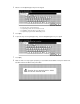
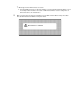
7 8 Touch [OK]. Make sure that a message appears prompting you to turn OFF and then ON the main power switch. Now, turn OFF and then turn ON the main power switch. Note: It is critical that the Administrator not forget any of the passwords. To correct a forgotten password will require a service technician, replacement parts and significant cost and down time to be corrected.
3 Setting the Encryption Key (encryption word) 1 Enter the Administrator Mode on the MFP display, Utility/Counter button > Administrator Settings > Input Admin Password > Security Setting > HDD Settings. 2 Touch [HDD Encryption Setting]. bizhub 750/600 models ONLY- select Image Data Encryption Key 3 A message appears that confirms whether or not the setting of the Encryption Key is to be continued. Touch [Yes].
4 Enter the new 20-digit Encryption Key from the keypad. – – – – Press the [C] key to clear all characters. Touch [Delete] to delete the last character entered. Touch [Shift] to show the upper case/symbol screen. Touch [Cancel] to go back to the HDD Setting screen. 5 Touch [OK]. 6 To prevent entry of a wrong Encryption Key, enter the 20-digit Encryption Key once again. 7 Touch [OK]. 8 Make sure that a message appears prompting you to turn OFF and then ON the main power switch.
The following screen appears after the machine has been restarted. bizhub 750/600 models ONLY - select Image Data Encryption Key 10 Enter the Administrator Mode on the MFP display, Utility/Counter button > Administrator Settings > Input Admin Password > Security Setting > HDD Settings > HDD Formatting. 11 Touch [HDD Format]. 12 A message will appear that confirms whether the HDD may be formatted or not. Touch [Yes].
? What happens when HDD Format is executed? Executing HDD Format erases data in the HDD. It is recommended that important data be saved in a backup medium in advance. Execution of HDD Format will also reset the setting values of different functions to the default values. 13 Make sure that a message appears prompting you to turn OFF and then ON the main power switch. Now, turn OFF and then turn ON the main power switch.
3.1 Changing the Encryption Key 1 Enter the Administrator Mode on the MFP display, Utility/Counter button > Administrator Settings > Input Admin Password >Security Setting > HDD Settings > HDD Encryption Setting. 2 Enter the currently registered 20-digit Encryption Key from the keypad. ter 2 3 Touch [Edit].
8 Make sure that a message appears prompting you to turn OFF and then ON the main power switch. Now, turn OFF and then turn ON the main power switch 9 The following screen appears after the machine has been restarted. 10 Enter the Administrator Mode on the MFP display, Utility/Counter button > Administrator Settings > Input Admin Password > Security Setting > HDD Settings > HDD Formatting. 11 Touch [HDD Format]. 14 A message will appear that confirms whether the HDD may be formatted or not.
15 Make sure that a message appears prompting you to turn OFF and then ON the main power switch. Now, turn OFF and then turn ON the main power switch.
4 Overwrite Temporary Data Overwrite Temporary Data should be enabled if the deletion of any latent image data that might be on the HDD after a print, scan or fax is required. This feature requires two different settings; Mode 1 (1x pass) or Mode 2 (3x pass) Setting Mode 1 Overwrite Method Overwrite with 0 x 00 Mode 2 Overwrite with 0 x 00 Overwrite with Oxff Overwrite with the letter “A” (Dx61) Verify Standards NAVSO P-5239-26 (US Navy) DoD 5220.
5 A message appears requesting confirmation of the execution of HDD format. Touch [Yes]. 6 Make sure that a message appears prompting you to turn OFF and then ON the main power switch. Now, turn OFF and then turn ON the main power switch.
5 bizhub MFP Box Data Deletion bizhub Box functions like User Box, Secure Print allow document data to be saved to the machine's internal hard disk. This data may be stored temporarily for printing or it can be stored for a period of time for use at a later date. All of the bizhub Box functions have the ability to delete or auto delete these stored documents. User Box Document Deletion Settings During the creation of a User Box the end user has the ability to set the deletion settings for that User Box.
Appendix A Overwrite All Data Function At the ‘End of Life’ or ‘End of Lease’ when the MFP is to be discarded the Overwrite All Data function overwrites and erases all data stored in all spaces of the HDD. This function also resets all passwords back to factory default settings, preventing any leakage of data. The HDD Overwrite Methods include the choice of eight different modes, [Mode 1] through [Mode 8] each Mode corresponding with a specific Government Standard.
Setting the Overwrite All Data 1 Enter the Administrator Mode on the MFP display, Utility/Counter button > Administrator Settings > Input Admin Password > Security Setting > HDD Settings 2 Touch [Overwrite All Data]. 3 Select the desired mode and touch [Overwrite]. 4 A message appears that prompts you to confirm whether you want to overwrite all data. Touch [Yes].
Note After the main power switch has been turned on, quickly turn it off and give the machine to the Service Engineer. If the Overwrite All Data function is executed by mistake, contact the Service Engineer. For more details, consult the Service Representative.
Appendix B Utilizing the Konica Minolta HDD Back Up Utility The HDD Backup Utility, which is to be installed in the PC of the Administrator of the machine, is application software used exclusively for accessing the HDD of an MFP. The HDD Backup Utility functions performed by the Administrator of the machine allow the image data saved in the HDD of the machine to be backed up and restored. It is not possible to open and review the backup data file directly.
4 Click [Next]. If a wrong Administrator Password is entered, a message appears that tells that there is a mismatch in the passwords. Enter the correct Administrator Password. If the Enhanced Security mode is set to [ON], entry of a wrong password is counted as unauthorized access.
7 Type a backup folder name that consists of 1 to 50 characters in the "Backup folder name" text box and click [Next]. 8 To set a password for the backup file, select the corresponding check box and type a password that consists of 1 to 64 digits in the box for "Password for backup file" and "Password for backup file (confirmation)" and then click [Next].
9 Check the data that has been set and click [Start]. 10 Make sure that the backup procedure has been completed. Then, click [Finish].
2.2 Restoring a Backup HDD File 1 Start the HDD Backup Utility. 2 Select this machine and click [Restore]. 3 4 Click [OK]. Click [Browse] and specify the destination, in which the backup file is to be saved. If a password has been set for the backup data, type the password that consists of one to 64 digits set during Backup and click [OK].
5 6 Click [Next]. Type the 8-digit Administrator Password registered in the machine in the "Administrator Password" box. If the "Save the administrator password" check box is selected, the Administrator Password entered is stored in the PC being used. If you do not want the Administrator Password stored, clear the "Save the administrator password" check box. 7 Click [Next]. If a wrong Administrator Password is entered, a message appears that tells that there is a mismatch in the passwords.
8 Check the data that has been set and click [Start]. 9 Click [OK]. Make sure that Restore procedure has been completed and then click [Finish].
Appendix C Recommended Password Rules Password Rules According to certain Password Rules, registration of a password consisting of a string of a single character or change of a password to one consisting of a string of a single character is rejected for the Administrator Password, User Password, Account Password, User Box Password, Secure Print Password, SNMP Password, WebDAV Server Password, and Encryption Key.
Konica Minolta Business Solutions U.S.A., INC. 100 Williams Drive Ramsey, NJ 07446 www.kmbs.konicaminolta.us www.kmbs.konicaminolta.