Data Management Software CA-S20w Installation Guide
Safety Precautions Before you use the CA-S20w software, we recommend that you thoroughly read this manual as well as the instruction manuals of your PC and the instrument.
Introduction Software License Agreement The terms of the license agreement of the CA-S20w software are provided in the Software License Agreement dialog box displayed on-screen during the installation process. This software can be installed only if you agree to all the terms of the agreement. Notes on Use • The CA-S20w application software is designed to be used with the Windows XP, Windows Vista or Windows 7 operating system. Note that neither operating system is included with this software.
Software Installation System Requirements CONTENTS 1.1 System Requirements ................................................................................. 3 1.1.1 System Requirements ....................................................................................3 1.1.2 Compatible Instruments.................................................................................3 1.1.3 Language .........................................................................................................3 1.
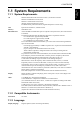
CONTENTS System Requirements 1.1 System Requirements 1.1.1 System Requirements OS Windows XP Professional 32-bit Service Pack 3, 64-bit Service Pack 2 Windows Vista Business 32-bit, 64-bit Windows 7 Professional 32-bit, 64-bit (English, Japanese and Korean versions For Windows XP professional 64-bit, English and Japanese versions only) CPU Equivalent to Pentium 4, 2.
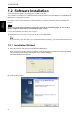
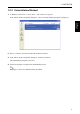
CONTENTS 1.2 Software Installation Software Installation Install the software before connecting the CA-2000 to the PC. The software is provided on a CD-ROM and the calibration data on a DVD-ROM. A CD-ROM/DVDROM drive is required to use them. If an older version of this software has been installed, you need to uninstall it before installing this version.
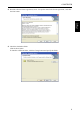
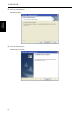
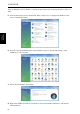
CONTENTS 3. Read the software license agreement, select ‘I accept the terms in the license agreement’, and click the Next button. Software Installation 4. Check the destination folder. Click the Next button. To install to a different folder, click the Change button and specify the folder.
CONTENTS 5. Click the Install button. Software Installation Installation starts. 6. Click the Finish button. Installation is complete.
CONTENTS 1.2.2 Uninstallation Method 1. In Windows, select Start - Control Panel - Add or Remove Programs. In the Add or Remove Programs dialog box, a list of currently installed programs is displayed. Software Installation 2. Select ‘CA-S20w’ from the list and click the Remove button. 3. In the Add or Remove Programs dialog box, click the Yes button. The uninstallation program is executed. 4. Follow the prompts to complete the uninstallation process.
CONTENTS Then, for Windows Vista or Windows 7, follow the procedure below to uninstall the driver of the CA2000. Software Installation 5. From the Start menu, select Control Panel. When ‘Classic View’ is displayed in Windows Vista, select ‘Control Panel Home’. 6. From the ‘System and Maintenance’ menu (Windows Vista) or ‘System and Security’ menu (Windows 7), select ‘System’. 7. Select ‘Device Manager’ under Tasks. 8.
CONTENTS 1.3 Connecting the CA-2000 to PC Install the software before connecting the CA-2000 to the PC. 1.3.1 Connecting the CA-2000 for the first time (Windows XP) 1. After turning on the CA-2000’s power, connect the USB cable to the PC and the CA-2000. The Found New Hardware Wizard dialog box appears. Wait a while. Connecting the CA-2000 to PC 2. Select ‘No, not this time’ and click the Next button.
CONTENTS 3. Select ‘Install the software automatically’ and click the Next button. Connecting the CA-2000 to PC When your OS is Windows XP Professional 64-bit, you need to specify the source of the installation. Select “ca2000.inf” in the “Driver” folder in the software CD and click the Next button. The Hardware Installation dialog box appears.
CONTENTS 4. Click the Continue Anyway button. Connecting the CA-2000 to PC 5. Click the Finish button. Installation is complete.
CONTENTS 1.3.2 Connecting the CA-2000 for the first time (Windows Vista) 1. After turning on the CA-2000’s power, connect the USB cable to the PC and the CA 2000. Connecting the CA-2000 to PC • The Found New Hardware dialog box appears. 2. Click ‘Locate and install driver software’. When the dialog box which confirms User Account Control appears, select ‘Continue’. 3. Insert the software CD into the drive and click the Next button. 4. Click the Close button.
CONTENTS 1.3.3 Connecting the CA-2000 for the first time (Windows 7) 1. Insert the software CD into the drive. After turning on the CA-2000’s power, connect the USB cable to the PC and the CA-2000. • The installation of the device driver should start automatically. 2. Select the icon showing Installing device driver software from the taskbar. 3. When the Device Software Installation dialog box appears, click ‘Skip obtaining driver software from Windows Update’. Connecting the CA-2000 to PC 4.
CONTENTS 5. Wait for the screen below to appear and click the Close button. • Please wait for a while as this may take several minutes. 6. Right click on the ‘Computer’ from the Start menu and select ‘Properties’. Connecting the CA-2000 to PC • The screen below will appear after clicking ‘Device Manager’ on the left of the Control Panel. 7. Right click on ‘k364usb’ and select ‘Update Driver Software’. 8. Click ‘Browse my computer for driver software’.
CONTENTS 9. Designate the driver folder in the software CD and click the Next button. (Example) In the case of CD-ROM in D drive. D:\Driver Connecting the CA-2000 to PC 10.Click the Close button. • The installation of the driver software is complete.
CONTENTS 1.4 Installing Calibration Files The CA-2000 you have purchased comes with a calibration data DVD for each lens you selected at time of purchase. All items on the DVD provided must be installed in order for the CA-2000 to make measurements. To install the calibration files, be sure to log on as an administrator to the PC. Note If you selected a user other than a user with administrator privileges, you cannot install the calibration files.
CONTENTS This operation must be performed for each disk. The drive name may be different depending on your PC usage environment. Ti p If the disk is not recognized, check the file path of the drive for the calibration disk in “File Path Settings” below. 1.4.2 Notes on Calibration Files 1.4.3 Hierarchy of the Installed Files CA-S20w and the calibration files are installed in the following hierarchy.
CONTENTS 1.4.4 File Path Settings You can change the storage location of measurement files and calibration data and the file path of the drive for the calibration disk. 1. Select Tool - File Path from the menu. Installing Calibration Files The Option File Path dialog box appears. 2. Change each file path as necessary. Click the Browse button to specify the existing file path. In the ‘Save folder’ field, do not choose a location in the root directory of the hard drive (such as C:\) but specify a folder.
9222-1735-22 © 2011 KONICA MINOLTA SENSING, INC.