E 9222-2724-11 SY-A308 ME-0307 INSTRUCTION MANUAL
Before you begin Thank you for purchasing this digital camera. Please take the time to read through this instruction manual so you can enjoy all the features of your new camera. Check the packing list before using this product. If any items are missing, immediately contact your camera dealer.
For proper and safe use Read and understand all warnings and cautions before using this product. WARNING Using batteries improperly can cause them to leak harmful solutions, overheat, or explode which may damage property or cause personal injury. Do not ignore the following warnings. • Only use the batteries specified in this instruction manual. • Do not install the batteries with the polarity (+/–) reversed. • Do not use batteries which show wear or damage.
• Keep batteries or small parts that could be swallowed away from infants. Contact a doctor immediately if an object is swallowed. • Store this product out of reach of children. Be careful when around children not to harm them with the product or parts. • Do not fire the flash directly into the eyes. It may damage eyesight. • Do not fire the flash at vehicle operators. It may cause a distraction or temporary blindness which may lead to an accident.
CAUTION • Do not use or store the product in a hot or humid environment such as the glove compartment or trunk of a car. It may damage the product and batteries which may result in burns or injuries caused by heat, fire, explosion, or leaking battery fluid. • If batteries are leaking, discontinue use of the product. • The lens retracts when the camera is turned off. Touching the lens barrel while it is retracting may cause injury. • The camera temperature rises with extended periods of use.
About this manual The basic operation of this camera is covered between pages 12 and 33. This section of the manual covers the camera parts, preparation of the camera for use, and the basic camera operation for recording, viewing, and deleting images. Many of the features of this camera are controlled with menus. The menu navigation sections concisely describe how to change menu settings. Descriptions of the settings immediately follow the navigation sections. Names of parts.................................
Advanced recording .............................................................................................................................34 Recording mode display ..........................................................................................................34 Super Macro ............................................................................................................................35 Program (P) exposure mode ....................................................................
Advanced playback ..............................................................................................................................68 Playing back movies ................................................................................................................68 Capturing a movie frame .........................................................................................................69 Navigating the playback-mode menu ................................................................
Data-transfer mode...............................................................................................................................93 System requirements...............................................................................................................93 Connecting the camera to a computer ....................................................................................94 Connecting to Windows 98 and 98SE...........................................................................
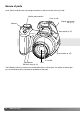
Names of parts * This camera is a sophisticated optical instrument. Care should be taken to keep these surfaces clean. Please read the care and storage instructions in the back of this manual (p. 109). Shutter-release button Flash (p. 26) Diopter-adjustment dial (p. 17) Speaker Strap eyelet (p. 12) Card-slot door (p. 16) AF window* Microphone Self-timer lamp (p. 47) Lens* The USB port and AV-out terminal are located behind the card-slot door. The battery-chamber door (p.
Flash-mode button (p. 26) Macro button (p. 35) Accessory shoe (p. 43) Exposure-mode dial (p. 21, 29, 36 - 40) Viewfinder* (p. 17) LCD monitor* Zoom lever (p. 20) Controller Access lamp Main switch Mode switch DC terminal Menu button Quick View/Delete button (p. 30, 31) Information button (p.
GETTING UP AND RUNNING Attaching the strap and lens cap Always keep the strap around your wrist in the event that the camera is accidentally dropped. An optional leather neck strap, NS-DG1000, is also available from your Minolta dealer. Availability varies with region. 2 1 Pass one of the small loops of the lens-cap strap through the eyelet on the lens cap (1). Pass the other loop through the first loop and tighten (2).
Inserting batteries This digital camera uses four AA-size alkaline or Ni-MH batteries. Do not use other types of AA batteries. The camera should be off when replacing batteries. 3 To open the battery-chamber door, slide the lock to the open position (1). Slide the door the the side of the camera (2) to release the safety catch. Lift the door to open (3). 1 2 Insert the batteries as indicated on the diagram on the inside of the battery-chamber door.
Battery condition indicator This camera is equipped with an automatic battery-condition indicator. When the camera is on, the battery-condition indicator appears on the monitor. If the monitor is blank, the batteries may be exhausted or installed incorrectly. Full-battery indicator - the battery is fully charged. This indicator is displayed for three seconds on the monitor when the camera is turned on. Low-battery indicator - battery power is low. The battery should be replaced as soon as possible.
Connecting the optional AC adapter Always turn off the camera before changing between power supplies. The AC Adapter allows the camera to be powered from an electrical household outlet. The AC Adapter is recommended when the camera is interfaced with a computer or during periods of heavy use. AC Adapter model AC-1L is for use in North America, Japan, and Taiwan, and AC-11 is for use in all other areas. Insert the mini plug of the AC adapter into the DC terminal (1).
Changing the memory card An SD Memory Card or MultiMediaCard must be inserted for the camera to operate. If a card has not been inserted, a no-card warning is displayed on the monitor. For more about memory cards see page 111. Always turn off the camera and confirm the access lamp is not lit before removing a memory card; damage and data loss may result. 1 2 3 4 1. Open the card-slot door by sliding the door toward the front of the camera. 2.
Turning on the camera and displays Press the main switch to turn the camera on. Pressing the switch again turns the camera off. Around the main switch is the mode switch. This switch is used to change between the recording and playback modes as well as the selecting the between the monitor and viewfinder display. Recording mode (Viewfinder display) - the camera can record images and the monitor is viewed through the viewfinder. The viewfinder has a built-in diopter.
Setting the date and time After initially inserting a memory card and batteries, the camera’s clock and calendar must be set. When images are recorded, the image data is saved with the date and time of recording. Depending on the region, the menu language may also have to be set. To change the language, see the camera notes on the following page. 3 Press the main switch (1) to turn the camera on.
Reset default Noise reductn Date/Time set Date imprint Reset default Noise reductn Date/Time set Data imprint – On – Off Use the right key to highlight the third tab at the top of the menu. Use the down key to highlight the date/time-set menu option. Press the right key. “Enter” will appear on the right side of the menu. Enter Press the central button to display the date/time setting screen. Date/Time set Use the left and right keys to select the item to be changed. 2003 . 01 .
BASIC RECORDING This section covers the basic operation of this camera. Thoroughly familiarize yourself with the operations in this section before moving on to the other sections in the manual. Turn on the camera. Set the mode switch to a recording position. Handling the camera While using the viewfinder or LCD monitor, grip the camera firmly with your right hand while supporting the body with your left. Keep your elbows at your side and your feet shoulder-width apart to hold the camera steadily.
Recording images automatically Turn the exposure-mode dial to the auto-recording position (1); all camera operations are now fully automatic. The autofocus, exposure, and imaging systems will work together to bring beautiful results effortlessly. 1 While many of the camera’s systems in this mode are automatic. The flash mode (p. 26) and drive mode (p. 46) can also be changed. Image size and quality can be set on the auto-recording menu (p. 44).
Basic recording operation The example uses auto recording. Except for movie recording, the operation for other exposure modes is the same. Automatic Digital Subject Program Selection is only active in the auto recording mode. Place the subject anywhere within the focus frame. Make sure the subject is within the focus range of the lens (p. 24). For very close subjects, use the macro function (p. 35). Press the shutter-release button partway down to lock the focus and exposure.
Automatic Digital Subject Program Selection Automatic Digital Program Selection chooses between program AE and one of five digital subject programs. The digital subject programs optimize camera setting for various conditions and subjects. Automatic Digital Subject Program Selection is only available in auto recording and can be disabled in the auto-recording menu. For information on individual subject programs, see page 29.
Focus lock Focus lock prevents the AF system from focusing. This can be used with off-center subjects or when a special focusing situation prevents the camera from focusing (p. 25). Place the subject within the focus frame. Press and hold the shutter-release button partway down. • The focus signal indicates the focus is locked. The shutter speed and aperture value change from white to black indicating the exposure is locked.
Focus signals The focus signal in the lower right corner of the LCD monitor indicates the focus status. The shutter can be released even if the camera cannot focus on the subject. Focus locked. Focus confirmed (sports action digital subject program only). AF continuously adjusts as the subject moves. Cannot focus. The subject is too close or a special situation is preventing the AF system from focusing.
Flash modes 1 To use the built-in flash, simply raise it (1). Lower the flash unit to prevent it from firing. To change the flash mode, simply press the flash mode button (2) until the appropriate mode is indicated. 2 Autoflash - the flash fires automatically in low-light and backlit conditions. Red-eye reduction - multiple flashes are used before the main flash burst to reduce red-eye; an effect caused by light reflected from the retina.
Flash range - auto-recording mode The camera controls the flash output automatically. For well-exposed images, the subject must be within the flash range. Distance is given from the CCD plane. Because of the optical system, the flash range is not the same at the lens’ wide-angle position as it is at the telephoto position. Wide-angle position 0.23 - 6.1m (0.75 - 20ft.) Telephoto position 1.2 - 4.8m (3.9 - 15.7ft.
i+ button The information (i+) button controls the monitor display. The display changes between full display and live image only. Full display Live image only Information button Adjusting monitor brightness The monitor image can be made lighter or darker. The brightness level can be set individually for viewfinder and direct viewing. Turn the mode switch to the appropriate position. Press and hold the information (i+) button to open the LCD brightness screen.
Digital subject programs Digital subject programs optimize the camera’s exposure, white-balance, and imageprocessing systems for specific conditions and subjects. Simply turn the exposure mode dial to select the appropriate subject program; the active subject program is displayed in the bottom left corner of the monitor Exposure-mode indicator Portrait - optimized to reproduce warm, soft skin tones and a slight defocusing of the background.
BASIC PLAYBACK Images can be viewed in the Quick View or playback modes. This section covers the basic operations in both modes. The playback mode has additional functions, see page 68. To view images from the playback mode, turn the mode switch to the playback position (1). 1 2 To view images from the recording mode, press the Quick View / delete button (2). Single-frame playback and histogram display Image size (p. 54) Image quality (p.
The histogram shows the luminance distribution of the image from black (left) to white (right). The 256 vertical lines indicates the relative proportion of that light value in the image. The histogram can be used to evaluate exposure, but displays no color information. Viewing and rotating images In Quick View or the playback mode, use the left/right keys of the controller to scroll through the images.
i+ button The information (i+) button controls the display format. Each time the button is pressed, the display cycles through to the next format: full display, image only, index playback. Full display Image only Index playback Information button In index playback, the four-way keys of the controller will move the yellow border. When the image is highlighted with the border, the date of recording, the lock and printing status, and the frame number of the image are displayed at the bottom of the screen.
Enlarged playback In single-frame playback in Quick View or the playback mode, a still image can be enlarged up to 6X in 0.2 increments for closer examination. With the image to be magnified displayed, slide the zoom lever to the right (T) to activate the enlarged playback mode. The degree of magnification is displayed on the LCD monitor. Slide the zoom lever to the right (T) to increase the image magnification. Slide the lever to the left (W) to decrease the magnification.
ADVANCED RECORDING This section cover the advanced recording features of this camera. Read the basic recording section before moving on to this section. Recording mode display A. Focus frame B. Spot metering area (p. 61) 34 ADVANCED RECORDING 1. 2. 3. 4. 5. 6. 7. 8. 9. 10. 11. 12. 13. 14. 15. 16. 17. 18. 19. 20. 21. 22. 23. 25. 25. Wide-angle converter indicator (p. 87) Mode indicator Flash-mode indicator (p. 26) Flash-compensation display (p. 60) Sharpness display (p. 64) Contrast display (p.
Super Macro Super Macro allows the camera to focus as close as 4 cm (1.7 in.) from the front of the lens or 11 cm (4,3 in.) from the CCD. Press the macro button (1) to activate the function; the lens automatically zooms to the Super-Macro position of 9.7mm. The zoom can be used, but the macro range changes with focal length. The standard macro indicator is displayed when the focal length is changed. The following chart lists the Super Macro and standard macro Super-macro indicator ranges.
Program (P) Exposure mode The program exposure mode controls both the shutter speed and aperture to ensure correct exposures. This exposure mode allows photographers to shoot without worry about exposure settings. The shutter speed and aperture values of the exposure are displayed on the monitor when the shutter-release button is pressed partway down. If shutter speed and aperture displays turn red, the scene is beyond the exposure control range of the camera.
Shutter priority (S) Exposure mode The photographer selects the shutter speed and the camera sets the appropriate aperture to ensure correct exposure. When shutter priority is selected, the shutter speed on the monitor turns blue and a double arrow indicator appears next to it. The shutter speed can be set between 1/1000 and 15 seconds. If the shutter speed is beyond the aperture range, the aperture display will turn red.
Manual (M) Exposure mode Manual exposure mode allows individual selection of shutter speeds and apertures. This mode overrides the exposure system giving the photographer total control over the final exposure. Use the up/down keys of the controller to change the shutter speed. Use the left/right keys of the controller to change the aperture. The changes made to the exposure will be visible in the live image on the monitor.
Time exposures Time photographs can be taken in the manual-exposure mode. Exposures up to thirty seconds can be made. The use of a tripod is recommended. The camera’s exposure system cannot be used to calculate time exposures. A separate light meter can be used to determine the exposure. 1 Use the down key of the controller to decrease the shutter speed below 15 seconds until “T” is displayed. Set the aperture using the left/right keys of the controller.
Movie recording This camera can record digital video with sound. Total recording time varies with the image size and frame rate, see page 66. Exposure compensation and the macro modes can be used. Other changes can be made with the movie recording menu (p. 44). Image size Frame rate Before recording, the frame counter shows the maximum time in seconds that can be recorded on the next movie clip. Recording time Frame the picture as described in the basic recording operation section (p. 22).
Exposure compensation The camera exposure can be adjusted to make the final picture lighter or darker by as much as ±2Ev in 1/3 increments. Exposure compensation can only be used with Digital Subject Programs, the P, A, and S exposure modes. With Digital Subject Programs, exposure compensation is reset when the exposure-mode dial is moved to another position or the camera is turned off. In P, A, and S exposure modes, exposure compensation remains in effect until reset.
Focus area selection Individual focus areas can be selected when recording still images. With auto recording and Digital Subject Programs, focus area selection is reset when the exposure-mode dial is moved to another position or the camera is turned off. In P, A, S, and M exposure modes, the selected focus area remains active until reset. Press and hold the central button of the controller until the three spot focus areas are displayed.
Attaching a Minolta accessory flash To extend the versatility of the camera, an accessory flash unit (sold separately) can be used. Always remove the accessory flash when the camera is not in use, and replace the accessory-shoe cap to protect the contacts. Slide the accessory-shoe cap off as shown. Mount the flash unit on the accessory shoe by sliding it forward until it stops.
Navigating the recording menus The recording menu displayed varies with the position of the exposure-mode dial. There are four menus depending on if auto recording, movie recording, Digital Subject Programs, or the P,A,S, and M exposure modes are selected. Pressing the menu button (1) turns the menu on and off. The four-way keys of the controller (2) move the cursor in the menu. Pressing the central button of the controller enters a setting. Activate the menu with the menu button.
Drive mode Image size Quality Auto DSP Digital zoom Single 2048x1536 Standard On Off Auto-recording menu Drive mode Image size Quality White balance Key func. Single 2048x1536 Standard Auto Flash mode Drive mode Image size Quality Focus mode Digital zoom Single 2048x1536 Standard Auto focus Off Digital Subject Program menu Focus mode Full-time AF Flash mode Flash comp.
Drive modes The drive modes control the rate and method images are captured. The drive mode is set on all menus except the movie menu. With auto recording and Digital Subject Programs, the drive mode is reset to single-frame advance when the exposure-mode dial is moved to another position or the camera is turned off. In P, A, S, and M exposure modes, the drive mode remains in effect until changed. Refer to the following sections for descriptions of the drive modes.
Self-timer Used for self-portraits, the self-timer will delay the release of the shutter for approximately ten seconds after the shutter-release button is pressed. The self-timer is set on section 1 of the recording menus (p. 44). With the camera on a tripod, compose the picture so the subject is within the focus frames. Press the shutter-release button partway down to lock the exposure and focus (1). Press the shutter-release button all the way down to begin the countdown (2).
Using the continuous-advance modes The continuous-advance drive modes allow a series of images to be captured while holding down the shutterrelease button. These drive modes are set in section 1 of the recording menus. Immediately after selecting the continuous option on the menu, a selection screen is displayed to select between standard and UHS continuous advance. Use the left/right keys of the controller to select the continuos advance mode.
Continuous-advance notes CONTINUOUS ADVANCE The number of images that can be captured at one time depend on the image-quality and image-size setting. The maximum rate of capture is approximately 1.5 fps. The built-in flash can be used, but the rate of capture is reduced because the flash must recharge between frames. Date imprinting (p. 92) also reduces the rate of capture. The following chart lists the maximum number of images that can be captured with different imagequality and image-size combinations.
Using the progressive-capture modes The Progressive-Capture drive modes continuously record images while holding down the shutter-release button. When the shutter button is released, the images stored in the camera’s buffer memory are saved. These drive modes are set in section 1 of the recording menus. Drive mode Image size Quality White balance Key func. Immediately after selecting the progressive option on the menu, a selection screen is displayed to select between standard and UHS Progressive Capture.
Progressive-Capture notes The advantage of Progressive Capture over the continuous-advance drive mode is that it allows you to record events without the need to predict when the event will start. Simply hold the shutter-release button down to start saving images, and when the action happens, release the shutter button to save the recorded series. When the red low-battery warning is displayed, these drive modes cannot be used.
Bracketing This mode makes a three-image bracket of a scene. Bracketing is a method of taking a series of images of a static subject in which each image has a slight variation in exposure. The bracketing mode is set in section 1 of the recording menus. Drive mode Image size Quality White balance Key func. Immediately after selecting the bracketing option on the menu, a selection screen is displayed to select the bracketing increment.
Number of frames in bracketing series Frame counter The remaining number of frames in the bracket series is displayed on the monitor next to the bracketing indicator. If the memory is filled or the shutter button is released before the series has completed, the camera will reset and the entire bracket must be made again. If the red low-battery indicator appears, the bracketing drive mode is disabled. The flash cannot be used with the bracketing drive mode.
Image size and image quality Changing image size affects the number of pixels in each image. The greater the image size, the larger the file size. Choose image size based on the final use of the image smaller images will be more suitable for web sites whereas larger sizes will produce higher quality prints. FINE STD. ECON. LCD monitor 2048 1600 1280 640 Number of pixels (hor. X vert.) 2048 X 1536 1600 X 1200 1280 X 960 640 X 480 Fine - high-quality JPEG image. Standard - the default setting.
Approximate file sizes. Size Quality Fine Standard Economy 2048 X 1764 1600 X 1200 1280 X 960 640 X 480 1.1MB 720KB 430KB 770KB 450KB 280KB 550KB 310KB 200KB 160KB 130KB 90KB Approximate number of images that can be stored on a 16MB memory card. Fine Standard Economy 9 17 32 14 27 47 22 39 69 69 100 150 Camera Notes The frame counter indicates the approximate number of images that can be stored on the memory card at the camera’s image quality and size settings.
Auto DSP Automatic Digital Subject Program Selection can be temporarily disabled in the auto-recording menu. When disabled, the program exposure mode is active. If the position of the exposure mode dial is changed or the camera is turned off, Automatic Digital Subject Program Selection is activated.
Focus modes This camera has autofocus and manual focus control. The focus mode must be activated separately in the Digital Subject Program and P, A, S, and M exposure-mode menus. The focus mode is activated in section 2 of the P, A, S, and M exposure-mode menu (p. 44).
White balance White balance is the camera’s ability to make different types of lighting appear neutral. The effect is similar to selecting daylight or tungsten film, or using color compensating filters in conventional photography. An indicator will be displayed on the monitor if a setting other than auto white-balance is chosen. White balance is set independently in section 1 of the movie, and P, A, S, and M exposuremode menus (p. 44).
Custom White Balance Custom white-balance allows the camera to be calibrated to a specific lighting condition. The setting can be used repeatedly until reset. Custom white balance is especially useful with mixed-lighting or when critical control over color is needed. The object used to make a calibration must be neutral. A blank piece of white paper is an ideal surface and can easily be carried in a camera bag. To calibrate the camera, select custom setup (Cust.
Full-time AF With full-time AF active, the autofocus systems continually focuses to keep the monitor image sharp. This also reduces the autofocusing time when taking pictures. When the camera is set to manual focus, full-time AF is disabled. Turning the full-time AF function off can help conserve battery power. Full-time AF can be turned on and off in section 2 of the P, A, S, and M menus (p. 44). Flash mode The flash modes can be changed in section 2 of the P, A, S, and M menus (p. 44).
Flash compensation changes the ratio between the ambient and flash exposures. When using fillflash to reduce harsh shadows caused by direct sunlight, flash compensation changes the ratio between the highlights and shadows. The flash affects the darkness of the shadows without affecting the area illuminated by the sun. By decreasing the flash output with a negative Ev setting, the shadows receive less light and are deeper, but retain detail that would be lost without the flash.
Camera sensitivity - ISO Five camera sensitivity settings can be selected: Auto, 50, 100, 200, and 400; the numerical values are based on an ISO equivalent. ISO is the standard used to indicate film sensitivity: the higher the number, the more sensitive the film. Camera sensitivity is set in section 3 of the P, A, S, and M menus (p. 44).
Color Mode The color mode controls whether a still image is color or black and white. This must be set before the image is recorded. The color mode is set in section 3 of the P, A, S, and M menus (p. 44). The live image reflects the selected color mode. The color mode has no effect on image file size. Vivid Color Black & White Sepia Natural Color reproduces the colors in the scene faithfully. This mode uses no monitor indicator when active. Vivid Color increases the saturation of the colors in the scene.
Sharpness Sharpness accents or softens details in an image in three levels: hard (+), normal, and soft (–). This can be set in section 3 of the P, A, S, and M menus (p. 44). Any changes made are applied to the live image, but may be difficult to see. However, when viewed with a computer, the changes will be evident. If any level except normal is selected, an indicator appears on the monitor as a warning.
Custom Key function The function assigned to the flash mode button can be selected among the flash mode, drive mode, white balance, focus mode, and color mode. This can be set in section 1 of the P, A, S, and M menus (p. 44). The flash mode can also be changed in section 2 of the P, A, S, and M menus. Drive mode Image size Quality White balance Key func. Flash mode Drive mode White balance Focus mode Color mode Pressing the flash-mode button changes the function set in the menu.
IMAGE SIZE (MOVIE) Movies can be recorded at three sizes: 640x480, 320x240, and 160x120. The larger the image size, the higher the image quality and the larger the file sizes. Image size is set in the movie menu (p. 44). Image size Frame rate Audio White balance Movie mode 320x240 30fps On Auto Night movie FRAME RATE Movies can be recorded at two frame rates: 15 fps and 30 fps. The higher the frame rate, the smoother the moving image and the larger the file sizes. Frame rate is set in the movie menu (p.
Audio Movie can be recorded with and without audio. Audio is set in the movie menu (p. 44). When audio is off, the optical zoom can be used during movie recording. Movie mode The movie mode option selects the type of movie recorded. Standard produces a normal movie clip. Night Movie uses high camera sensitivity to record under low light levels; camera sensitivity will automatically increase in low light. Image quality can be lower with Night Movies because of the higher sensitivity.
ADVANCED PLAYBACK The basic functions in this mode are described in the basic playback section on pages 30 through 33. This section covers how to playback movie clips as well as the advanced function on the playback menu. Movie clips can be played back in Quick View. Playing back movies Play Use the left/right keys of the controller to display the movie. Press the center of the controller to play back the movie clip.
Capturing a movie frame A single frame from a movie clip can be copied and saved as a still image. The copied image has the same image size as the original movie. During playback, press the center button of the controller to pause the movie playback at the point to capture the frame. When the movie is paused, the left/right keys can be used to jog the clip to display the correct frame. Pause Rew Fwd Vol Press the up key of the controller to capture the frame.
Navigating the playback menu Pressing the menu button (1) turns the menu on and off. The fourway keys of the controller (2) move the cursor in the menu. Pressing the central button of the controller enters a setting. 2 Activate the menu with the menu button. Use the left/right keys of the controller to highlight the appropriate menu tab; the menu changes as the tabs are highlighted. 1 Use the up/down keys to scroll through the menu options. Highlight the option whose setting needs to be changed.
Delete Format Lock – – – Slide show Playback Duration Repeat – – – Auto DPOF set Index print Copy E-mail copy Image size – No – – 640x480 To delete images on the memory card (p. 73). To format the memory card (p. 74). To protect images from deletion (p. 75). To play back images automatically (p. 76) To select the images for the Slide Show (p. 76). To specify how long each image is played back (p. 76) To repeat the Slide Show presentation automatically (p. 76). To select images for DPOF printing (p.
Frame-selection screen When a marked-frames setting is chosen on a menu, the frame selection screen will appear. This screen allows multiple images to be chosen. The left/right keys of the controller moves the yellow border to select the image. :move :sel. :enter The up key of the controller selects the frame; when selected, an indicator appears next to the image. The down key deselects the image removing the indicator. The garbage can indicates the image is selected for deletion.
Delete Deleting permanently erases the file. Once deleted, a file cannot be recovered. Care should be taken when deleting images. Delete Format Lock – – – Single, multiple, or all files on the memory card can be deleted in section 1 of the playback menu (p. 70). The delete option has three settings: This frame All frames Marked frames The file displayed or highlighted in the playback mode is deleted. All unlocked files are deleted. To delete multiple files.
FormAT When a memory card is formatted, all data on the card is erased. Delete Format Lock – – – Delete – The formatting function is used to erase all data on a memory card. Before formatting a memory card, copy the data to a computer or storage device. Locking images will not protect them from being deleted when the card is formatted. Always format the memory card using the camera; never use a computer to format a card.
Lock Single, multiple, or all files can be locked. A locked file cannot be deleted by either the playback menu functions or the QV/delete button. However, the formatting function (p. 74) will erase all files on a memory card whether locked or not. Important images should be locked. The lock function is in section 1 of the playback menu (p. 70). The lock option has four settings: This frame All frames Marked frames Unlock all The file displayed or highlighted in the playback mode is locked.
Slide Show Section 2 of the playback menu controls the slide-show function. This function automatically displays all still images and movie clips on the memory card in order. The menu has the following options: Enter To start the slide-show presentation. Highlight “Enter” and press the central button of the controller to start the slide show. All frames To select all the images on the memory card to be displayed in the slide-show presentation.
The controller can be used to control the presentation during playback. Press the central button of the controller to pause and restart the slide show presentation. Slide show Playback Duration Repeat – – – Auto The left/right keys advance to the next still image or return to the previous one. During a movie, the keys forward or rewind the clip Press the menu button to cancel the presentation. Camera Notes The presentation can be viewed without image information.
About DPOF This camera is supported by DPOF™ version 1.1. The DPOF (Digital Print Order Format) allows direct printing of still images from digital cameras. After the DPOF file is created, the memory card is simply taken to a photofinishing service or inserted into the memory-card slot of DPOF compatible printers. When a DPOF file is created, a misc. folder is automatically created on the memory card to store it (p. 98).
When the this-frame or all-frames setting is chosen, a screen appears requesting the number of copies of each image; a maximum of nine copies can be ordered. Use the up/down keys of the controller to set the required number of copies. If the all-frames setting was used to create a print order, any additional images recorded afterwards will not be included in the order. DPOF files created with another camera will be canceled.
Copy and E-mail Copy The copy function makes exact copies of image or movie files and can store the copied data on another memory card. E-mail Copy makes a standard 640 X 480 (VGA) or 160 X 120 (QVGA) JPEG copy of an original still image so that it may be easily transmitted by e-mail. E-mail copies can only be copied to the original card. The copy functions are selected in section 3 of the playback menu (p. 70).
Copy When the image(s) to be copied are selected, a screen with four messages is displayed. The messages are highlighted during the copying procedure. Copy Copying to camera memory. Change card. Copying to card. Copying completed. Enter Copied to 101MLTCP. OK When the change-card message is highlighted, remove the camera’s memory card and insert the card to which the image should be copied. Press the central button of the controller to continue or the menu button to cancel the copy operation.
Viewing images on a television It is possible to view camera images on your television. The camera has a video-out terminal to make the connection using the supplied AV cable. The camera is compatible with the NTSC and PAL standards. The video-output setting can be checked and set in section 4 of the setup menu (p. 83). 1. Turn off the television and the camera. 2. Insert the small plug of the AV cable into the camera’s AV-out terminal. 3.
SETUP MENU The setup menu is used to control the camera’s functions and operation. The navigating the setup menu section covers the operation of the menu. The section is followed by detailed descriptions of the settings. Opening the setup menu The setup menu is opened from the other menus. It can be accessed from any of the recording or playback menus.
Navigating the setup menu See page 83 on how to open the menu. The four-way keys of the controller (1) move the cursor in the menu. Pressing the central button of the controller enters a setting. 1 Use the left/right keys of the controller to highlight the appropriate menu tab; the menu changes as the tabs are highlighted. Use the up/down keys to scroll through the menu options. Highlight the option whose setting needs to be changed.
LCDbrightness Power save Inst.Playback Lens acc. Language – 1 min. Off None English File # memory Folder name Audio signals Shutter FX Volume Off Std. form 1 1 2 Reset default Noise reductn Date/Time set Date imprint – On – Off Video output NTSC To set monitor brightness (p. 86). To set the auto power save period (p. 86). To play back a still image after it is recorded (p. 86). Specified when using a lens accessory (p. 87). To set the menu language (p. 87). To activate file number memory (p. 87).
LCD monitor brightness Monitor brightness can be adjusted in 11 levels. Brightness can be set individually for viewfinder and direct viewing in the recording mode. Turn the mode switch to the appropriate position before opening the brightness option in section 1 of the setup menu (p. 84). Also see page 28. Set LCD brightness Low High Use the left/right keys of the controller to adjust brightness, the monitor image changes accordingly. Press the central button of the controller to set the level.
Lens accessory This camera is compatible with the optional Wide Converter Kit ZCW-100. This kit contains a 0.75X wide-angle converter, which reduces the focal length of the zoom lens’ wideangle position giving it the equivalent of a 28mm lens on a 35mm camera. When the converter is mounted, the lens accessory option in section 1 of the setup menu should be set to “WideConvertr.” An indicator (W) appears in the top left corner of the monitor as a warning.
Folder name All recorded images are stored in folders on the memory card. Two folder-name formats are available in section 2 of the setup menu, standard and date. Standard folders have an eight character name. The initial folder is named 100MLT20. The first three digits are the folder’s serial number, which will increase by one each time a new folder is created. The next three letters refer to Minolta, and the last two numbers indicate the camera used; 29 indicates a DiMAGE Z1.
Shutter FX When the shutter is released, a shutter sound effect gives a positive confirmation a still image is recorded. The sound effect can be turn off in section 2 of the setup menu (p. 84). Two shutter effects are available. Signal 1 is taken from the Dynax/Maxxum 9 SLR and signal 2 is taken from the legendary Minolta CLE, a compact rangefinder that represents the pinnacle of the development of the Leitz-Minolta CL.
Recording mode White balance Custom key function Full-time AF Flash compensation Metering mode Camera sensitivity (ISO) Color mode Sharpness Contrast Auto Flash mode Off 0.0 Multi segment Auto Natural color Normal Normal p. 58 p. 65 p. 60 p. 60 p. 61 p. 62 p. 63 p. 64 p. 63 Movie menu Image size Frame rate Audio White Balance Movie mode 320 X 240 15 fps On Auto Standard movie p. 66 p. 66 p. 67 p. 58 p.
Noise reduction This function reduces the affect of dark noise caused by long exposures. Noise reduction is only applied to exposures of one second or longer. Dark-frame subtraction is applied to each image after it is captured. The processing time varies from image to image; a message will be displayed during this period. Noise reduction can be turned off in section 3 of the setup menu.
Date imprinting The date of recording can be printed directly on the image. The imprinting function must be activated before the image is taken. Once activated, the date will continue to be imprinted until the function is reset; a yellow bar is displayed behind the frame counter to indicate the imprinting function is active. Date imprinting is activated in section 3 of the setup menu (p. 84). Date-imprinting indicator The date is imprinted in the lower right corner of the image when viewed horizontally.
DATA-TRANSFER MODE Read this section carefully before connecting the camera to a computer. Instructions on using and installing the DiMAGE Viewer software are found in the supplied software manual. The DiMAGE manuals do not cover the basic operation of computers or their operating systems; please refer to the manual supplied with your computer.
Connecting the camera to a computer Confirm the battery has sufficient power before connecting the camera to a computer; the full-battery indicator should be displayed on the monitor. The use of the AC adapter (sold separately) is recommended over the use of the battery. For users with Windows 98 or 98 Second Edition, read the section on page 95 on how to install the necessary USB driver before connecting the camera to a computer. 1. Start up the computer.
When the USB connection is completed, a drive icon, or volume, appears in My Computer or the desktop; the name varies with memory card. When using Windows XP or Mac OS X, a window opens requesting instructions on what to do with the image data; follow the directions in the window. Mac OS X Mac OS Windows XP Windows Connecting to Windows 98 and 98 SE The driver needs only to be installed once.
Manual Installation To install the Windows 98 driver manually, follow the instructions in the connecting-the-camera-to-a-computer section on page 94. When the camera is plugged into the computer, the operating system will detect the new device and the add-new-hardware-wizard window opens. Place the DiMAGE Viewer CDROM in the CD-ROM drive. Click “Next.” Choose the recommended search for a suitable driver. Click “Next.” Choose to specify the location of the driver.
The add new hardware wizard will confirm the location of the driver. The letter designating the CD-ROM drive will vary between computers. Click “Next” to install the driver in the system. One of three drivers may be located: MNLVENUM.inf, USBPDR.inf, or USBSTRG.inf. The last window confirms the driver has been installed. Click “Finish” to close the add new hardware wizard. Restart the computer. When the my-computer window is opened, a new removabledisk icon is displayed.
Memory card folder organization Once the camera is connected to the computer, image files can be accessed by double clicking on icons. Image folders are located in the DCIM folder. The misc. folder contains DPOF print files (p. 78). Drive Icon Dcim Files and folders on the memory card can be deleted using the computer. Never format the memory card from the computer; always use the camera to format the card. Only files recorded by the camera should be stored on the memory card.
The number in the image file name may not correspond to the frame number of the image. As images are deleted in the camera, the frame counter will adjust itself to show the number of images on the card and reassign the frame numbers accordingly. The serial numbers used with image files will not change when an image is deleted. When a new image is recorded, it will be assigned a number one greater than the largest serial number in the folder.
Disconnecting the camera Never disconnect the camera when the access lamp is red - the data or memory card may permanently be damaged. Windows 98 / 98 Second Edition Confirm that the access lamp is not lit. Turn off the camera and then disconnect the USB cable. Windows Me, 2000 Professional, and XP To disconnect the camera, click once on the unplug-or-eject-hardware icon located on the task bar. A small window will open indicating the device to be stopped. Click on the small window to stop the device.
The hardware devices to be stopped will be displayed. Highlight the device by clicking on it then click “Stop.” A confirmation screen will appear to indicate the devices to be stopped. Clicking “OK” will stop the device. A third and final screen will appear to indicate the camera can be safely disconnected from the computer. Close the window, turn the camera off, and then disconnect the USB cable.
Changing the memory card Never remove the card when the access lamp is red - the data or memory card may permanently be damaged. Windows 98 and 98 Second Edition 1. Turn off the camera. 2. Change the memory card. 3. Turn on the camera to remake the USB connection. Windows ME, 2000 Professional, and XP 1. Stop the USB connection using the unplug-or-eject-hardware routine (p. 100). 2. Turn off the camera. 3. Change the memory card. 4. Turn on the camera to remake the USB connection. Macintosh 1.
Connect the camera to the printer using the camera’s USB cable. The larger plug on the cable is connected to the printer. Open the card chamber door and insert the smaller plug of the cable into the camera. Turn the camera on; the USB Direct Print screen is displayed automatically. Number of prints in the print run. Strike through indicates unprintable file type. Number of copies of the displayed image. Use the left/right keys of the controller to display the image to be printed.
Notes on printing errors If a minor problem occurs during printing, such as the paper runs out, follow the procedure recommended for the printer; no action is required for the camera. If a major printer error occurs, press the center of the controller to end the routine. Refer to the printer manual for the correct procedure for the printer problem. Check the printer settings before starting again and use the USB Direct Print screen to deselect the images that were printed.
Printing DPOF files The USB DIRECT PRINT menu DPOF-print option allows still images and an index print selected with the DPOF printing options in section 2 of playback menu to be printed from an Epson USB DIRECT-PRINT compatible printer. See page 78 on how to create a DPOF file. Before each print run, check the printer settings; refer to the printer manual. A fully charged battery should be used when the camera is connected to the printer.
APPENDIX Troubleshooting The section covers minor problems with basic camera operation. For major problems or damage, or if a problem continues to reoccur frequently, contact a Minolta service facility listed on the back cover of this manual. Problem The camera will not work. Symptom APPENDIX Solution The batteries are dead. Replace batteries (p. 13). AA Ni-MH batteries are inserted incorrectly.
Problem Symptom Focus signal is red. Pictures are not sharp. Pictures are taken indoors or in low-light situations without flash. While using flash, the pictures are too dark. Cause Solution Subject is too close. Make sure the subject is within the autofocus range (p. 24) or use the macro mode (p. 35). The camera is in macro mode. Cancel the macro mode setting (p. 35). A special situation is preventing the autofocus system from focusing (p. 25).
Uninstalling the driver software - Windows 1. Insert a memory card in the camera and connect it to the computer with the USB cable. Other devices must not be connected to the computer during this procedure. 2. Right click on the My-computer icon. Select “properties” from the drop-down menu. Windows XP: from the start menu go to the control panel. Click on the performance and maintenance category. Click “System” to open the system properties window. 3.
QuickTime system requirements Pentium-based computer Windows 95, 98, 98SE, NT, Me, 2000 Professional, or XP. 32MB or more of RAM Sound Blaster or compatible sound card DirectX 3.0 or later recommended To install QuickTime, follow the instructions in the installer. Macintosh users can download the latest version of QuickTime free of charge from the Apple Computer web site: http://www.apple.com. Videoimpression system requirements To install ArcSoft VideoImpression, follow the instructions in the installer.
Storage • Store in a cool, dry, well-ventilated area away from dust and chemicals. For long periods of disuse, store the camera in an airtight container with a silica-gel drying agent. • Remove the batteries and memory card from the camera when not in use for extended periods. • Do not store the camera in an area with naphthalene or mothballs. • During long periods of storage, operate the camera occasionally. When taking the camera out of storage, check that the camera is functioning properly before using.
Memory cards SD Memory Cards and MultiMediaCards are manufactured with precision electronic components. The following may cause data loss or damage: • Improper use of the card. • Bending, dropping, or subjecting the card to impact. • Heat, moisture, and direct sunlight. • Static electrical discharge or electromagnetic fields near the card. • Removing the card or interrupting the power supply while the camera or a computer is accessing the card (reading, writing, formatting, etc.).
Batteries • Battery performance decreases with temperature. In cold environments, we recommend keeping spare batteries in a warm place, such as the inside of a coat. Batteries can recover their power when they warm up. • If batteries have been exhausted when used in the camera, do not reload them even if their charge seems to recover over time. These batteries will interfere with normal camera operation. • A special built-in long-life battery supplies power to the clock and memory when the camera is off.
This mark on your camera certifies that this camera meets the requirements of the EU (European Union) concerning interference causing equipment regulations. CE stands for Conformité Européenne (European Conformity). This device complies with Part 15 of the FCC Rules.
Technical specifications CCD: Number of effective pixels: Total number of pixels: Camera sensitivity (ISO): Aspect ratio: Lens construction: Maximum aperture: Focal length: Focusing range (from the CCD): Autofocusing system: Shutter: Shutter speeds: Built-in flash recycling time: Monitor LCD: Monitor field of view: Viewfinder field of view: A/D conversion: Recording media: File formats: Printing output control: Menu languages: AV output: 114 APPENDIX 1/2.7-type interline primary-color CCD 3.2 million 3.
Batteries: Battery performance (recording): Battery performance (playback): Optional external power source: Dimensions: Weight: Operating temperature: Operating humidity: Four AA alkaline or Ni-MH batteries. Approximately 250 frames with alkaline batteries, LCD monitor on, full-size images (2048 X 1536), standard image quality, no instant playback, no full-time AF, flash used with 50% of the frames. Approx. continuous playback time: 300 min. with alkaline batteries.
We offer support for our digital products 24 hours per day on www.minoltasupport.com. Camera know-how, image composition, digital image editing: discover more about Minolta’s new internet world and visit www.minoltaphotoworld.com © 2003 Minolta Co., Ltd. under the Berne Convention and the Universal Copyright Convention.