IF-102.book Page i Friday, June 21, 2002 1:22 PM Foreword Forward If the IF-102 (Internet Fax kit) is installed and a network is connected, data scanned by the 7115*/7118*/7115F/7118F can be attached to electronic mail (e-mail) and sent to a computer or Internet fax terminal through an intranet or the Internet. In addition, scanned data can also be uploaded to an FTP server. * With the 7115/7118, this is performed with the optional fax kit FK-117.
IF-102.book Page ii Friday, June 21, 2002 1:22 PM For the U.S.A. Users FCC Part 15-Radio Frequency Devices This device complies with Part 15 of the FCC Rules. Operation is subject to the following two conditions: (1) This device may not cause harmful interference, and (2) this device must accept any interface received, including interface that may cause undesired operation.
IF-102.book Page iii Friday, June 21, 2002 1:22 PM For Europe CE Marking (Declaration of Conformity) This product complies with the following EU directives: 89/336/EEC, 73/23/EEC and 93/68/EEC directives. This declaration is valid for the area of the European Union. This device must be used with shielded interface cables. The use of nonshielded cables is likely to result in interference with radio communications and is prohibited under EU directives.
IF-102.book Page iv Friday, June 21, 2002 1:22 PM Contents CONTENTS 1 Introduction ........................................................ 1 1.1 Available Features ................................................... 1 1.2 Required Environment ............................................ 4 1.3 Connecting to a Network (LAN) .............................. 4 1.3.1 Connecting the Ethernet Cable ........................... 5 1.4 Control Panel Parts and Their Functions .............. 6 1.4.
IF-102.book Page v Friday, June 21, 2002 1:22 PM Contents 2 Internet Faxing ................................................. 25 2.1 Basic Faxing ........................................................... 25 2.1.1 Using the Automatic Document Feeder ............ 26 2.1.2 Positioning Documents on the Original Glass .................................................................... 27 2.2 Transmission Settings ........................................... 29 2.2.1 Adjusting the Fax Resolution ............
IF-102.book Page vi Friday, June 21, 2002 1:22 PM Contents 4 INITIAL SET Mode Settings ............................ 55 4.1 Programming Scan Settings (“SCAN SETTING” Menu) ...................................... 55 4.1.1 Setting the “RESOLUTION” Function ............... 55 4.1.2 Setting the “IMAGE FORMAT” Function ........... 55 4.1.3 Setting the Compression Encoding Method (“CODING METHOD” Function) ........... 56 4.2 Programming E-mail Addresses .......................... 57 4.2.
IF-102.book Page 1 Friday, June 21, 2002 1:22 PM 1 Introduction 1 Introduction 1.1 Available Features Internet faxing • As opposed to a normal fax, which transmits through telephone lines, Internet fax sends and receives fax images through the Internet. Internet fax uses the Internet electronic mail (e-mail) setup to send and receive fax images. Image data scanned at an Internet fax terminal is attached to an e-mail, then sent to the recipient’s Internet fax terminal.
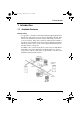
IF-102.book Page 2 Friday, June 21, 2002 1:22 PM 1 Introduction Network scanning Paper documents can easily be converted to electronic data and used, for example, with electronic filing. Scanned image data (scan data) is sent to a computer through a network as a TIFF-F or PDF file. The scanned image can be sent either as an email attachment or to an FTP server. • Scan data is sent to a computer as a TIFF-F or PDF file attached to an e-mail, then sent to a computer through an intranet or the Internet.
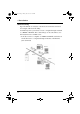
IF-102.book Page 3 Friday, June 21, 2002 1:22 PM 1 Introduction • Scan data is uploaded to an FTP server as a TIFF-F or PDF file. (Scan to Server) FTP Server Intranet Internet FTP Server In addition, the system can be set to send to a specified recipient (only one) a notification of the FTP server address where the data was uploaded.
IF-102.book Page 4 Friday, June 21, 2002 1:22 PM 1 Introduction 1.2 Required Environment The following network environment is required in order to use the Internet fax and network scanning features. Internet faxing • Mail server (POP3 server and SMTP server) Network scanning (Scan to E-mail) • Mail server (SMTP server) Network scanning (Scan to Server) • FTP server (The enclosed Document Management Utility can be used as a simple FTP server.
IF-102.book Page 5 Friday, June 21, 2002 1:22 PM 1 Introduction 1.3.1 Connecting the Ethernet Cable 1. Make sure that the machine is turned off. 2. Insert one plug on the Ethernet cable into the connector (marked “NETWORK SCANNER”) on the left side of the machine, and then insert the other plug into the hub.
IF-102.book Page 6 Friday, June 21, 2002 1:22 PM 1 Introduction 1.4 Control Panel Parts and Their Functions 1.4.1 Names of Control Panel Parts and Their Functions 2 3 4 2 3 4 5 6 7 8 5 6 7 8 1 9 1 9 No. Part Name 1 [ERROR] indicator 2 [CONFIRM] key 3 [INITIAL SET] key 6 [RESOLUTION] key [TEL BOOK]/ [PHONE BOOK] key [FAX SET] key 7 [SPEED DIAL] key 8 [MAIL] key 9 One-touch dial keys 4 5 6 Function Lights up if an error has occurred.
IF-102.book Page 7 Friday, June 21, 2002 1:22 PM 1 Introduction 16 17 10 16 13 11 12 10 17 19 20 18 13 11 12 18 14 15 14 15 19 20 No. Part Name 10 Display 11 12 13 14 15 16 17 18 19 20 Function Displays setting menus, error messages, and specified settings such as e-mail addresses. [NO/CLEAR] key Erases the entered letters and numbers. Returns to the previous screen. [YES/ENTER] key Confirms the current setting. 10-key pad Used to enter setting values.
IF-102.book Page 8 Friday, June 21, 2002 1:22 PM 1 Introduction 1.4.2 Display Indications 1 2 1 2 No. 1 2 Display Indication Description Mode or function • Displays the currently selected mode or function setting. name • Displays the current menu, function or setting. • Error messages are displayed when errors occur. • The current date and remaining amount of memory is displayed during standby. Message area Displays messages such as operating instructions.
IF-102.book Page 9 Friday, June 21, 2002 1:22 PM 1 Introduction 1.5 Entering Text When specifying the user name or programming one-touch dial keys with the recipient name, letters, accented characters, numbers and symbols can be entered. 1.5.1 Key Operation • One-touch dial keys [01] through [27]: Used to enter letters and symbols. • 10-Key Pad: Used to enter numbers.
IF-102.book Page 10 Friday, June 21, 2002 1:22 PM 1 Introduction 1.5.2 Inputting Example To enter the name “NJ Office” * The cursor (_) flashes alternately with the character at its current location. NAME=_ Press the [MNO] key twice. NAME=N Press the [JKL] key once. NAME=NJ Press the [Space] key once. NAME=NJ Press the [MNO] key 3 times. NAME=NJ O Press the [def] key 3 times. NAME=NJ Of Press the key. NAME=NJ Of_ Press the [def] key 3 times. NAME=NJ Off Press the [ghi] key 3 times.
IF-102.book Page 11 Friday, June 21, 2002 1:22 PM 1 Introduction Correcting text and input precautions • To erase all entered text, press the [NO] key. • To delete only part of the entered text, use the and keys to move the cursor (_) to the character that you wish to delete, and then press the [Delete] key (one-touch dial key [27]). • To change an entered character, use the and keys to move the cursor (_) to the character that you wish to change, and then enter the new character.
IF-102.book Page 12 Friday, June 21, 2002 1:22 PM 1 Introduction 1.6 Specifying Network Settings 1.6.1 Required Settings In order to use the Internet fax and network scanning features, certain settings must first be specified. Note • This machine must be set based on the network environment that it is connected to. Therefore, before starting to set this machine, be sure to ask the network administrator for the information required to specify the settings correctly.
IF-102.book Page 13 Friday, June 21, 2002 1:22 PM 1 Introduction Network Settings Description E-mail) SMTP SERVER This function is used to enter the IP address or host name for the SMTP server. *Consult with the network administrator. TEXT This function is used to specify whether or not to INSERT insert text explaining that an image data has been attached when scan data attached to an e-mail is being sent.
IF-102.book Page 14 Friday, June 21, 2002 1:22 PM 1 Introduction 1.6.2 Specifying Network Settings (“NETWORK(FAX/ SCAN)” Menu) From the “NETWORK(FAX/SCAN)” menu of the INITIAL SET mode, various network settings can be specified. Tip • If, at any time, you wish to quit setting a “NETWORK(FAX/SCAN)” function, press the [NO] key. When the message “STOP SETTING?” appears, press the [YES] key to quit. To set the “IP ADDRESS” function 1. Press the [INITIAL SET] key.
IF-102.book Page 15 Friday, June 21, 2002 1:22 PM 1 Introduction Note • “AUTO” is available if a DHCP server is on the network. If “AUTO” is selected, it will not be necessary to specify the subnet mask or gateway settings. • If a fixed IP address has been set, you must select “IP Address in NVRAM” in the enclosed Network Management Utility Light. Make this setting in the “TCP/IP Configuration” menu on the “Network” tab.
IF-102.book Page 16 Friday, June 21, 2002 1:22 PM 1 Introduction To set the “GATEWAY” function 1. From the “NETWORK(FAX/SCAN)” menu of the INITIAL SET mode, press the [3] key from the 10-key pad to select “GATEWAY”. 2. Using the 10-key pad, enter the IP address of the gateway. • The screen at the right shows an example of an entered IP address. For the appropriate setting, consult the network administrator. 3. Press the [ENTER] key. The “NETWORK(FAX/SCAN)” menu appears again. To set the “DNS CONFIG.
IF-102.book Page 17 Friday, June 21, 2002 1:22 PM 1 Introduction To set the “SERVER TIMEOUT” function 1. From the “NETWORK(FAX/SCAN)” menu of the INITIAL SET mode, press the [5] key from the 10-key pad to select “SERVER TIMEOUT”. 2. Using the 10-key pad, enter the timeout period (seconds). • The timeout period can be set between 5 and 120 seconds. 3. Press the [ENTER] key. The “NETWORK(FAX/SCAN)” menu appears again. 1.6.
IF-102.book Page 18 Friday, June 21, 2002 1:22 PM 1 Introduction 3. Press the [1] key from the 10-key pad to select “SENDER NAME”. 4. Enter the sender’s name. • For details on entering text, refer to “1.5 Entering Text” (p. 9). • The sender name can contain a maximum of 20 characters. 5. Press the [ENTER] key. The “E-MAIL SETTING 1” menu appears again. To program the e-mail address of the sender 1.
IF-102.book Page 19 Friday, June 21, 2002 1:22 PM 1 Introduction To set the SMTP server address 1. From the “E-MAIL SETTING 1” menu of the INITIAL SET mode, press the [3] key from the 10-key pad to select “SMTP SERVER”. 2. Enter the IP address or host name for the SMTP server. • For details on entering text, refer to “1.5 Entering Text” (p. 9). • The host name can contain a maximum of 64 characters. • The upper-right screen shows an example of an entered IP address.
IF-102.book Page 20 Friday, June 21, 2002 1:22 PM 1 Introduction To set the “DEFAULT SUBJECT” function 1. From the “E-MAIL SETTING 1” menu of the INITIAL SET mode, press the [5] key from the 10-key pad to select “DEFAULT SUBJECT”. 2. Enter the default subject. • For details on entering text, refer to “1.5 Entering Text” (p. 9). • The default subject can contain a maximum of 20 characters. 3. 20 Press the [ENTER] key. The “E-MAIL SETTING 1” menu appears again.
IF-102.book Page 21 Friday, June 21, 2002 1:22 PM 1 Introduction 1.6.4 Specifying E-mail Settings (“E-MAIL SETTING 2” Menu) To set the POP3 server address 1. Press the [INITIAL SET] key. The first screen of the INITIAL SET mode appears. 2. Using the and keys, select “E- MAIL SETTING 2”. 3. Press the [1] key from the 10-key pad to select “POP3 SERVER”. 4. Enter the IP address or host name for the POP3 server. • For details on entering text, refer to “1.5 Entering Text” (p. 9).
IF-102.book Page 22 Friday, June 21, 2002 1:22 PM 1 Introduction To set the “POP3 ACCOUNT” function 1. From the “E-MAIL SETTING 2” menu of the INITIAL SET mode, press the [2] key from the 10-key pad to select “POP3 ACCOUNT”. 2. Enter the account name. • For details on entering text, refer to “1.5 Entering Text” (p. 9). • The account name can contain a maximum of 64 characters. 3. Press the [ENTER] key. The “E-MAIL SETTING 2” menu appears again. To set the “POP3 PASSWORD” function 1.
IF-102.book Page 23 Friday, June 21, 2002 1:22 PM 1 Introduction To set the “AUTO RECEPTION” function 1. From the “E-MAIL SETTING 2” menu of the INITIAL SET mode, press the [4] key from the 10-key pad to select “AUTO RECEPTION”. 2. Using the and keys, select either “ON” or “OFF”, and then press the [YES] key. • If “ON” was selected, a screen appears, allowing you to specify the time interval for checking for new email. (Continue with step 3.
IF-102.book Page 24 Friday, June 21, 2002 1:22 PM 1 Introduction To set the address where results are sent 1. From the “E-MAIL SETTING 2” menu of the INITIAL SET mode, press the [5] key from the 10-key pad to select “REPLY ADDRESS”. 2. Enter the e-mail address for the recipient of error notifications. • For details on entering text, refer to “1.5 Entering Text” (p. 9). • The e-mail address can contain a maximum of 64 characters. • Normally, enter the e-mail address of the administrator. 3.
IF-102.book Page 25 Friday, June 21, 2002 1:22 PM 2 Internet Faxing 2 Internet Faxing The procedures for sending scan data and receiving e-mail are described below. Note • For information on documents that can be used, the scanning area of the image, the print area and paper types and sizes, refer to the User’s Manual for the 7115F/7118F or the FK-117 Fax unit for the 7115/7118. • Internet faxing is not possible for approximately three minutes after the machine is turned on. 2.
IF-102.book Page 26 Friday, June 21, 2002 1:22 PM 2 Internet Faxing 2.1.1 Using the Automatic Document Feeder 1. Press the [FAX] key. The machine enters Fax mode, and the fax screen appears. 2. Load the document to be sent into the Automatic Document Feeder. • Adjust the Document Guide Plates to fit the size of the document. • Load the document with the side to be scanned facing up. 3. If necessary, change the “Resolution” setting (p. 29). 4. Press the [MAIL] key.
IF-102.book Page 27 Friday, June 21, 2002 1:22 PM 2 Internet Faxing 2.1.2 Positioning Documents on the Original Glass 1. Press the [FAX] key. The machine enters Fax mode, and the fax screen appears. 2. Lift open the Original Cover, and then position the document to be faxed on the Original Glass. • Position the document with the side to be scanned facing down. • Align the document on the scales above and to the left of the Original Glass.
IF-102.book Page 28 Friday, June 21, 2002 1:22 PM 2 Internet Faxing 5. Press the [MAIL] key. The [MAIL] key lights up, and an email address can be entered. 6. Enter the e-mail address of the recipient. • For details on entering text, refer to “1.5 Entering Text” (p. 9). • The e-mail address of a previously programmed recipient can also be specified. Refer to “2.2.2 Specifying the Recipient” (p. 30). 7. Check that the correct document size appears in the screen.
IF-102.book Page 29 Friday, June 21, 2002 1:22 PM 2 Internet Faxing 2.2 Transmission Settings 2.2.1 Adjusting the Fax Resolution Selecting one of the following resolutions to match the type of document to be faxed will produce a sharper result.
IF-102.book Page 30 Friday, June 21, 2002 1:22 PM 2 Internet Faxing 2.2.2 Specifying the Recipient Specify the recipient using any of the different methods described below. To directly enter the e-mail address 1. Press the [MAIL] key. The [MAIL] key lights up, and an email address can be entered. 2. Enter the e-mail address of the recipient. • For details on entering text, refer to “1.5 Entering Text” (p. 9). • The e-mail address can contain a maximum of 64 characters.
IF-102.book Page 31 Friday, June 21, 2002 1:22 PM 2 Internet Faxing To use one-touch dialing Note • For details on programming the one-touch dial keys, refer to “4.2.1 Programming One-Touch Dial Keys” (p. 57). • If the recipient will be specified using a one-touch dial key, it is not necessary to press the [MAIL] key. 1. Press the one-touch dial key ([01] through [27]) programmed with the email address of the desired recipient. The machine automatically starts scanning the document and sending the fax.
IF-102.book Page 32 Friday, June 21, 2002 1:22 PM 2 Internet Faxing To use speed dialing Note • For details on programming speed dial numbers, refer to “4.2.2 Programming Speed Dial Numbers” (p. 58). • If the recipient will be specified using speed dialing, it is not necessary to press the [MAIL] key. 1. Press the [SPEED DIAL] key, and then use the 10-key pad to enter the 3-digit speed dial number (number programmed with the e-mail address).
IF-102.book Page 33 Friday, June 21, 2002 1:22 PM 2 Internet Faxing To use group dialing Note • For details on programming one-touch dial keys for group dialing, refer to “4.2.3 Programming Group Dialing” (p. 59). • If the recipient will be specified using group dialing, it is not necessary to press the [MAIL] key. 1. Press the one-touch dial key ([01] through [27]) programmed with the group of recipients that you wish to send the fax to.
IF-102.book Page 34 Friday, June 21, 2002 1:22 PM 2 Internet Faxing To use the phone book The phone book contains all programmed one-touch dialing and speed dialing numbers, allowing you to search for and select the recipient that you wish to send the fax to. 1. Press the [TEL BOOK]/[PHONE BOOK] key. 2. Using the and keys, select either “LIST” or “SEARCH”, and then press the [YES] key. • If “LIST” was selected: The list of programmed one-touch dialing and speed dialing numbers is displayed.
IF-102.book Page 35 Friday, June 21, 2002 1:22 PM 2 Internet Faxing 3. Enter the first few characters of the name programmed for the desired recipient. • Enter the name programmed in the one-touch dial key or the speed dial number. (For details on entering text, refer to “1.5 Entering Text” (p. 9).) • A maximum of 10 numbers can be entered. 4. Press the [ENTER] key. • The number of names beginning with the text entered in step 3 is displayed.
IF-102.book Page 36 Friday, June 21, 2002 1:22 PM 2 Internet Faxing 2.2.3 Broadcast Transmission The same scan data can be sent to multiple recipients at one time. Tip • Both e-mail addresses and fax numbers can be specified as recipients. • With the result report printed after the transmission is finished, you can check whether the fax was sent to all recipients. Note • A maximum of 143 recipients can be specified for the same transmission.
IF-102.book Page 37 Friday, June 21, 2002 1:22 PM 2 Internet Faxing Tip • If the e-mail address is entered directly, press the [MAIL] key after entering the address. (For details on entering text, refer to “1.5 Entering Text” (p. 9).) • If the wrong recipient has been specified, press the [NO] key to delete the current selection. (This is valid only before the recipient is set by pressing the [YES] key.) 6. 7. Press the [START] key.
IF-102.book Page 38 Friday, June 21, 2002 1:22 PM 2 Internet Faxing 2.3 Timer Transmission A document can be scanned and stored in the memory to be sent at a specified time. Note • The time is set on a 24-hour system. • If the machine is not programmed with the current time, the fax cannot be sent at the specified time. • Timer transmission can be combined with broadcast transmission. To use timer transmission 1. Position the document to be faxed. 2. If necessary, change the “Resolution” setting (p.
IF-102.book Page 39 Friday, June 21, 2002 1:22 PM 2 Internet Faxing 2.4 Cancelling (Deleting) a Document Queued for Transmission Of the e-mails stored in the memory and queued to be sent by timer transmission, a specific e-mail can be selected and deleted. To cancel a queued document 1. Press the [FAX SET] key. 2. From the 10-key pad, press the [8] key. Otherwise, press the [FAX SET] key 8 times to select “8 CANCEL RESERV.”, and then press the [YES] key.
IF-102.book Page 40 Friday, June 21, 2002 1:22 PM 2 Internet Faxing 3. Using the and job to be deleted. keys, select the • The following types of transmission jobs are displayed. (Fax transmission jobs are also displayed.) MEMORY: B-CAST: Memory transmission Broadcast transmission TIMER: Timer Transmission M.B.
IF-102.book Page 41 Friday, June 21, 2002 1:22 PM 2 Internet Faxing 2.5 Receiving 2.5.1 E-Mail Formats That Can Be Received This machine can receive the following types of e-mail. • Text (single byte character only) • TIFF-F images • Combination of text (single byte character only) and TIFF-F images • Attached text file (single byte character only) Note • If the IP address and POP3 server address are not yet specified, email cannot be received.
IF-102.book Page 42 Friday, June 21, 2002 1:22 PM 2 Internet Faxing 2.5.3 Manual Reception If the machine is not set to automatically receive e-mails or if you wish to receive e-mails immediately, the e-mail must be received manually. To receive e-mails manually 1. Press the [FAX] key. The machine enters Fax mode, and the fax screen appears. 2. Press the [FAX SET] key. 3. From the 10-key pad, press the [0] key.
IF-102.book Page 43 Friday, June 21, 2002 1:22 PM 3 Network Scanning 3 Network Scanning The procedures for sending scan data in Scan mode and for uploading scan data to an FTP server are described below. Note • For information on documents that can be used and the scanning area of the image, refer to the User’s Manual for the 7115F/7118F or the FK-117 Fax unit for the 7115/7118. • Network scanning is not possible for approximately three minutes after the machine is turned on. 3.
IF-102.book Page 44 Friday, June 21, 2002 1:22 PM 3 Network Scanning 3.1.1 Using the Automatic Document Feeder Note • For details on entering text, such as the e-mail address and subject, refer to “1.5 Entering Text” (p. 9). 1. Press the [SCAN] key. The machine enters Scan mode, and the scan screen appears. 2. Load the document to be scanned into the Automatic Document Feeder. • Adjust the Document Guide Plates to fit the size of the document. • Load the document with the side to be scanned facing up.
IF-102.book Page 45 Friday, June 21, 2002 1:22 PM 3 Network Scanning 5. Enter the subject (“SUBJ.”), and then press the [ENTER] key. 6. Specify the e-mail address of the recipient that you wish to send a copy (cc) to, and then press the [ENTER] key. • The e-mail address of a previously programmed recipient can also be specified. Refer to “2.2.2 Specifying the Recipient” (p. 30). 7. If you wish to send a cc to multiple recipients, press the [YES] key, and then specify the other recipients.
IF-102.book Page 46 Friday, June 21, 2002 1:22 PM 3 Network Scanning 3.1.2 Positioning Documents on the Original Glass 1. Press the [SCAN] key. The machine enters Scan mode, and the scan screen appears. 2. Lift open the Original Cover, and then position the document to be scanned on the Original Glass. • Position the document with the side to be scanned facing down. • Align the document on the scales above and to the left of the original glass. 3. Press the [MAIL] key.
IF-102.book Page 47 Friday, June 21, 2002 1:22 PM 3 Network Scanning 5. Enter the subject (“SUBJ.”), and then press the [ENTER] key. 6. Enter the e-mail address of the recipient that you wish to send a copy (cc) to, and then press the [ENTER] key. • The e-mail address of a previously programmed recipient can also be specified. Refer to “2.2.2 Specifying the Recipient” (p. 30). 7. If you wish to send a cc to multiple recipients, press the [YES] key, and then specify the other recipients.
IF-102.book Page 48 Friday, June 21, 2002 1:22 PM 3 Network Scanning 11. If the document to be faxed contains multiple pages, position the next page of the document on the Original Glass when the screen shown at the right appears, and then press the [YES] key. • Repeat step 11 until all pages of the document have been scanned. 12. Press the [START] key to begin transmitting. To change the Scan mode settings From the screen allowing you to select the resolution, you can change various Scan mode settings.
IF-102.book Page 49 Friday, June 21, 2002 1:22 PM 3 Network Scanning 6. To specify another setting, press the key. (Continue with step 7.) To finish setting the Scan mode, press the [START] key. 7. Using the and keys, select the compression encoding method (“MH”, “MR” or “MMR”). 8. Press the [START] key to return to the scan screen. A screen appears, allowing you to select the document mode.
IF-102.book Page 50 Friday, June 21, 2002 1:22 PM 3 Network Scanning 3.2 Uploading to an FTP Server (Scan to Server) Tip • In order to access an FTP server, certain settings such as the FTP server address must be set in advance. These settings can be specified using Network Management Utility Light. (For details, refer to the Network Management Utility Light for IF-102 User’s Manual.) • In addition, a specified recipient can be notified by e-mail of the FTP server address that the data was uploaded to.
IF-102.book Page 51 Friday, June 21, 2002 1:22 PM 3 Network Scanning 3.2.1 Using the Automatic Document Feeder 1. Press the [SCAN] key. The machine enters Scan mode, and the scan screen appears. 2. Load the document to be scanned into the Automatic Document Feeder. • Adjust the Document Guide Plates to fit the size of the document. • Load the document with the side to be scanned facing up. 3. Press the [SPEED DIAL] key, and then use the 10-key pad to enter the 3-digit speed dial number.
IF-102.book Page 52 Friday, June 21, 2002 1:22 PM 3 Network Scanning 4. Press the [ENTER] key. • If settings such as the resolution are not to be specified, press the [START] key, instead of pressing the [ENTER] key. 5. Using the and keys, select the desired resolution (200 × 200 dpi, 300 × 300 dpi or 600 × 600 dpi), and then press the [ENTER] key. • To specify detailed Scan mode settings, press the key. For details on changing the settings, refer to “ To change the Scan mode settings” (p. 48). 6.
IF-102.book Page 53 Friday, June 21, 2002 1:22 PM 3 Network Scanning 3.2.2 Positioning Documents on the Original Glass 1. Press the [SCAN] key. The machine enters Scan mode, and the scan screen appears. 2. Lift open the Original Cover, and then position the document to be scanned on the Original Glass. • Position the document with the side to be scanned facing down. • Align the document on the scales above and to the left of the original glass. 3.
IF-102.book Page 54 Friday, June 21, 2002 1:22 PM 3 Network Scanning 4. Press the [ENTER] key. • If settings such as the resolution are not to be specified, press the [START] key, instead of pressing the [ENTER] key. 5. Using the and keys, select the desired resolution (200 × 200 dpi, 300 × 300 dpi or 600 × 600 dpi), and then press the [ENTER] key. • To specify detailed Scan mode settings, press the key. For details on changing the settings, refer to “ To change the Scan mode settings” (p. 48). 6.
IF-102.book Page 55 Friday, June 21, 2002 1:22 PM 4 INITIAL SET Mode Settings 4 INITIAL SET Mode Settings 4.1 Programming Scan Settings (“SCAN SETTING” Menu) From the “SCAN SETTING” menu, the default settings for the resolution, data format and compression encoding method during scanning and transmission with network scanning can be changed. 4.1.1 Setting the “RESOLUTION” Function 1. Press the [INITIAL SET] key. 2. Using the and keys, select “SCAN SETTING”. 3.
IF-102.book Page 56 Friday, June 21, 2002 1:22 PM 4 INITIAL SET Mode Settings 4. Using the and keys, select the data format (either “TIFF” or “PDF”), and then press the [YES] key. The “SCAN SETTING” menu appears again. 4.1.3 Setting the Compression Encoding Method (“CODING METHOD” Function) 1. Press the [INITIAL SET] key. 2. Using the and keys, select “SCAN SETTING”. 3. Press the [5] key from the 10-key pad to select “CODING METHOD”. 4.
IF-102.book Page 57 Friday, June 21, 2002 1:22 PM 4 INITIAL SET Mode Settings 4.2 Programming E-mail Addresses The procedures for programming one-touch dial keys and speed dial numbers with e-mail addresses are described below. Note • For details on changing or deleting programmed e-mail addresses, refer to the User’s Manual for the 7115F/7118F or the FK-117 Fax unit for the 7115/7118. 4.2.1 Programming One-Touch Dial Keys 1. Press the [INITIAL SET] key. 2.
IF-102.book Page 58 Friday, June 21, 2002 1:22 PM 4 INITIAL SET Mode Settings 7. Enter the name of the programmed email address. • For details on entering text, refer to “1.5 Entering Text” (p. 9). • Text up to 20 characters long can be entered for the name. 8. Press the [ENTER] key. • The settings are registered. To program another one-touch dial key, repeat steps 4 through 8. 9. Press the [NO] key to finish programming. The “FAX REGISTRATION” menu appears again. 4.2.
IF-102.book Page 59 Friday, June 21, 2002 1:22 PM 4 INITIAL SET Mode Settings 6. Press the [ENTER] key. • If the e-mail address does not contain “@”, the [ENTER] key cannot be pressed. 7. Enter the name of the programmed email address. • For details on entering text, refer to “1.5 Entering Text” (p. 9). • Text up to 20 characters long can be entered for the name. 8. Press the [ENTER] key. • The settings are registered. To program another speed dial number, repeat steps 4 through 8. 9.
IF-102.fm Page 60 Tuesday, June 25, 2002 9:17 AM 4 INITIAL SET Mode Settings 5. Enter the name of the group, and then press the [YES] key. • For details on entering text, refer to “1.5 Entering Text” (p. 9). • Text up to 20 characters long can be entered for the name of the group. 6. By using the one-touch dial keys or the speed dial numbers, or by entering the dialing information directly, specify the recipients.
IF-102.book Page 61 Friday, June 21, 2002 1:22 PM 4 INITIAL SET Mode Settings 4.3 Specifying the “FORWARD” Function You can set up the machine to forward any received faxes to other fax machines and internet fax terminals (e-mails). You cannot forward any received Internet faxes (e-mails). To set the “FORWARD” function 1. Press the [INITIAL SET] key. 2. Press the key 8 times to select “RX OPERATION”. 3. Press the [6] key from the keypad to select “FORWARD”. 4.
IF-102.book Page 62 Friday, June 21, 2002 1:22 PM 4 INITIAL SET Mode Settings 4.4 Specifying E-mail Settings (“E-MAIL SETTING 1” and “E-MAIL SETTING 2” Menus) For details on specifying the functions available on the “E-MAIL SETTING 1” and “E-MAIL SETTING 2” menus, refer to “1.6.3 Specifying E-mail Settings (“E-MAIL SETTING 1” Menu)” (p. 17). 4.5 Specifying Network Settings (“NETWORK (FAX/SCAN)” Menu) For details on specifying the functions available on the “NETWORK(FAX/ SCAN)” menu, refer to “1.6.
IF-102.book Page 63 Friday, June 21, 2002 1:22 PM 5 Checking the Transmission/Reception Result 5 Checking the Transmission/Reception Result The transmission result information for a maximum of 60 sent and received e-mails, including sent and received faxes, is saved. This machine is set to automatically print the report each time it reaches a total of 60 transmissions. In addition, the transmission report can be viewed or printed by pressing the [CONFIRM] key. 5.1 Checking the Transmission Result 1.
IF-102.book Page 64 Friday, June 21, 2002 1:22 PM 6 Error Messages 6 Error Messages 6.1 Main Error Messages and Their Remedies Message *COMM.ERROR* XXXX SERVER *CANNOT CONNECT* XXXX SERVER *CANNOT GET IP* XXXX SERVER *DISCONNECT* XXXX SERVER *WRONG PASSWORD* XXXX SERVER *RECEIVE WRONG DATA* Cause Communication is not possible because of some problem in the machine or the condition of the network or server. A connection to the server cannot be established.
IF-102.book Page 65 Friday, June 21, 2002 1:22 PM 6 Error Messages Message MACHINE TROUBLE (Flashing alternately) (C####) Cause Some problem occurred in the machine. Remedy Turn the machine off, then on again. If the error is still displayed, contact your service representative.
IF-102.book Page 66 Friday, June 21, 2002 1:22 PM 7 Appendix 7 Appendix 7.