
Users Manual


68
Operation of DR Detector
HINT
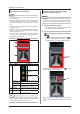
• The blue label or blue lines also helps you identify the top-
bottom orientation of the DR Detector.
• To carry out exposures in portrait orientation, turn the DR
Detector so that its blue label or blue lines comes to the
bottom position.
Blue Label
Blue lines
• The side with the triangular mark is the exposure surface.
• When exposing the chest, abdomen, and pelvis in land-
scape, because the functions to determine the orientation
of the body and to rotate the image automatically is cong-
ured, set the orientation of DR Detector as follows:
— For wired connection with an I/F cable or wireless con-
nection, ensure that the orientation of the triangular mark
to the left when performing an exposure.
— For wired connection with an AeroDR UF cable, perform
an exposure in a direction to which the AeroDR UF cable
can be connected.
• Radiography is not allowed on a subject in a horizon-tal po-
sition when an AeroDR 1717HQ, AeroDR 3 1717HD, and
AeroDR 3 1717HD2 are used.
3�2�6 Precautions for exposure
Exposure area
IMPORTANT
• If the irradiation eld is larger than DR Detector when you
take an image, an artifact may occur due to the X-ray back-
scatter eect. Adjust the irradiation led to t within the im-
aging range.
• The size lines of DR Detector indicate the exposure
size.
• During exposure, place the exposure body part with-
in the white lines on the four corners.
White lines
White lines or Blue lines
Sizelines
HINT
• As for AeroDR 3 1417HD, AeroDR 3 1717HD and AeroDR
3 1012HQ, the line in the bottom is blue.