E INSTRUCTION MANUAL
Thank you for purchasing the Minolta Vectis 300. The Vectis 300 is an easy to operate lens shutter camera from Minolta’s line of Advanced Photo System™ cameras. Your camera features drop-in loading, a 24 - 70mm zoom lens, and a wide focus frame. The sleek and compact design gives the Vectis 300 a sophisticated appearance suitable for any occasion. This manual is designed to help you understand the operation of your camera and its functions.
TABLE OF CONTENTS FOR PROPER AND SAFE USE .....................................................................4 NAMES OF PARTS.........................................................................................6 QUICK OPERATION .....................................................................................10 BASIC OPERATION Attaching The Strap..................................................................................13 Installing The Battery................................................
FOR PROPER AND SAFE USE Read and understand all warnings and cautions before using this product. WARNING Batteries may become hot or explode due to improper use. • Use only the batteries specified in this instruction manual. • Do not install the batteries with the polarity (+/–) reversed. • Do not subject batteries to fire or high temperatures. • Do not attempt to recharge, short, or disassemble. • Tape over lithium battery contacts before disposal. Follow local codes for battery disposal.
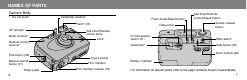
NAMES OF PARTS Camera Body * - Do not touch Viewfinder window* Flash-mode/Select button Flash* (33) AF window* Meter window* Remote-control receiver* Title button (48) Manual-rewind button (31) Strap eyelet 6 Data panel Self-timer/Remotecontrol lamp Lens* Self-timer/Remotecontrol/Adjust button Shutter-release button Format-selector switch (21) Main switch Viewfinder* Date button (42) Zoom buttons (22) Tripod socket Film chamber Film-chamber release (18) Battery chamber For information on spec
NAMES OF PARTS - CONT’D Data Panel Viewfinder Title/Date-time/Film speed indicator Title mark Battery-condition indicator (15) Focus frame Close-framing guide (25) Self-timer indicator (56) Frame counter Flash mode indicators (36) Film transport signals Remote-control indicator (58) Film cassette mark • Only the necessary indicators will appear in the data panel. 8 Focus lamp (green) lamp on focus OK focus cannot be confirmed slow blinking or special focus situation (p.
QUICK OPERATION 1. Insert the battery (p. 14). 2. Turn the camera on, then insert the film (p. 16). 3. Select the print format (p. 21). 4. Frame the subject as desired (p. 22). W 5. Center your subject in the focus frame (pp. 22-23). 6. Press the shutter-release button all the way down to take the picture (p. 23).
ATTACHING THE STRAP Attach the strap as shown. BASIC OPERATION Button key 12 • A button key is included on the strap for pressing the Date button and Manualrewind button.
INSTALLING THE BATTERY Your camera uses one 3-volt CR-2 lithium battery to supply power for all camera operations. CHECKING THE BATTERY POWER Each time the main switch is turned on, a symbol will appear in the data panel to indicate the power status of the battery. 1. Open the battery chamber as shown. 2. Insert the battery into the chamber as indicated by the + and – marks. 3. Close the battery chamber. • After installing a new battery, reset the date and time (p. 44).
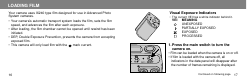
LOADING FILM Your camera uses IX240 type film designed for use in Advanced Photo System cameras. • Your camera’s automatic transport system loads the film, sets the film speed, and advances the film after each exposure. • After loading, the film chamber cannot be opened until rewind has been initiated. • DEP, Double Exposure Prevention, prevents the camera from accepting exposed film. • This camera will only load film with the mark current.
LOADING FILM - CONT’D 2. Turn the camera upside down, then turn the film-chamber release in the direction indicated. The film-chamber door will open partway. 3. Open the film-chamber door and insert the cassette into the film chamber. 18 4. Press the film-chamber door closed until it clicks. • The camera will display the cassette mark and the film’s ISO in the data panel, then advance the film to the first frame. The frame counter will display the number of frames remaining on the roll.
LOADING FILM - CONT’D 20 FULL-AUTO OPERATION If 0 and the film transport signals blink in the data panel, turn the film chamber release, open the chamber, then remove the film. 1. Press the main switch to turn the camera on. - If the film’s current VEI is , insert a new roll of film. - If a partially exposed roll of film was loaded into this camera, the VEI has been changed from to . - If a processed roll of film was loaded into this camera, the VEI has been changed from to .
FULL-AUTO OPERATION - CONT’D 3. Looking through the viewfinder, frame the subject as desired. Press the W zoom button to zoom out. Press the T zoom button to zoom in. 4. Center your subject in the focus frame, then press the shutter-release button partway down. 22 • In low-light conditions, the AF illuminator (flash) will fire to determine focus distance (unless is selected). • If the orange flash lamp blinks quickly, the flash is not charged.
FOR CLOSER SUBJECTS The green focus-lamp will blink rapidly and the shutter will lock when you are closer than the focus distance indicated below. Focal Length 24mm Print Format All Focus Distance 0.4m - ∞ (1.3 ft. - ∞) When your subject is closer than 1m (3.3 ft.) (1.7m (5.6 ft.) in Panorama format), compose your picture within the close-framing guide using focus hold if necessary (see p. 28). 70mm C or H 0.4m - ∞ (1.3 ft. - ∞) P 0.8m - ∞ (2.6 ft.
SPECIAL FOCUSING SITUATIONS Some scenes or subjects, like the examples below, are difficult for the autofocus system to lock on to. When the focus will not lock, focus hold (p. 28) on another object the same distance from you as your main subject, recompose, then press the shutter-release button all-the-way down to take the picture. When a very bright or low contrast area fills the focus frame. 26 The green focus lamp will blink slowly to warn you that focus may not be accurate.
FOCUS HOLD Subjects outside the focus frame may not be in focus. Use focus hold to ensure accurate focusing. 2. Press and hold the shutter-release button partway down until the green focus lamp glows. 1. Center your subject in the focus frame. 3. Without lifting your finger, recompose the picture and press the shutter-release button all-theway down to take the picture. • Lift your finger from the shutter-release button to cancel focus hold.
REWINDING THE FILM Your camera automatically rewinds the film into the cassette after the last exposure. 1. Wait for the film to completely rewind into the cassette. • The frame counter will count down during rewind. • 0 will appear in the frame counter and will blink when the film is rewound. 2. Turn the camera upside-down and turn the film-chamber release to open the film-chamber. 3. Open the film-chamber and remove the film.
PROCESSING For best results, take your film to a Certified Advanced Photo System photofinisher displaying this symbol (see p. 64). USING THE BUILT-IN FLASH When you turn the camera on, the built-in flash is set to autoflash or autoflash with red-eye reduction, whichever mode was used last. The flash will fire automatically when necessary.
FLASH LAMP FLASH RANGE With the shutter-release button pressed partway down: • If the orange flash lamp blinks rapidly, the flash is charging. Wait until it glows steadily, then take the picture. • If the orange flash lamp blinks slowly, your scene is too dark for a hand-held picture. Use the flash or place your camera on a tripod. The range of the built-in flash depends on the film speed and the focal length you are using.
SELECTING THE FLASH MODE Besides autoflash mode fill-flash , night portrait , autoflash with red-eye reduction , or flash cancel can be selected. RED-EYE REDUCTION , manual Press the flash mode button until the desired indicator appears in the data panel. • Flash modes remain selected after the picture is taken. 36 Use the built-in flash’s red-eye reduction mode to reduce the red-eye effect when photographing people or animals at night or in low light situations.
MANUAL FILL-FLASH FLASH CANCEL The flash will fire when the shutter is released regardless of lighting. Use manual fill flash to reduce harsh shadows on your subject’s face. Use flash cancel when you are photographing twilight scenes, night scenes, distant subjects that are beyond the flash range, or you want to capture the ambiance of existing light. 38 Press the flash mode button until appears in the data panel. Press the flash mode button until appears in the data panel.
NIGHT PORTRAIT In night portrait mode, the camera balances the flash and existing light exposure so you can take beautiful pictures of people at sunset or at night. The flash is set to manual fill-flash with red-eye reduction. Press the flash mode button until appears in the data panel. • The shutter speed may be slow. Use of a tripod is recommended. • The flash mode remains selected after you take the picture.
DATE IMPRINTING Your camera records date and time information on the film’s magnetic strip that certified photofinishers can imprint in the front and back of your photographs. • Some labs can not imprint date and/or time information on the front of your photographs. See your photofinisher for a full description of available services. Before taking the picture: Using the button key, press the date button until the data panel displays the format you want to see on the print.
DATE IMPRINTING - Setting the Date and Time • This camera has a quartz clock and automatic calendar through the year 2029. 1. Turn the camera off, then press the date button with the button key to display the date. 2. Press the select button until the item you want to adjust blinks. • Each press of the select button causes the next item to blink. The sequence is: YY 44 MM DD hh mm stops blinking 3. Press the adjust button to change the blinking item.
DATE IMPRINTING - Changing the Format 1. Press the main switch to turn the camera off. 2. Press the date button to display the date. 3. Press and hold the select button until all items in the date display blink. 46 4. Press the adjust button to change the display format. • The format sequences as follows: `Y M D M D`Y D M`Y 5. Press the select button until all items stop blinking to set the updated information.
TITLE IMPRINTING TITLE IMPRINTING - Preselecting Titles Three titles from the title list can be preset for use while taking pictures. Any one of the three preselected titles can be selected before the picture is taken. When selected, the title will be recorded on the film’s magnetic data strip. At certified Advanced Photo System labs, the selected title will be printed on the back of the print. Three title codes have been set into memory. You can change one or all three title codes at any time.
TITLE IMPRINTING - Preselecting Titles 4. Press the select button, the last digit of the title code number will blink. 6. Press the select button to make the next digit blink, change its value using the adjust button. 5. Press the adjust button to change its value. 7. Press the select button to make the language code blink. • Press and hold the adjust button to change the value rapidly. 50 Continued on following page.
TITLE IMPRINTING - Preselecting Titles 8. Press the adjust button to change the language code. TITLE IMPRINTING - Frame Title With the camera on and before taking the picture: 1. Press the title button to display the code for the title you want. • Each press of the title button changes the title code to the next selection. 9. When the title information is correct, press the title button. 52 2. Take the picture. The magnetic data is written and the selection is cancelled for the next frame.
TITLE IMPRINTING - Filmstrip Title An additional title for the entire roll of film can be selected. Both the filmstrip title and the frame title will be printed on the back of the print. After the film has been rewound and blinks in the data panel: 2. Press the shutter release button all-the-way down to set the title. • The camera advances to write the data on the film’s leader, then rewinds the film. 3. When blinks in the data panel again, turn the filmchamber release and remove the film. 1.
SELF-TIMER The self-timer delays release of the shutter for approximately 10 seconds after you press the shutter release button. 1. Place the camera on a tripod, then press the self-timer button until appears in the data panel. 2. Center your subject in the focus frame. 56 3. Press the shutter-release button all-the-way down. • will blink in the data panel during countdown. • The self-timer lamp will blink slowly. Just before the shutter is released, the self-timer lamp will blink rapidly, then glow.
REMOTE CONTROL (Sold Separately) The IR Remote Control RC-3 (not included) allows remote camera operation from up to 5m (16.4 ft.) away. • The remote control may not operate with backlit subjects or under fluorescent light. • To save power, the camera automatically shuts down if the remote control is not operated for more than eight minutes. • Remote control mode will remain selected after the picture is taken. 1.
REMOTE CONTROL - CONT’D FOCUS HOLD IN REMOTE CONTROL MODE 1. Set the camera to remote control mode. 2. Center your subject in the focus frame, then press the shutter-release button partway down until the green focus lamp glows. 3. Lift your finger from the shutterrelease button, then recompose the picture. 4. Point the remote toward the front of the camera and press • or 2s. • The focus will remain locked until the focus is reset, remote-control mode is cancelled, or the camera is turned off.
REMOTE CONTROL - CONT’D CHANGING THE BATTERY The remote control uses a 3V lithium battery (CR2032). When pressing the remote-control buttons does not release the shutter, the battery must be replaced. (The supplied battery should be sufficient for approximately ten years of operation). 1. Pull out the battery chamber and remove the old battery. APPENDIX 2. Insert a new battery into the battery chamber with its plus side up. 3. Slide the battery chamber back into the remote control.
LAB SERVICES To receive the best possible prints, take your film to a photolab displaying the Certified Advanced Photo System logo. Photofinishers displaying this logo have been certified according to Advanced Photo System guidelines. Certified photolabs will be able to provide the following five services. 3. PQI - Print Quality Improvement The lab will compensate (or not compensate) printing according to the data recorded on the magnetic data strips. 4. Film is returned in the cassette.
CARING FOR YOUR CAMERA CLEANING • Keep the AF and AE windows clean or the focus and/or exposure may not be accurate. • If the camera body is dirty, gently wipe it clean with a soft, clean, dry cloth. • To clean the lens surface, first brush away any dust or sand then, if necessary, moisten a lens tissue with lens cleaning fluid and gently wipe the lens in a circular motion, starting from the center. • Never place lens fluid directly on the lens. • Never touch the lens surface with your fingers.
CARING FOR YOUR CAMERA - CONT’D QUESTIONS AND SERVICE • If you have questions about your camera, contact your local camera dealer or write to the Minolta distributor in your area. • If the camera is damaged or the rewind motor does not operate, do not open the film chamber or forcefully remove the cassette. Contact an authorized Minolta Service Facility. • Before shipping your camera for repair, please contact an authorized Minolta Service Facility for details.
CARING FOR YOUR CAMERA - CONT’D OPERATING TEMPERATURE AND CONDITIONS • This camera is designed for use from -10 to 40 °C (14 to 104 °F). • Never leave your camera where it may be subjected to extreme temperatures such as in the glove compartment of a car. • At colder temperatures, the data panel response time will be slow. At higher temperatures, the display will temporarily darken, but will restore when the temperature normalizes. 70 • Never subject the camera to extreme humidity.
TECHNICAL DETAILS Camera Type: Lens: IX240 Lens Shutter Camera 24-70mm f/5.7 - 9.8 lens (approx. equivalent to 30-87.5mm in 35mm format); 4 element/4 group construction Focusing Range: C/H: Wide 0.4m - ∞ (1.3 ft. - ∞) Tele 0.4m - ∞ (1.3 ft. - ∞) P: Wide 0.4m - ∞ (1.3 ft. - ∞) Tele 0.8m - ∞ (2.6 ft. - ∞) Film Speed Setting: Automatic setting for DX coded films ISO 25-3200 Metering Range (ISO 200): Ev 4.0 - 17 Flash Range (ISO 200): Wide:0.4 - 4.4m (1.3- 14.4 ft.) Tele: 0.4 - 2.6m (1.3 - 8.5 ft.
This device complies with Part 15 of the FCC Rules. Operation is subject to the following two conditions: (1) This device may not cause harmful interference, and (2) this device must accept any interference received, including interference that may cause undesired operation. Changes or modifications not approved by the party responsible for compliance could void the user's authority to operate the equipment.
NOTES 76 NOTES 77
Minolta Co., Ltd. 3-13, 2-Chome, Azuchi-Machi, Chuo-Ku, Osaka 541-8556, Japan Minolta GmbH Minolta France S.A. Minolta (UK) Limited Minolta Austria Ges. m.b.H. Minolta Camera Benelux B.V. Belgium Branch Minolta (Schweiz) AG Minolta Svenska AB Finland Branch Minolta Portugal Limitada Minolta Corporation Head Office Los Angeles Branch Minolta Canada Inc. Head Office Vancouver Branch Minolta Hong Kong Limited Minolta Singapore (Pte) Ltd. Shanghai Minolta Optical Products Co., Ltd.