
Service Manual

FIXING UNIT
3-55
III DIS./ASSEMBLY
2
9.3 Removing and Reinstalling
the Fixing Claw
A. Periodically replaced parts/cycle
• Fixing claw: Every 240,000 copies (7145)
• Fixing claw: Every 200,000 copies (7235/7228/
7222)
B. Procedure
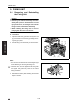
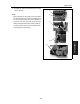
1. Remove the fixing unit from the main body.
2. Remove the 2 covers/F, /R.
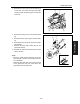
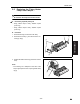
3. Open the fixing guide [1].
4. Remove the 2 set screws [2], and remove the
fixing paper exit board/U [3].
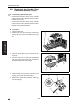
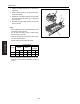
5. Remove the 3 screws [4] from the fixing paper
exit board/U, and remove the fixing claw unit [5].
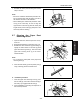
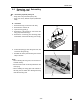
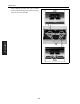
6. Unhook the spring [1] of the fixing claw unit, and
remove the fixing claw [2].
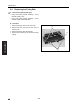
7. Reinstall the above parts following the removal
steps in reverse.
Note:
• When installing the fixing claw, be sure that it is
oriented correctly.
• Be sure that the claw is securely attached to the
claw spring.
• When installing the fixing paper exit board/U to
the fixing unit, be careful not to damage the fixing
roller with the fixing claw.
[1]
[2]
[2]
[3]
[5]
[4]
[1]
[2]