Thank you for purchasing the Minolta Dimâge 2300. Please take the time to read through this instruction manual so you can enjoy all its features. For information on installing and operating the included application software, please read the accompanying software instruction manual. This manual contains information regarding products introduced before Jan., 2000.
FOR PROPER AND SAFE USE BEFORE YOU BEGIN Read and understand all warnings and cautions before using this product. WARNING Batteries may become hot or explode due to improper use. • Use only the batteries specified in this instruction manual. • Do not install the batteries with the polarity (+/-) reversed. • Do not subject batteries to fire or high temperatures. • Do not attempt to recharge, short, or disassemble. • Do not mix batteries of different types, brands, or ages.
TABLE OF CONTENTS TABLE OF CONTENTS FOR PROPER AND SAFE USE...........................................................2 BEFORE YOU BEGIN ..........................................................................3 TABLE OF CONTENTS ........................................................................4 NAMES OF PARTS CAMERA BODY.............................................................................8 BOTTOM OF BODY.....................................................................10 VIEWFINFER ...
TABLE OF CONTENTS - CONT’D TABLE OF CONTENTS - CONT’D PLAYING BACK IMAGES (PLAY MODE) PLAY MODE SCREENS Play Mode Screen (LCD monitor) - Single-frame Play ................65 Play Mode Screen (LCD monitor) - Index Play............................65 SINGLE-FRAME PLAY........................................................................66 INDEX PLAY........................................................................................67 To Turn Off The Camera in PLAY Mode .................................
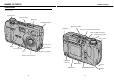
NAMES OF PARTS NAMES OF PARTS CAMERA BODY * Do not touch.
NAMES OF PARTS - CONT’D NAMES OF PARTS - CONT’D BOTTOM OF BODY DATA PANEL The following diagram shows all items displayed to aid the explanation.
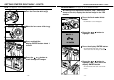
GETTING STARTED RIGHT AWAY GETTING STARTED RIGHT AWAY PREPARATION - See pages 18 - 25 for detailed information Frame the image in either the LCD monitor or viewfinder. Insert the batteries. • Place the viewfinder’s focus frame on the subject or center the subject in the LCD monitor. Insert the compact flash card. • The green focus lamp will glow if focus is confirmed. • The orange flash lamp will glow if the flash is charged and ready.
GETTING STARTED RIGHT AWAY - CONT’D GETTING STARTED RIGHT AWAY - CONT’D PLAY - See pages 65 - 70 for detailed information Turn the Function dial to DELETING IMAGES - See pages 78 - 83 for detailed information According to the operations between step 1 and step 4 shown at the left, display the desired image in the LCD monitor. . Press the flash-mode / delete button. • A confirmation screen will appear. Move the lens cover slide to . Press the or highlight “YES”.
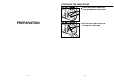
ATTACHING THE HAND STRAP Insert the smaller loop of the strap through the strap eyelet. PREPARATION - 16 - Put the other end of the strap through the small loop.
INSERTING BATTERIES INSERTING BATTERIES The Minolta Dimâge 2300 uses four AA-sized alkaline batteries. • You may also use AA-sized Ni-Cd or Ni-MH batteries. • When using Ni-Cd or Ni-MH batteries, fully recharge them with a vendor-endorsed battery charger. While pulling up the battery/cardchamber door slightly, fold it down and slide it slightly toward the front of the camera. Then, while using a downward pressure, slide it back to the rear of the camera until it clicks.
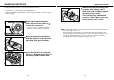
INSERTING BATTERIES - CONT’D INSERTING BATTERIES - CONT’D Low Battery Warning Auto Power Off This camera is equipped with an automatic battery-condition indicator. To save battery power, this camera will shut down if it is not operated for more than 3 minutes. Full-Battery symbol --When the camera power is on, the batterycondition indicator always appears in the data panel. indicates the battery power is full. To restore power in REC mode, move the lens cover slide to .
INSERTING BATTERIES - CONT’D COMPACT FLASH CARD Using the AC Adapter (Sold Separately) Your camera requires a compact flash card to be inserted before capturing images. Use the AC Adapter (optional accessory) allows the camera to receive power from an electrical outlet. Use of the AC Adapter is recommended to conserve batteries during periods of heavy use. It is also recommended when interfacing the camera with the computer.
COMPACT FLASH CARD - CONT’D While pulling up the battery/cardchamber door slightly, fold it down and slide it slightly toward the front of the camera. Then, while using a downward pressure, slide it back to the rear of the camera until it clicks. COMPACT FLASH CARD - CONT’D While pulling up the battery/cardchamber door slightly, fold it down and slide it slightly toward the front of the camera. Then, while using a downward pressure, slide it back to the rear of the camera until it clicks.
BASIC RECORDING PROCEDURE Turn the Function dial to TAKING PICTURES . Move the lens cover slide to to open the lens cover. • The camera will be turned on and be set to REC (Record) mode. Press the display / ENTER button to turn on the LCD monitor if desired. Center the subject in the LCD monitor or place the viewfinder’s focus frame on the subject. • Use Focus Hold for off-center subjects (See page 32). • When holding the camera, make sure your fingers do not cover the lens.
BASIC RECORDING PROCEDURE - CONT’D BASIC RECORDING PROCEDURE - CONT’D Press the shutter-release button part-way down. • Focus and exposure will be determined and locked. • The green focus lamp will glow if focus is determined. Repeat steps 4 and 5 if the focus lamp (green) blinks. • The orange flash lamp will blink if the flash is charging and will glow if the flash is charged and ready. When the flash lamp (orange) blinks, the shutter will not be released.
FOCUS FOCUS This digital camera has a precise, high-speed autofocusing system. SPECIAL FOCUSING SITUATIONS FOCUS LAMP/NO FOCUS INDICATOR Some scenes or subjects are difficult for the autofocus system to lock on to. When the focus will not lock, FOCUS HOLD on another object the same distance from you as your main subject, recompose, then press the shutter-release button allthe-way down to take the picture.
FOCUS - CONT’D BUILT-IN FLASH FOCUS HOLD When the camera is turned on, the flash is automatically set to autoflash. The other flash modes can be set by using the flash-mode/delete button and or button. Subjects outside the focus frame or LCD monitor center may not be in focus. Use focus hold to ensure accurate focusing. Place the focus frame on your subject or center the subject in the LCD monitor, then press and hold the shutter-release button partway down so the green focus lamp glows.
BUILT-IN FLASH - CONT’D FLASH RANGE BUILT-IN FLASH - CONT’D • When you press the button, the flash modes will change as follows: To ensure proper exposure, make sure your subject is positioned within the flash range. ISO - Normal setting 0.6m - 2.2m (1.97 ft. - 7.2 ft.) ISO - High setting 0.6m - 4.4m (1.97 ft. - 14.4 ft.) See page 62 for detail about ISO sensitivity changing. • When you press the button, the flash modes will change in reverse order.
BURST IMAGE CAPTURE BURST IMAGE CAPTURE Burst image capture is similar to the continuous-drive mode on the conventional cameras. This digital camera will continuously take pictures while the shutter-release button is held down. The maximum number of images that can be captured at a time is follows: Image Quality The Maximum Number of Images S.FINE (Super Fine) 1 FINE (Fine) 4 STD. (Standard) 8 ECON. (Economy) 12 Frame the picture as instructed in “BASIC RECORDING PROCEDURE”, steps 4 and 5.
SELF-TIMER / REMOTE CONTROL SELF-TIMER / REMOTE CONTROL SELF-TIMER The self-timer will delay the release of the shutter for approximately 10 seconds after you press the shutter-release button. Turn the Function dial to . Press the shutter-release button all-the-way down to start timer. • The self-timer lamp on the front of the camera will blink rapidly before the shutter is released. • Do not press the shutter-release button while standing in front of the camera.
SELF-TIMER / REMOTE CONTROL - CONT’D SELF-TIMER / REMOTE CONTROL - CONT’D REMOTE CONTROL (SOLD SEPARATELY) Arrange the camera and subject positions, and compose your picture. The IR Remote Control RC-3 (optional accessory) allows remote camera operation up to 5m (3.28 ft.) away. Turn the Function dial to . Emitter window Delay button Place the camera on a tripod, then move the lens cover slide to to open the lens cover. • The camera will be turned on and be set to REC (Record) mode.
DIGITAL ZOOM [REC MODE] DIGITAL ZOOM [REC MODE] The digital zoom will increase the magnification of the live image on the LCD monitor and recorded image up to two times of the normal screen. Press the digital zoom button. • If you want to change the zoom magnification, repeat steps 2 and 3. • The viewfinder image does not change. Use the LCD monitor to compose your picture. In REC mode, press the digital zoom button. • When the digital zoom button is pressed, the LCD monitor automatically turns on.
MACRO MACRO The Macro Photography function allows you to fill the frame with a business-card size object. The minimum focus distance in Macro is 0.3m (0.98 ft.). In REC mode, press the flashmode/delete button. While looking at the LCD monitor, frame your picture. • For best results, steady the camera on a stable surface or use a tripod. • The currently set flash mode appears on the data panel. Press the shutter-release button part-way down. Press the or button until the is displayed in the data panel.
EXPOSURE COMPENSATION The exposure can be adjusted to make the final image lighter or darker. Exposure can be adjusted as much as ± 2 EVs in 1/2 EV increments. In REC mode, press the exposure-compensation/lock button. EXPOSURE COMPENSATION Press the exposurecompensation/lock button or press the shutter-release button part-way down. • will remain in the data panel as a reminder that exposure compensation is set. • The currently set exposure compensation value appears in the body data panel.
RECORD MODE MENUS The Record Mode Menus allow you to change the default settings for image capturing, like Image Quality and Image Size settings. RECORD MODE MENUS (LCD Monitor) RECORD MODE MENUS RECORD MODE MENU ITEMS AND EACH SETTING QUALITY S.FINE (Super Fine) FINE STD. (Standard) ECON.
RECORD MODE MENUS SELECTING IMAGE QUALITY To Display the Record Mode Menus Select the image quality before recording the image. This digital camera supports four image quality modes, super-fine (S.FINE), fine (FINE), standard (STD.), and economy (ECON.). Turn the Function dial to or . , , Move the lens cover slide to to open the lens cover. • The camera will be turned on and be set to REC mode. • Press the display/ENTER button to turn the LCD monitor on if desired.
SELECTING IMAGE QUALITY Press the display/ENTER button. • The currently set image quality will be highlighted. SELECTING IMAGE QUALITY Image quality may be changed while the capacity of compact flash card remains. One compact flash card may contain images of various image qualities. The image quality setting is maintained when the camera is turned off. Changing the image quality will affect the remaining number of images which may be stored in the card.
SELECTING IMAGE SIZE Select the image size before recording the image. The image size is a factor in determining how many images fit onto a compact flash card. There are two image size options; FULL and HALF. SELECTING IMAGE SIZE Press the or button to highlight desired image size. • The image quality will change as follows: Image Size FULL HALF Number of Pixels taken (H x V) 1792 x 1200 800 x 600 FULL HALF In Record mode, press the MENU button. • The Record mode menus will appear.
FILE SIZE CARD CAPACITY The file size of the image is determined by the selected Image Quality and Image Size. There are four Image Quality (Rate of compression) options; Super Fine (1:1), Fine (1:5), Standard (1:13), and Economy (1:26). See page 51. There are two options for Image Size; FULL (1792 x 1200 pixels) and HALF (800 x 600 pixels). See page 54.
SELECTING WHITE BALANCE SELECTING WHITE BALANCE White Balance is the camera’s ability to make different types of lighting appear neutral. The effect is similar to selecting daylight film or tungsten film. The default white balance setting is AUTO. Press the or button to highlight desired white balance. • The white-balanve will change as follows: AUTO: Daylight: Fluorescent: Tungsten: The AUTO setting will detect the type of light and adjust the white balance accordingly.
SELECTING SHARPNESS There are three sharpness options; HARD, NORMAL, and SOFT. HARD: This option increases the sharpness of the image to be taken. NORMAL: No additional sharpening will be done. SOFT: This option creates a soft-focus effect. Small details in the image are diffused. In Record mode, press the MENU button. SELECTING SHARPNESS Press the or button to highlight desired sharpness. • The sharpness will change as follows: HARD NORMAL • The Record mode menus will appear.
CHANGING ISO SENSITIVITY (GAIN UP MODE) The CCD used in this camera has a sensitivity of ISO 85 equivalent when shipped from the factory. By setting this camera to the Gain Up mode, it may be set to ISO 340 equivalent. This will improve camera performance by letting you use it in dark, indoor locations. CHANGING ISO SENSITIVITY (GAIN UP MODE) Press the or button to highlight desired ISO sensitivity. • The ISO sensitinity will change as follows: HIGH NORMAL: ISO 85 equivalent. HIGH: ISO 340 equivalent.
PLAY MODE SCREENS Play Mode Screen (LCD monitor) - Single-frame Play Digital zoom Play Mode Indicator X1.0 / X2.0 / X3.0 PLAY X3.
INDEX PLAY SINGLE-FRAME PLAY Turn the Function dial to In single-frame Play mode, turn the Function dial to . . • The LCD monitor changes from single-frame play to index play. The monitor is divided into a nine-image index. • The white border appears around the image displayed when the function dial is set to . Move the lens cover slide to , then press and hold the display / ENTER button about 1 second. PLAY X1.0 • After a short wait, the last image recorded is displayed on the LCD monitor.
DIGITAL ZOOM [PLAY MODE] INDEX PLAY - CONT’D Turn the Function dial to . • The LCD monitor changes from index play to single-frame play. • The image enclosed in the white border appears on the LCD monitor. The digital zoom will increase the magnification of the image displayed on the LCD monitor up to three times of the normal screen. In single-frame Play mode, press the digital zoom button. • The currently set zoom magnification appears in the upper-right corner of the LCD monitor (see page 65).
AUTO-PLAY (SLIDE SHOW) DIGITAL ZOOM [PLAY MODE] - CONT’D Press the digital zoom button. • If you want to change the zoom magnification, repeat steps 2 and 3. The images can be played back like an automatic slide show. Auto-Play (Slide show) Screen (LCD monitor) • The digital zoom will return to X1.0 when you turn the camera off and back on again. PLAY X 3.
AUTO-PLAY (SLIDE SHOW) - CONT’D Press the or button to highlight “START”. AUTO-PLAY (SLIDE SHOW) - CONT’D To Stop Auto-Play (Slide show) While performing Auto-Play (Slide show), press the MENU button. • The Auto-Play (Slide show) menus will appear. Press the display/ENTER button. • Auto-Play will start according to the INTERVAL and the DIRECTION settings in the Auto-Play (Slide show) menus. Press the or button to highlight “EXIT”. Press the display/ENTER button. • Auto-Play (Slide show) will stop.
AUTO-PLAY (SLIDE SHOW) - CONT’D To Change Auto-Play (Slide show) Settings Check that the Function dial is set to , press the MENU button. AUTO-PLAY (SLIDE SHOW) - CONT’D Press the display/ENTER button. • The interval time you have highlighted at the previous step will be selected and set to the camera. • The Auto-Play (Slide show) menus will appear. Press the or button to highlight “INTERVAL”. Press the or button to highlight “DIRECTION”. Press the display/ENTER button.
AUTO-PLAY (SLIDE SHOW) - CONT’D Press the display/ENTER button. • The direction you have highlighted at the previous step will be selected and set to the camera.
DELETING A SINGLE IMAGE DELETING A SINGLE IMAGE Delete a single, unprotected image from the compact flash card in the camera. As a deleted image cannot be recovered, care is required when deleting images. Important images can be locked (write-protected) to prevent accidental deletion (see page 81). Turn the Function dial to Press the or button until the desired image appears in the LCD monitor. • The button scrolls forward, the scrolls backward. button . Press the flash-mode / delete button.
DELETING A SINGLE IMAGE - CONT’D Press the or button to highlight “NO”, then press the display / ENTER button. • The LCD monitor will return to the PLAY screen. LOCKING (PROTECTING) IMAGES Important images can be locked (write-protected) to guard them from accidental deletion. Locked (protected) images cannot be removed from the CF card in the camera by using the Delete function. Locked (protected) images will be removed when the FORMAT function (see page 105) is performed.
LOCKING (PROTECTING) IMAGES - CONT’D LOCKING (PROTECTING) IMAGES - CONT’D Press the or button until the desired image appears in the LCD monitor. • The button scrolls forward, the scrolls backward. button Press the exposurecompensation/lock button. • A Lock icon will appear in the LCD monitor, showing that the image is locked (write-protected). PLAY UNLOCKING (UNPROTECTING) IMAGES Display the images for which lock (write-protect) is to be cleared with steps to on pages 81 - 82.
PLAY MODE MENUS The Play Mode Menus allow you to lock (write-protect)/unlock (unprotect) all images, delete all images, and select the printing method (DPOF). PLAY MODE MENUS (LCD Monitor) PLAY MODE MENUS PLAY MODE MENU ITEMS AND EACH SETTING DELETE ALL NO YES LOCK ALL NO YES UNLOCK ALL NO YES SET ORDER PRINT STD PRINT ALL INDEX CANCEL ALL [*] IMAGES * Number of images selected to be printed.
DELETING ALL IMAGES DELETING ALL IMAGES Delete all recorded images from the compact flash card in the camera. Press the display/ENTER button. • A confirmation screen will appear. As a deleted image cannot be recovered, care is required when deleting images. Important images can be locked (write-protected) to prevent accidental deletion (see page 81). In PLAY mode, turn the Function dial to , or . Press the or highlight “YES”. button to • To cancel this operation, select (highlight) “NO”.
LOCKING (PROTECTING) ALL IMAGES This function locks (protects) all captured images. Stored images that are locked (protected) using this function cannot be deleted either the single image delete function or the all-image delete function. LOCKING (PROTECTING) ALL IMAGES Press the display/ENTER button. • A confirmation screen will appear. Locked (Protected) images will be removed when the FORMAT function (see page 105) is performed. In PLAY mode, turn the Function dial to , or .
UNLOCKING (UNPROTECTING) ALL IMAGES UNLOCKING (UNPROTECTING) ALL IMAGES This function unlocks (unprotects) all locked (write-protected) images. Press the display/ENTER button. • A confirmation screen will appear. In PLAY mode, turn the Function dial to , or . Press the or highlight “YES”. button to • To cancel this operation, select (highlight) “NO”. Press the MENU button. • The Play mode menus will appear. Press the display/ENTER button.
SELECTING THE PRINT METHOD (DPOF™) This camera supports DPOF™ so that you can select the images you want to print and the printing mode to be used. SELECTING THE PRINT METHOD (DPOF) Press the or button to highlight “PRINT”. The DPOF (Digital Print Order Format) is jointly developed by Eastman Kodak Company, Canon Inc., Fuji Photo Film Co., Ltd., and Matsushita Electric Industrial Co., Ltd. for direct printing from digital cameras.
SELECTING THE PRINT METHOD (DPOF) - CONT’D SELECTING THE PRINT METHOD (DPOF) - CONT’D SELECTING THE IMAGES TO BE PRINTED Select the Print Type according to the steps pages 92 - 93. to Press the or button to move the white border around the thumbnail to be printed, then press the display/ENTER button. on • A cursor appears under the selected thumbnail. • Pressing the display/ENTER button again disappears a cursor to cancel the selection. Press the display/ENTER button.
SELECTING THE PRINT METHOD (DPOF) - CONT’D SELECTING THE PRINT METHOD (DPOF) - CONT’D PRINTING ALL IMAGES Press the display/ENTER button. Select the Print Type according to the steps pages 92 - 93. to • A confirmation screen will appear. on Press the display/ENTER button. • The Print order menu will appear. Press the or button to highlight “YES” and press the display/ENTER button. • The print order (print all images) will be confirmed and the LCD monitor will return to the print order menu.
SELECTING THE PRINT METHOD (DPOF) - CONT’D SELECTING THE PRINT METHOD (DPOF) - CONT’D CANCELING ALL IMAGES Press the display/ENTER button. Select the Print Type according to the steps pages 92 - 93. to • A confirmation screen will appear. on Press the display/ENTER button. • The Print order menu will appear. Press the or button to highlight “YES” and press the display/ENTER button. • The print order cancel will be confirmed and the LCD monitor will return to the print order menu.
SETUP MODE MENUS The SETUP Mode Menus allow you to initialize a CF card and to set the brightness of the LCD monitor, time that an Auto Power Off feature will activate, date, and time.
SETUP MODE MENUS - CONT’D SETTING THE BRIGHTNESS OF THE LCD MONITOR To Display the Setup Mode Menus Set the brightness of the LCD monitor. This setting is applicable both REC mode and PLAY mode. Turn the Function dial to SETUP. Turn the Function dial to SETUP. Move the lens cover slide to to open the lens cover. Or, move the lens cover slide to , then press and hold the display / ENTER button about 1 second. • The Setup mode menus will appear. Move the lens cover slide to to open the lens cover.
SETTING THE BRIGHTNESS OF THE LCD MONITOR Press the or button to highlight desired brightness. • The brightness will change as follows: FORMATTING A COMPACT FLASH CARD Formatting a compact flash card removes all protected and unprotected images from the card. The standard accessory card is pre-formatted. Compact flash cards purchased separately may need formatting. BRIGHT This deletes all write-protected images. Take extreme care when formatting. NORMAL Turn the Function dial to SETUP.
FORMATTING A COMPACT FLASH CARD - CONT’D Press the display/ENTER button. • A confirmation screen will appear. SETTING THE AUTO POWER-OFF TIME Set the Auto power-off time - time that an Auto power-off feature will activate. If no action is taken (no buttons are pressed) during the period you have set, the camera power will be turned off automatically. Turn the Function dial to SETUP. Press the or highlight “YES”. button to • To cancel this operation, select (highlight) “NO”.
SETTING THE AUTO POWER-OFF TIME - CONT’D Press the or button to highlight desired time. • The auto power-off time will change as follows: SETTING THE DATE/TIME This camera records the date and time an image was captured. For your reference, set the date and time accurately. Turn the Function dial to SETUP. 30MIN (30 minutes) 10MIN (10 minutes) 5MIN (5 minutes) 3MIN (3 minutes) Press the display/ENTER button.
SETTING THE DATE/TIME - CONT’D Press the or button to highlight desired style. • The style (the order of year, month, and day) will change as follows: YYYY/MM/DD SETTING THE DATE/TIME - CONT’D Press the display/ENTER button as many times as required to highlight the value to be changed. • Press the display/ENTER button repeatedly to move the highlight to Year Month Day Hour Minute.
SETTING THE DATE/TIME - CONT’D SETTING THE DATE/TIME - CONT’D When the DATE (Year, Month, Day, and their Order) do not need to be changed, highlight “TIME” at the step 3 and press the display/ENTER button. When the Minute value has been changed, press the display/ENTER button. The value for “Hour” will be highlighted. The following operations are as same as those from step 8. • The internal clock begins operation and the LCD monitor will return to the Setup mode menus.
RETURNING TO THE DEFAULT SETTINGS Returns the each setting of the camera to the default ones as follows. Image Quality (P. 51) Image Size (P. 54) White Balance (P. 58) Sharpness (P. 60) ISO (P. 62) INTERVAL (Auto-Play, P. 74) DIRECTION (Auto-Play, P. 75) Print Type (DPOF, P. 93) Brightness of the LCD monitor (P. 103) Power Save time (P. 107) Date Style (P. 110) Default setting STD.
VIDEO OUT It is possible to view images in the camera on your television. This camera has a video out terminal which allows you to connect the camera to your television using the video cable. Turn off the television and the camera. Insert the mini plug end of the video cable into the camera’s video out terminal. Plug the other end of the video cable into the video input terminal on the television. APPENDIX Turn the television on. Turn the camera’s Function dial to , , or .
TROUBLESHOOTING Problem The camera will not take a picture. TROUBLESHOOTING Cause The camera is off. The camera is not in REC (Record) mode. The camera is processing, WAITING appears in the LCD monitor and the green focus lamp nearby the viewfinder blinks slowly. Pictures are out of focus. Solution Move the lens cover slide to . When the camera is in PLAY mode, press the display/ENTER button to exit PLAY mode, then move the lens cover slide to .
TROUBLESHOOTING - CONT’D Problem Cause TROUBLSHOOTING - CONT’D Solution The subject is beyond the flash range. Be aware of the flash range of your camera, listed on page 34. The flash is not charged. The orange flash lamp blinks when the shutterrelease button is pressed partway down while the flash is charging. Wait until the flash lamp glows. All the images are too dark or too light. Exposure-compensation is not set to 0. Set the exposurecompensation value to 0 (P. 46, 47).
CARE AND STORAGE CARE AND STORAGE Operating Temperatures and Conditions Safety and Handling for Compact Flash Cards • This camera has been designed for use from 0°C to 40°C (32°F to 104°F). • Never leave the camera where it may be subjected to extreme temperatures, such as the glove compartment of a car. • Do not subject the camera to extreme humidity. • To prevent condensation from forming, place the camera in a sealed, plastic bag when bringing it from the cold exterior to a warm building.
CARE AND STORAGE - CONT’D TECHNICAL DETAILS Cleaning Camera Type • If the camera or lens is dirty, gently wipe it with a soft, clean, dry cloth. If the camera or lens comes in contact with sand, gently blow away loose particles, wiping may scratch the surface. • To clean the lens surface, first brush away any dust or blow away sand, then, if necessary, moisten a lens tissue with lens cleaning fluid and gently wipe the lens. • Never use organic solvents to clean the camera.
TECHNICAL DETAILS - CONT’D TECHNICAL DETAILS - CONT’D Exposure Control Interface Programmed AE Metering: Center weighted TTL metering by CCD Metering range: EV 2 to 16 Shutter speed: 1/500 sec. - 2 sec., Mechanical shutter control Exposure compensation: Up to ±2EV in 1/2 EV increments ISO sensitivity: approx. 85 equivalent / approx.
MEMO - 128 -
E Camera Instruction Manual Minolta Co., Ltd. 3-13, 2-Chome, Azuchi-Machi, Chuo-Ku, Osaka 541-8556, Japan Minolta Corporation Head Office Los Angeles Branch Minolta Canada Inc. Head Office Minolta Europe Minolta France S.A. Minolta (UK) Limited Minolta Austria Ges. m.b.H. Minolta Camera Benelux B.V. Belgium Branch Minolta (Schweiz) AG Minolta Svenska AB Finland Branch Minolta Portugal Limitada Minolta Hong Kong Limited Minolta Singapore (Pte) Ltd. 101 Williams Drive, Ramsey, New Jersey 07446, U.S.A.