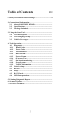
Table of Contents EN l. Safety Precautions and Warnings .....................................4 2. Generational Information.............................................. 2.1 About KONNWEI KW850........................................ 2.2 Specifications.............................................................. 2.3 Package Included....................................................... 3. Using the Scan Tool.............................................................. 2.4 Tool Description...............
1. Safety Precautions and Warnings To prevent personal injury or damage to vehicles and/or the scan tool, read this user’s manual first carefully and observe the following safety Precautions at a minimum whenever working on a vehicle: • • • • • • • • • • • Always perform automotive testing in a safe environment. Do not attempt to operate or observe the tool while driving a vehicle. Operating or observing the tool will cause driver distraction and could cause a fatal accident.
2. General Information 2.1 About KONNWEI KW850 The KONNWEI KW850 OBD2 / EOBD Car Diagnostic Scanner supports all 10 OBD II test modes on all OBD II compliant vehicles for a complete diagnosis. Featuring the unique patented One-Click I/M Readiness Key, TFT color display and built-in speaker, Real Time Battery Voltage Monitoring, the KONNWEI KW850 is truly the ultimate in power and affordability, allowing users to do their jobs faster.
3. Using the Scan Tool 3.1 Tool Description 1) OBD II CONNECTOR - Connects the scan tool to the vehicle’s Data Link Connector (DLC) 2) LCD DISPLAY - Displays menus and test results 3) GREEN LED - Indicates that engine systems are running 4) YELLOW LED- Indicates there is a possible problem. A “pending” DTC is present and/or some of the vehicle’s emission monitors have not run their diagnostic testing. 5) RED LED- Indicates there is a problem in one or more of the Vehicle’s systems.
) One-Click I/M Readiness Key - Quick-checks State Emissions readiness and drive cycle verification. 7) ESC BUTTON - Returns to previous menu 8) LEFT SCROLL BUTTON – More cursor left for selection, or turn page up when more than one page is displayed. 9) HELP BUTTON - Provides help information and Code Breaking Function. 10) UP SCROLL BUTTON - Move cursor up for selection 11) OK BUTTON- Confirms a selection (or action) from a menu list.
You can press UP/DOWN key to select any language and press OK button to confirm. The system will convert to the chosen language interface at once. 3.3 Vehicles Coverage The scan tool is specially designed to work with all OBD II compliant vehicle’s including control area network (CAN), it is required by EPA that all 1996 and newer vehicles (Cars and light trucks) sold in the united states must be OBD II compliant.
4. Tool Operation 1) 2) 3) 4) 5) Turn the ignition off, Locate the vehicle's 16-pin Data Link Connector(DLC)* Plug the OBD II cable into the vehicle’s DLC‘ Turn on the ignition and engine fully. After finishing, press OK button enter Main Menu as following CAUTION: Don’t disconnect any test equipment with ignition ON or engine Running.
4.1 Diagnostic Use the LEFT/RIGHT button or UP/DOWN button to select [Diagnostic] in Main Menu and press OK button, the screen will display Monitor Status interface as following flgure4.3: Monitor Status MIL Status DTCs in this ECU Readiness Completed Readiness Not Completed Readiness Not Supported DataStream Supported Ignition Protocol Type OFF 0 0 9 21 Spark VPW Figure 4.3 Press ESC button to back to the Main Menu of Diagnostic, the screen will display as following Figure 4.
Diagnostic Menu Read Codes Erase Codes l/M Readiness Data Stream Freeze Frame O2 Sensor Test On-Board Monitoring Evap System(mode $ 8) Figure 4.4 ? ? ? ? ? ? ? ? 4.1.1 Read Codes Select [Read Codes] and press OK button in Diagnostic Menu, if there are some codes, the screen will display the codes as shown below: • According to the above Figure to select different item by pressing UP or DOWN and press OK to confirm. Then you can use DOWN key to view the next code.
1) Current DTCs: Current DTCs is meaning the existing codes currently in your car computer’s engine systems, normally it can be reset by choosing function of “EASE CODE” 2) Pending DTCs: Pending DTCs are also referred to as “maturing codes” or “continuous monitor codes”. They indicate problems that the control module has detected during the current or last driving cycle but are not considered serious yet. Pending codes will not turn on the malfunction indicator light (MIL).
Press OK button to erase DTCs, and the screen will display the interface as shown below: According to the above figure to press OK button and the screen will display the interface as shown on the next page: Notes: • Before performing this function, make sure to retrieve and record the trouble codes. • After clearing, you should retrieve trouble codes once more or turn ignition on and Retrieve codes again.
Monitor Run Status. Select [I/M Readiness] and press OK button, the screen will display the interface as shown below: You can use UP/DOWN button to select and press OK button, the screen will display the interface as shown below: ·You can use LEFT/RIGHT button to view other data of vehicle. ·Press ESC to return to Diagnostic Menu。 ·N/A means not available on this vehicle, INC means incomplete or not ready, OK means Completed or Monitor OK 4.1.
Select [View All Items] and press OK button, the screen will display the interface as shown below: You can use LEFT/RIGHT button to view other data stream. Press ESC to return to Diagnostic Menu.
turn page, the screen will display the interface as shown on the next page: After selected items and press ESC, the screen will display the interface as shown below: Press ESC to return to Diagnostic Menu.
You can use UP/DOWN button to select single data stream items to view of live data with a graph, and press OK button, the screen will display the interface as shown below: Press ESC to return to Diagnostic Menu. You can view all data stream items or select a certain item of live data with a graph. 4.1.5 Freeze Frame When and emission-related fault occurs, certain vehicle conditions are recorded by the on-board computer. This information is referred to as freeze frame data.
4.1.6 O2 sensor Test The results of O2 sensor test are not live values but instead the results of the ECU’s last O2 sensor test. For live O2 sensor readings, refer to any of the live sensor screens such as Graph Screen. Not all test values are applicable to all vehicles. Therefore, the list generated will vary depending on vehicle. In addition, not all vehicles support the Oxygen Sensors screen.
Figure 4.23 You can use UP/DOWN button to select an item and press OK, the screen will display as shown below: Figure 4.24 Press ESC to return to Diagnostic Menu. 4.1.7 On-board monitoring This function can be utilized to read the results of on-board diagnostic monitoring tests for specific components/systems.
You can use UP/DOWN button to select an item and press OK, the screen will display as shown below: Press ESC to return to Diagnostic Menu. 4.1.8 Evap System The EVAP test function lets you initiate a leak test for the Vehicle’s EVAP system. The scan tool does not perform the leak test, but signals to vehicle’s on-board computer to initiate the test.
the procedures necessary to stop the test. Select [Evap System] and press OK, the screen will display their native information about EVAP system. Some vehicle manufacturers do not allow external devices to vehicle system. If the car supports this function, it will display as below: 4.1.
You can use UP/DOWN key to change the first letter. It can be switched among “P”, “B”,“C” and “U’ . Press OK moves the cursor to next. And then press LEFT/RIGHT key to input number. After you input the code number, press OK to view the definition of the code. 4.3 Review This function is used to review the recorded Data Streams, DTC, and Freeze.
Select [Delete DTC] in the Review and press OK and the screen will display the interface as showing below: Press OK to confirm, and press ESC to return to Main Menu. 5) Delete Data stream The operation is similar to the “Delete DTC” function. 6) Delete Freeze Frame The operation is similar to the “'Delete DTC” function. 4.4 Help This Function is used to view tool information, About OBD, and About Data stream.
Tool Information includes: software version, hardware version, serial number, supported, time and date. About OBD: Relevant introductions information about OBD. About Data stream: Relevant introductions information about Data stream. 4.5 BAT Check 4.6 LED Interpretation KW850 Supports Real-time Battery Monitoring, Displays the Voltage. <10.8V (before Starting)--Too Low, change battery, otherwise, might not be able to start. 10.8V-11.
certified. 2) YELLOW LED ~ With MIL off, there may be three possible conditions to cause the yellow LED to light. A. If a “stored” Diagnostic Trouble Code is causing the Yellow LED to light, it is still possible that the vehicle will be allowed to be tested for emissions and certified. B. If a “Pending” Diagnostic Trouble Code is causing the Yellow LED to light, it is still possible that the vehicle will be allowed to be tested for emissions and certified. C.
3) Run uplink.exe in your computer. 4) Use the UP/DOWN scroll button to select Print Data from Main Menuin the scan tool, and press the OK button. (Figure 5.2) Figure 5.
5) Use the UP/DOWN scroll button to select the desired item to print from Print Data menu. • To print all retrieved data, use the UP/DOWN scroll button to select Print All Data from Print Data menu. 6) Press the OK button to upload data to the computer. 7) In the uplink.exe Tool Kit, you could edit, delete, copy and print the data in the text box by selecting the by selecting the icons on the upper right of window.
Figure 6.1 NOTE: When you made a wrong choice and the scan tool is unable to work properly, you may need to update the programs. To hold LEFT scroll button and power on the scan tool, you will enter the update mode forcedly. Then follow the update procedure to refresh the program. 7. Service Procedures If you have any questions, please contact your local store, distributor or visit our official website at www.konnwei.com to get more information.