
User Manual

The Koolance COV-RP450 is designed for one PMP-450 or PMP-450S pump
(not included). It can be mounted to a 80-140mm fan grill, if available, using the
included bracket.
COV-RP450 Rev.2.0 Installation Guide v 1.0
1
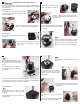
Pump Disassembly
The pump must be disassembled for installation.
Unscrew the large ribbed collar on the pump by hand
or with a strap wrench.
Remove the original pump o-ring and ribbed outer
collar. These are not used with the COV-RP450.
Pump Installation
Original pump o-ring (not used)
Take the Koolance black rubber o-ring from the
nozzle base.
4
Attach the acrylic partition with its 2 included
plastic screws.
Thread the included reservoir coupler onto
the pump base. Make sure both black
o-rings are in place and remain aligned
while tightening.
O-ring
O-ring
Screw the desired reservoir component(s) onto
the reservoir coupler. Reservoir components are
sold separately.
Gently tighten the reservoir components by
hand.
Add your desired nozzles to the inlet and outlet
sockets on the side of the COV-RP450.
2
Pull the pump wiring through the black metal ring
on the mounting bracket. Place the bracket down
over the pump.
3
If you are using the COV-RP450 mounting
bracket, attach the two metal wings to the
support bracket using the 2 included
screws.
The wing distance can be adjusted to
accommodate different fan grill widths
(80-140mm).
Use standard chassis fan screws to attach COV-RP450 to a rear fan. If there is
no fan available, any short bolt and nut can be used to attach the COV-RP450 to
the chassis fan grill (or another area, like onto a radiator).
Reservoir Installation
COV-RP450 includes the option to directly
mount a reservoir (reservoir components sold
separately).
If you are attaching a reservoir, remove the top
pump inlet plug.
Adjust Distance
Place this Koolance black o-ring around the rim
of the pump motor. Do NOT use the original
pump’s o-ring.
Place the cover plate over the rear of the pump. Notches
in the plate accommodate the pump wiring and speed
knob (if present).
With the pump o-ring in place, gently
insert the pump into the nozzle base.
Tighten the mounting bracket plate to the acetal
nozzle base with the four large supplied screws.
Tighten screws in a cross-pattern, but do not over
tighten or the nozzle base may become stripped.