® Superior Liquid Cooling Systems PSU-1000ATX-12N User’s Manual English v1.0 Protected by U.S. Patents 6,313,990; 6,664,627; 7,167,366; 7,295,436 Other Technology Pending U.S.
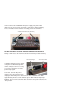
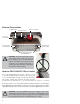
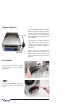
Your Koolance PSU-1000ATX-12N power supply may arrive with rubber inserts to protect the top nozzle connections during shipping. These should be removed before inserting your desired nozzles. Protective Nozzle Inserts (Remove) DO NOT ATTEMPT TO OPEN THE BOTTOM NOZZLE SOCKETS! Doing so will release the internal coolant and void the product warranty.
This User Manual is updated regularly. Please be sure to check our support page for a newer version of this guide: www.koolance.com/support GENERAL PRECAUTION Please read this manual carefully before beginning the installation of your Koolance system. This manual assumes the user has basic experience in building and configuring computer systems. Information referring to traditional hardware assembly is intentionally brief.
WARNING: Never open the power supply, expose the internal liquid coolant, or remove the internal liquid coolant. If liquid is removed, the power supply will be permanently damaged. All warranties are voided upon opening the product or removing its liquid. First aid measures are not anticipated if coolant ingestion has occured. If irritation has occured with eye or skin contact, flush with water for 15 minutes. Remove contact lenses. Call a physician if any irritation persists.
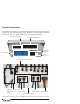
Internal Connections The modular connections must match their appropriate plug on the PSU (power supply unit). Pay careful attention to the direction of each plug and notch while inserting, as some are upside-down. Never force a plug into the PSU. 12V 8-pin (Motherboard) Motherboard Main ATX SATA, IDE, Peripherals PCI-Express *Internal Temp. Sensor PCI-Express 4 x 8-pin, 4 x 6-pin Peripheral x 2 Cables (IDE, Floppy, etc.
External Connections DC Signal Light Main AC Power In Main Power Switch (Not used) 12V Fan Out External Nozzle Socket (In/Out) External Nozzle Socket (In/Out) Plugs for Internal Coolant (DO NOT OPEN!!!) ! CAUTION: The bottom (internal) coolant socket plugs must remain closed at all times. Otherwise, the sealed internal fluid will leak. This liquid is not inexpensive and evaporates very quickly. Tampering or opening the bottom (internal) coolant plugs will void the product warranty.
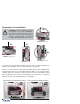
Preparation for Installation ! CAUTION: The PSU-1000ATX-12N must be mounted in one of the “CORRECT” orientations illustrated below. Other directions will not allow the pump to circulate coolant properly, or coolant will not fully submerge internal heat sources. UP INCORRECT Direction UP UP UP CORRECT PSU Direction CORRECT Direction INCORRECT Direction If your chassis has a rear PSU mounting plate, this may need slight modification to allow the PSU-1000ATX-12N rear heat exchanger to fit properly.
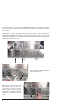
For most computer cases, the PSU-1000ATX-12N must be installed from inside the chassis due to its width. If you do not have a Koolance case, please skip to the next section. Most Koolance chassis must give up one hard drive cage in order to fit the PSU1000ATX-12N. Begin by removing the screws for this rear drive cage, the top screws for the front hard drive cage, and the PSU partition wall. Screws are located above and below the hard drive area. Remove the PSU partition wall and rear hard drive bay.
Support Bracket Bracket Wing The PSU-1000ATX-12N is supplied with an optional support bracket. For chassis with top-mounted power supplies (above the motherboard), the support bracket can help increase case stability. The bracket is screwed into the PSU’s cable panel, on the same side of the computer less frequently opened. It is adjustable to meet the computer’s side panel. Velcro strips are provided to be applied in between the bracket’s flat wing and the computer chassis side panel.
Tubing Connection Once the power supply is mounted inside the chassis, insert and tighten the desired inlet and outlet nozzles (purchased separately). These should only be installed on the top nozzle sockets! Attach the inlet and outlet tubing to the inlet and outlet nozzles. If you require the PSU-1000ATX-12N hoses to be connected inside the computer chassis, install the supplied L-bracket into an available rear card slot.
Specifications AC Input Operating Range: 110-240VAC, Auto-switching Frequency: 47-63Hz Current: 12A @ 110V, 6A @ 240VAC PFC: Active Efficiency: 80% min. DC Output Output Max: +5V @ 30A +3.3V @ 30A (combined +5V and +3.3V is 180W max.) +12V @ 70A (12V1@18A, 12V2@18A, 12V3@30A, 12V4@30A) -12V @ 0.8A +5VSB @ 3.0A Continuous Power: 1000W Regulation: 5%, -4% (3.3V, +5V, +12V, 5Vsb) +9-5%(-12V) Ripple & Noise: 50mV (3.3V, 5V, 5Vsb), 120mV (-12V), 240mV(+12V) Hold Time: 16ms min.
Limited Warranty Koolance Incorporated (“Koolance”) warrants each new PSU-1000ATX-12N liquidcooled power supply (“the system”), against defects in materials or workmanship for a period of three years from the date of purchase, and agrees to repair or replace any defective Koolance system without charge. Shipping costs are nonrefundable. This warranty is non-transferable. All warranty claims must be accompanied by the original proof of purchase.
www.koolance.