TABLE OF C ONTENTS ADJUSTING YOUR LCD MONITOR • General safety precautions ………………….…………… 2 ………………………………… 5 …………………………………………… 6 • Unpacking your monitor • Viewing angle -------------2 • Connecting your monitor …………………………… 7 ……………………………………………… 8 • OSD Functions and adjustments ……………….…..……… 9 • User controls • Menu adjustments …………………………….…..……… 10 • Refining the picture APPENDIX - ………………………….…..
Adjusting your lcd monitor General safety precautions This Monitor has been engineered and manufactured to assure your safety. Please read this manual and comply with the warnings and the procedures to avoid any serious electrical shock and other serious damage. 1. Do not place anything heavy, wet or magnetic on the monitor or power cord. Do not cover the ventilation openings nor touch them with metallic or flammable material. 2. High temperature can cause troubles.
Adjusting your lcd monitor 5. 6. 7. 8. Place the monitor on a flat surface to prevent it from falling. Do not apply any mechanical shocks to the machine. Install it in a well-ventilated area or secure enough space for ventilation. Turn the monitor off before connecting it to the power outlet.
Adjusting your lcd monitor 9. Make sure that the power cord and the other cords are properly connected. 10.Overloaded AC outlets and extension cords are dangerous. Also, the frayed power cords and the broken plugs may cause electric shock or fire. 11.Do not open the monitor. There are no user-serviceable components inside. There is a risk of exposure to highvoltage electricity inside, even when power is turned off.
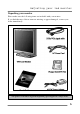
Adjusting your lcd monitor Unpacking your monitor Please make sure the following items are included with your monitor. If you find that any of these items are missing or appear damaged, contact your dealer immediately. The power cord can be different depending upon different voltage areas.
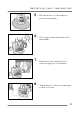
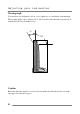
Adjusting your lcd monitor Viewing angle Your monitor was designed to allow you to adjust it to a comfortable viewing angle. The viewing angle can be adjusted 2? to 90? forward and backward respectively as indicated by the arrow marks below. 2? 90? Caution Basically when the monitor is in used, please make sure that the monitor is at the safe angle less then 45 degrees.
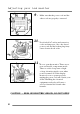
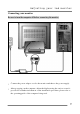
Adjusting your lcd monitor Connecting your monitor Be sure to turn the computer off before connecting the monitor ? Connect the power adaptor cord to the monitor and then to the power supply. ? After powering on the computer, adjust the display using the various controls provided. For further information on the installation procedure, please refer to the operating guide of the computer being used.
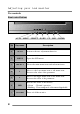
Adjusting your lcd monitor User controls Front control buttons AUTO MENU No. Key name 8 SELECT DOWN UP LED POWER Description 1 AUTO Activates the auto adjustment function. 2 MENU Opens the OSD menu. 3 SELECT Selects the main menu items and sub-menu items. 4 ◀ Moves to the lower menu item or sub-menu item. Decreases the value of the parameter. 5 ▶ Moves to the upper menu item or sub-menu item. Increases the value of the parameter.
Adjusting your lcd monitor OSD Functions and adjustments Main menu and control selection Press the MENU key to access the main menu. Place the color box on the control icon you wish to adjust by pressing using the ◀ or ▶ key. Press the SELECT key to access the control. Exit menu Press the MENU key to exit the OSD screen. Auto exit The OSD menu will disappear automatically after a few second of inactivity. Auto save The monitor automatically saves the new values when OSD closes.
Adjusting your lcd monitor Menu adjustments Icon Settings and sub-menus BRIGHTNESS CONTRAST AUTO-ADJUST 10 Description • IMAGE BRIGHTNESS CONTROL • IMAGE CONTRAST CONTROL • AUTOMATICALLY IMAGE SHARPNESS CONTROL AND NOISE ELIMINATION. POSITION • H&V POSITION, CLOCK & PHASE CONTROL.
Adjusting your lcd monitor Icon Settings and sub-menus COLOR Description • WHITE BALANCE CONTROL Preset Color 1 • ONE OF FACTORY SET OF WHITE BALANCE Preset Color 2 • ONE OF FACTORY SET OF WHITE BALANCE User Color • USER CAN CHANGE THE WHITE LEVEL LANGUAGE • OSD ADJUST • OSD WINDOW & OSD TIME CONTROL LANGUAGE SELECTION Horizontal Position Vertical Position OSD TIME INFORMATION • Information of input timing. • This message is displayed after a few seconds of no input signal.
Adjusting your lcd monitor Refining the picture At first display, a full screen, such as window background or "H" Step 1 character should be achieved by using editor. Adjust the screen to the center of the display (LCD), by using the top and bottom display controls (i.e. using Vertical position menu). Step 2 Adjust the screen to the center of the display (LCD) by using the right and left display controls (i.e. using Horizontal position menu).
APPENDIX Power management function This monitor is equipped with a DPMS(Display Power Management Signaling) function that automatically cuts the power dissipation down to less than 5W when the computer is left unattended. Although the monitor can be left in power-saving mode for longer periods, we recommend that you turn it off after your daily work. Status Description Green Power on. Blink (Amber/Green) Power saving. Red Non operating / Abnormal operating.
APPENDIX Display modes For the display modes listed below, the screen image has been optimized during production. Preset timing modes. Mode Display Mode Horizontal Frequency (KHz) Vertical Frequency (Hz) Standard Type 640 x 350 31.5KHz 70Hz IBM ? 720 x 400 31.5KHz 70Hz IBM ? 640 x 480 31.5KHz 60Hz Industry Standard 640 x 480 37.9KHz 72Hz VESA Standard 640 x 480 37.5KHz 75Hz VESA Standard 640 x 480 43.3KHz 85Hz VESA Standard 800 x 600 35.
APPENDIX Troubleshooting Warning : This section will try to anticipate potential problems that you may encounter in the day-to-day use of your monitor. If after trying the suggested solutions, your monitor’ s symptom remains the same, contact your authorized service center. Troubleshooting problems Problems LED ON No Picture LED OFF LED Amber Display is not clear Corrective Actions • Using OSD, adjust Brightness and Contrast to maximum or reset to their default settings. • Check the power switch.
APPENDIX Problems Corrective Actions Out of Range • Check the maximum resolution and the frequency on the video port of your computer. Picture is scrambled • Check the signal cable connection between the computer and monitor. Picture is fuzzy 16 • Perform Auto adjustment. Picture bounces or has wavy oscillations • Check the signal cable connection between computer and monitor. Picture appears to be ghosting • Check the signal cable connection between computer and monitor.
APPENDIX Specifications Type LCD viewable size Pixel pitch 17” viewable diagonal TFT type 0.088 mm (H) x RGB x 0.264 mm (V) Viewable angle L/R : 65˚, U/D : 40˚/65˚ Glass surface Anti-glare, Hard coating. Contrast ratio 400:1 (Typical) Response time 25ms(Rising + Falling) Display mode Normally white Brightness 250 cd/ m2 Input resolution RGB Analog, Fh : 31.