Congratulations! Congratulations on your purchase of a state-of-the-art TFT-LCD monitor by Korea Data Systems Co., Ltd. (KDS) We know you will be pleased with your investment and will enjoy the dynamic viewing experience — You will never look at digital images the same again! Our monitor is easy to set up. Just follow these simple instructions and you will be viewing a “new digital world” in no time: Connect the monitor to your PC.
Table of Contents General Information Safety Symbols . . . . . . . . . . . . . . . . . . . . . . . . . . . . . . . . . . . . . . . . Warning ............................................. Caution ............................................. LCD Panel .......................................... Unpacking Your Monitor and Taking Inventory of the Parts . . . . . . 2 3 6 7 8 Component Information The Front of the Monitor . . . . . . . . . . . . . . . . . . . . .. . ... . . . . . . . .
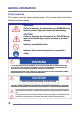
GENERAL INFORMATION Safety Symbols This manual uses the safety symbols below. They denote critical information. Please read them carefully. WARNING Failure to abide by the information in a WARNING may result in serious injury and can be life threatening CAUTION Failure to abide by the information in a CAUTION may result in moderate injury and/or property or product damage Indicates a prohibited action Indicates that an electrical ground is required for safety.
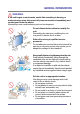
GENERAL INFORMATION WARNING If the unit begins to emit smoke, smells like something is burning or makes strange noise, disconnect all power connections immediately and contact your dealer for advice. Attempting to use a malfunctioning unit can be dangerous. Do not dismantle the cabinet or modify the unit. Dismantling the cabinet or modifying the unit may result in electric shock or burn. Refer all servicing to qualified service personnel.
GENERAL INFORMATION Place the unit on a strong, stable surface A unit placed on an inadequate surface may fall, resulting in injury or equipment damage. When the unit is dropped, please ask your dealer for advice. Do not continue using a damaged unit. Using a damaged unit may result in fire or electric shock To avoid danger or suffocation, keep the plastic packing bags away from babies and children.
GENERAL INFORMATION The equipment must be connected to a grounded main outlet. Not doing so may cause fire or electric shock. To disconnect the power cord, grasp the plug firmly and pull. Never tug on the cord, doing so may cause damage and could result in fire or electric shock. Handle the power cord with care. Do not place the cord underneath the unit or other heavy objects. Do not pull on or tie the cord. If the power cord becomes damaged, stop using it.
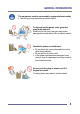
GENERAL INFORMATION CAUTION Handle with care when moving the unit. Disconnect the power cord and cables when moving the unit. Moving the unit with the cord attached is dangerous. It may result in injury or equipment damage. When handling the unit, grip the bottom of the unit firmly with both hands, ensuring the panel faces outward before lifting. Dropping the unit may result in injury or equipment damage. Do not block the ventilation slots on the cabinet.
GENERAL INFORMATION LCD Panel The screen may have defective pixels. These pixels may appear as slightly light or dark areas on the screen. This is due to the characteristics of the panel itself and not the product. The backlight of the LCD panel has a fixed life span. When the screen becomes dark or begins to flicker, please contact your dealer. Do not press on the panel or edge of the frame strongly, as this will result in damage to the screen.
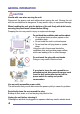
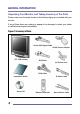
GENERAL INFORMATION Unpacking Your Monitor and Taking Inventory of the Parts Please make sure the parts shown in the following figure are included with your monitor. If any of these items are missing or appear to be damaged, contact your dealer or call technical support immediately.
GENERAL INFORMATION NOTE: Depending on the voltage requirements for your area, the power cord may be different than what is indicated in the figure. When unpacking the monitor and its components: • Carefully open the box. • Lay the box flat on a table and carefully slide the contents out of the box. • Do not “dump” the contents out of the box. When inspecting the monitor and its components: • Verify all the components are present, according to the previous figure. • Verify the parts are not damaged.
COMPONENTS The Front of the Monitor 1 2 Figure 2: CT1702 Front of the Monitor No. 1 2 Item LCD Panel (screen) Built-In Speakers 3 MENU 4 SELECT 34 5 6 7 8 9 10 Function 17” TFT-LCD, max resolution 1280 x 1024. After connecting the audio input, you can use the speakers : 1W output Pressing this button displays the main menu. Pressing this button selects the highlighted menu item. Pressing this button moves to the next lower menu item.
COMPONENTS The Back of the Monitor (Connection Locations) Figure 3: CT1702 Connection Locations (Back of the Monitor) No.
COMPONENTS Adjusting the Tilt / Viewing Angle Your monitor was designed to allow you to adjust it to a comfortable viewing angle. The monitor can be tilted back -3º ~ -40 degrees. Figure 4: CT1702 Tilt Angle REMINDER: To prevent the monitor from falling over, make sure it is within the safe viewing angle range.
COMPONENTS Power Management Function This monitor is equipped with a Display Power Management Signaling(DPMS) function that automatically cuts the power dissipation down to less than 5Watt when the computer is left unattended. TIP: Although the monitor can be left in power-saving mode for longer periods, we recommend that you turn it off after your daily work is through. Power Light Status Green Amber/ Blink Description Power on. Power saving mode enabled.
CONNECTING Connecting Your Monitor to Your Computer 1. Turn off and unplug your computer until instructed otherwise. 2. Carefully unpack all the components and verify that all parts are present and undamaged see page 8. 3. Organize the cables you need and familiarize yourself with the connection configuration for the CT1702, see pages 11 & 16. 4. With the Monitor laying screen-side down on a smooth, clean surface, flip open the Monitor base.
CONNECTING REMINDER: Do not plug the power cord into the wall outlet or surge protector yet. 12. Stand your Monitor up and adjust it to the most comfortable viewing angle (see page 12). 13. Plug the power cords for both the monitor and computer in to the wall power outlet or surge protector. 14. Turn both the monitor and computer on. 15. Remove the plastic protective cover from the front of the Monitor. 16.
CONNECTING Connecting the PC 16
CONNECTING Connecting Your Monitor to a Tuner (TV/CATV) 1. Carefully unpack all the components and verify all the parts are present and undamaged. (See page 8.) 2. Organize the cables you need and familiarize yourself with the connection configuration for the CT1702, see pages 11 & 16. 3. With the Monitor laying screen-side down on a smooth, clean surface, flip open the Monitor base. TIP: For easier access to the cable connections, keep the monitor laying screen-side down on a smooth surface. 4.
CONNECTING 11. Remove the plastic protective cover from the front of the Monitor. 12. Pressing either the SELECT button on the front of the Monitor (page 12) or the SOURCE button on the Remote Control (page 15), scroll to the TUNER Input Source option. REMINDER: Insert the battery into the Remote Control. 13. Using the On Screen Display (OSD) menus, select the appropriate antenna type. (See page 35.) 14. If necessary, onfigure the Tuner to automatically search for the channels. (See page 31.) 15.
CONNECTING Connecting a Television Set(CT1702T only) • Connect the antenna cable to the monitor directly, or via a video recorder, as shown in the figure below.
CONNECTING Other External A/V Devices to Your Monitor 1. Carefully unpack all the components and verify all the parts are present and undamaged. (See page 8.) 2. Organize the cables you need and familiarize yourself with the connection configuration for the CT1702, see pages 11 & 16. 3. With the Monitor laying screen-side down on a smooth, clean surface, flip open the Monitor base. TIP: For easier access to the cable connections, keep the monitor laying screen-side down on a smooth surface. 4.
CONNECTING 12. Remove the plastic protective cover from the front of the Monitor. 13. Pressing either the SELECT button on the front of the Monitor (page 12) or the SOURCE button on the Remote Control (page 15), scroll to the SVIDEO or COMPOSITE Input Source option, whichever is appropriate for your system. REMINDER: Insert the battery into the Remote Control. 14. If necessary, fine-tune the display by using the On Screen Display (OSD) menus (image position, brightness, and other items). (see page 39). 15.
CONNECTING Connecting External Appliances (video recorder, DVD, camcorder) • Connect external appliances to the monitor by using the cables according to the figure below.
CONNECTING Function of the Remote controller No Key 1 Power Key Turns on/off the monitor. 2 Menu Key Press the MENU to display the menu screen 3 Channel Up Key 4 Channel Down Key 5 6 7 Volume Up Key Volume Down Key Mute Key Description a. Moves to higher menu items or sub-menu items in the menu screen. (All mode) b. Selects next higher channel. (Only TV[Tuner] Mode) a. Moves to lower menu items or sub-menu items in the menu screen. (All mode) b. Selects next lower channel.