Thank you for purchasing the Korg Digital Piano Concert C-4500. To ensure long, trouble-free operation, please read this manual carefully. Owner’s Manual Main features------------------------------- 4 Parts of the C-4500 and their function ----- 4 Recording / playing back your performance ------------------------ 17 1. Recording your performance ----- 17 2. Playing back your recorded performance ------------------------- 18 3.
INSTRUCTIONS PERTAINING TO A RISK OF FIRE, ELECTRIC SHOCK, OR INJURY TO PERSONS IMPORTANT SAFETY INSTRUCTIONS WARNING—When using electric products, basic precautions should always be followed, including the following: 1) Read all the instructions before using the product. 2) Do not use this product near water—for example, near a bathtub, washbowl, kitchen sink, in a wet basement, or near a swimming pool, or the like.
About the backup battery This product contains a backup battery that prevents the contents of internal memory from being lost when the power is turned off. If the [TOUCH] switch indicator blinks when the power is turned on, the battery must be replaced. Please contact a nearby Korg dealer or a Korg service center. ❍ When you press the [TOUCH] switch, it will stop blinking.
Main features A wide variety of sounds Parts of the C-4500 and their function (☞p.11) Six different expressive and high-quality sounds, including a concert grand piano, are produced by Korg's proprietary HI (Hyper Integrated) synthesis system. You can use the Layer or Split functions to play two sounds simultaneously. Effects (☞p.11) The C-4500 provides built-in digital effects that can simulate the reverberation of a concert hall or add rich spaciousness. Pedal effects (☞p.
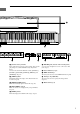
G C3 C4 C5 C6 C7 E C8 F 8 9 0 A B 8 [Sound selector] switches These switczhes are used to select sounds. You can also play using two sounds simultaneously (Layer functions). You can select from six different sounds: [PIANO 1], [PIANO 2], [E.PIANO], [HARPSI], [ORGAN], and [STRINGS]. (☞p.11) C PHONES jack (located on the bottom panel) A set of stereo headphones can be connected to this jack. (☞p.7) 9 [TEMPO] slider This slider adjusts the tempo of the metronome and recorder (☞p.13).
Switch functions By pressing two switches simultaneously, you can access the following functions. ❍ [Sound selector] switches + Local on/off (☞p.20) + 2 beats Program change on/off 3 beats Control change on/off PC I/F frequency (☞p.22) 4 beats + L M H (☞p.14) + L M H (☞p.11) + L M H (☞p.11) + L M H (☞p.12) Data dump (☞p.21) 38.4kBPS 31.25kBPS 6 beats (☞p.13) Metronome click (☞p.13) Accent note bell Werkmeister Kirnberger (☞p.15) ❍ Recorder section + Erase part 1 (☞p.
Before you begin playing 1. Plug in the power cable. Plug the power cable into an outlet. Make sure that the AC outlet is the correct voltage for your piano. 2. Open the keyboard cover. Lightly lift the center of the front edge, and support it as you slide the cover gently away from yourself. 4. Adjust the volume. Use the [MASTER VOLUME] slider to control the volume that is output from the built-in speakers, the headphone jack, and the rear panel [OUTPUT] jacks.
Listening to the demo songs 1. 2. 3. 4. 5. 6. PIANO1 PIANO2 E.PIANO HARPSI ORGAN STRINGS F.Chopin / Fantasy-Impromptu Op.66 KORG Original / Harmony of Love KORG Original / The Harp of Wind J.S.Bach / Italian Concert BWV971 F.Mendelssohn / Wedding March J.S.Bach / Air on the G string 7. 8. 9. 10. 11. 12. PIANO1 PIANO2 E.PIANO HARPSI ORGAN STRINGS L.v.Beethoven / For Elise W.A.Mozart / Sonata K.331 F.Burgmuller / "La chevaleresque" Op.100-25 F.Mendelssohn / Springs Song Op.62-6 R.Schumann / A Dream Op.
Playing the C-4500 2. Adding effects to the sound 1. Selecting a sound Adjusting the brightness ❍ Press a [Sound selector] switch to select the desired sound. The indicator of the [Sound selector] switch you pressed will light. The brightness can be adjusted independently for each sound. This setting is remembered for each sound until you change it. 1. Hold down the [BRILLIANCE] switch, and press either the [PIANO 1/L], [PIANO 2/M], or [E.
Adding spaciousness You can apply modulation to the sound currently selected by the [Sound selector] switches, to create a sense of spaciousness and richness. This is called the Chorus effect. The Chorus effect can be set independently for each sound. This setting is remembered for each sound until you change it. 3. Using the pedals This instrument has three pedals: damper, sostenuto, and soft. They can be used to make your performance more expressive. 1.
4. Playing with the metronome Adjusting the volume If you wish to play at an accurate tempo, it is convenient to use the metronome. This metronome also sets the time signature and tempo used when you record a performance (☞p.17). 1. Press the [METRONOME] switch to start the metronome. Sounding the metronome 1. Press the [METRONOME] switch, and the metronome will start. 2. To increase the volume, hold down the [METRONOME] switch and repeatedly press the [PART 2] switch.
5. Adjusting the keyboard touch 6. Changing keys (Transpose) You can adjust the way in which the dynamics respond to your playing strength. This is called the Touch Control function. By changing the key (transposing), you can play a song using easier fingering that uses fewer black keys, or use familiar fingering to play a song at a pitch that matches another instrument or vocalist. This is called the Transpose function. 1.
7. Adjusting the pitch 8. Selecting a temperament You can make fine adjustments to the pitch. This allows you to precisely match the pitch when playing with other instruments. The pitch can be adjusted in 0.5 Hz steps over a range of 427.5–452.5 Hz (Hertz). There are numerous classical compositions that were composed using temperaments that differ from the “equal temperament” commonly used today.
Recording / playing back your performance The C-4500 contains a built-in recorder that lets you record and playback your performance as easily as using a tape recorder. You can record your playing on two parts. These parts can be played back simultaneously to create a single song, or used to record two separate songs. 4. Recording will begin when you press either the [START/STOP] switch, a note, or a pedal, or when a MIDI message is received.
2. Playing back your recorded performance 3. Erasing recorded data To play back your recorded performance 1. While playback is stopped, hold down the [TRANSPOSE/FUNCTION] switch, and press either the [PART 1] or [PART 2] switch. The indicators of the [TRANSPOSE/FUNCTION] switch and either the [PART 1] or [PART 2] switches will blink, and the C-4500 will be ready to erase recorded data. 1. If there is recorded data, the indicator(s) of the [PART 1] and/or [PART 2] switches will light green.
Connecting other devices 2. Connecting MIDI equipment What is MIDI? You can connect another keyboard, module or CD player into this instrument so that sound from the other device can be heard through the speakers/ headphones of the C-4500, or connect the C-4500 to your audio system to record your playing on a tape recorder, etc. INPUT jacks (L/MONO, R) These jacks can be connected to the output jacks of another instrument (synthesizer etc.
MIDI channel Program changes When you have finished making MIDI connections, set the C-4500 and the connected MIDI device to the same MIDI channel. There are sixteen MIDI channels: 1–16. Program change messages can be transmitted from the C-4500 to a connected MIDI device to select sounds, or transmitted from a connected MIDI device to select sounds on the C-4500. ❍ Hold down the [TRANSPOSE/FUNCTION] switch, and press a note in the range of C2–D#3 that corresponds to the desired MIDI channel.
MeMO When the power is turned on, program changes will be enabled for all MIDI channels. Control changes Operations of the C-4500’s damper pedal etc. can be transmitted to control a connected external MIDI device, or damper pedal data etc. from an external MIDI device can be received by the C-4500 to control it. If you wish to transmit and receive this data, you can Enable control changes. If you do not wish to transmit or receive this data, you can Cancel control changes.
Connecting an IBM PC compatible 3. Connecting a computer A special PC I/F cable can be used to connect the C4500 to your computer, allowing the C-4500 to be played from your computer or a performance on the C-4500 to be recorded on your computer in the same way as when using MIDI. The C-4500 can be connected using a special PC I/F cable to an IBM PC compatible or to an Apple Macintosh computer. The PC/MIDI select switch must be moved only when the power is turned off.
Troubleshooting The pitch or tone of piano sounds is wrong in certain key ranges • Power does not turn on • • • Is the power cable connected to an appropriate AC outlet? (☞p.7) Is the power switch turned on? (☞p.7) If the power still does not turn on, disconnect the power cable from the AC outlet, and contact a nearby Korg service center. Pedal effects do not apply correctly • No sound • • • • Is the [MASTER VOLUME] slider raised? (☞p.7) Have headphones been plugged in? (☞p.
Specifications Keyboard Sounds Tone generator system Polyphony Effects Recorder Keyboard modes Temperaments Touch control Controls Pedals Connectors Main amp Speakers Power supply Power consumption Dimensions Weight (with stand) Included items Options 88 note (A0–C8) 6 sounds: Piano 1, Piano 2, Electric piano, Harpsichord, Organ, Strings HI synthesis system 64 notes Reverb (3 levels), chorus (3 levels), brilliance (3 levels) 2 parts (maximum capacity 14,000 notes) Tempo, Metronome, Record, Start/stop, Paus
2. Attach the side panel (left) 1 and side panel (right) 2 to the pedal box 3, and use four long screws 5 to fasten them. Assembling the ST-4500 Caution 2 Use two or more people to assemble the stand. When placing the piano on the stand, be careful not to pinch your hand. Be sure that the correct parts are assembled in the correct orientation, and follow the steps in the order that they are given. 5 3 • Pull out the Pedal Cord. • Screw the Adjuster 6 into the Pedal 1 Box 3 until it is all the way in.
5. Connect the pedal cable and power cable, and fasten them. Connect the power cable included with the piano to the socket located on the back of the piano. Check after assembly [ ] Are any parts left over? If any parts are left over, check the diagrams to see where they should be used. [ ] Make sure that all screws are tight. Insert the pedal cable connector into the pedal connector located on the bottom of the piano. Be sure that the connector is inserted in the correct orientation.
[Digtal piano] C-4500 MIDI Implementation Chart Function Transmitting Receiving Remarks 1 Basic channel Default Changed Mode Default Message Altered X ************** True Voice 15–113 ************** 0–127 21–108 Note ON O 9n, V=1–127 O 9n, V=1–127 Note OFF X X Key's X X Ch's X X X X 7 11 O O O O Volume Expression 64 66 67 O O O O O O Damper pedal Sostenuto pedal Soft pedal O 0–20 O 0–20 ************** 0–20 O O :Song position :Song select :Tune X X X X X X :Clock
NOTICE KORG products are manufactured under strict specifications and voltages required by each country. These products are warranted by the KORG distributor only in each country. Any KORG product not sold with a warranty card or carrying a serial number disqualifies the product sold from the manufacturer’s/distributor’s warranty and liability. This requirement is for your own protection and safety. E KORG INC. ©1999 KORG INC.