
Electronic Keyboard User Manual


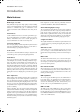
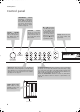
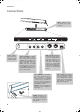
Table Of Contents
- Introduction
- Main features
- Wide range of sounds
- Performances
- Four zones keyboard
- Touch control
- Pedal effects
- Piano eXperience
- One-hundred eighty-five songs
- SongBook included
- Onboard recorder
- Metronome
- Data transfer via USB
- MIDI capabilities
- MIDI over USB
- Temperaments
- Adjustable pitch
- Effects
- Powerful integrated amplification
- Two sets of headphones
- Main features
- Control panel
- Connections
- Before you begin
- Basic functions
- Using performances
- The metronome
- Playing back a song
- Recording a song
- Quick recording procedure
- Step 1: Entering the Record mode
- Step 2: Selecting sounds
- Step 3: Setting the record options
- Step 4: Setting the time signature and tempo
- Step 5: Recording
- Step 6: Second-pass recording
- Changing sounds to a recorded song
- Changing tempo to a recorded song
- Pedal Punch recording
- Auto Punch recording
- Saving the song
- Editing a song
- Editing sounds and performances
- Accessing the Sound edit mode
- Exit from the Sound edit mode
- Saving a sound
- Saving a performance
- Setting the volume
- Adjusting the panning
- Adjusting the effects
- Setting the reverb effect
- Setting the chorus or modulation effect
- Setting the insert effects
- Setting the octave transposition
- Adjusting the fine tune
- Programming the pedals
- Selecting a scale
- Resetting the current sound and performance
- Global settings
- Accessing Global edit
- Exit from the Global edit mode
- Touch settings
- Turning the internal speakers on or off
- Master tuning
- Brilliance
- Default split point
- Assigning functions to the pedals
- Quarter Tone (SubScale realtime programming)
- Fast Play
- Mute Level
- Turning the keyboard on or off (Local Control)
- MIDI Clock
- MIDI IN Channels
- MIDI OUT Channels
- MIDI Filters
- Data transfer via the USB port
- Erasing songs from the User Song album
- General Reset
- System version number
- MIDI
- Installing the Korg USB MIDI Driver
- Assembling the stand
- Appendix
- Sounds
- Performances
- Effects
- Songs
- Error messages
- Write Protect
- Out of Memoy
- Maximum song length reached
- Loading Song Error
- USB Working Wait please
- Memory Full
- Invalid Name
- Song Exists Execute
- Record Mode Not Allowed
- Song Modified Save?
- Sound Modified Save?
- Perf. Modified Save?
- Globals Modified Save?
- Save Global Failure
- Save Preset Failure
- Save Midi Failure
- General Reset Wait Please
- General Reset / nn%
- Troubleshooting
- Polyphony
- Technical specifications
- MIDI Implementation Chart
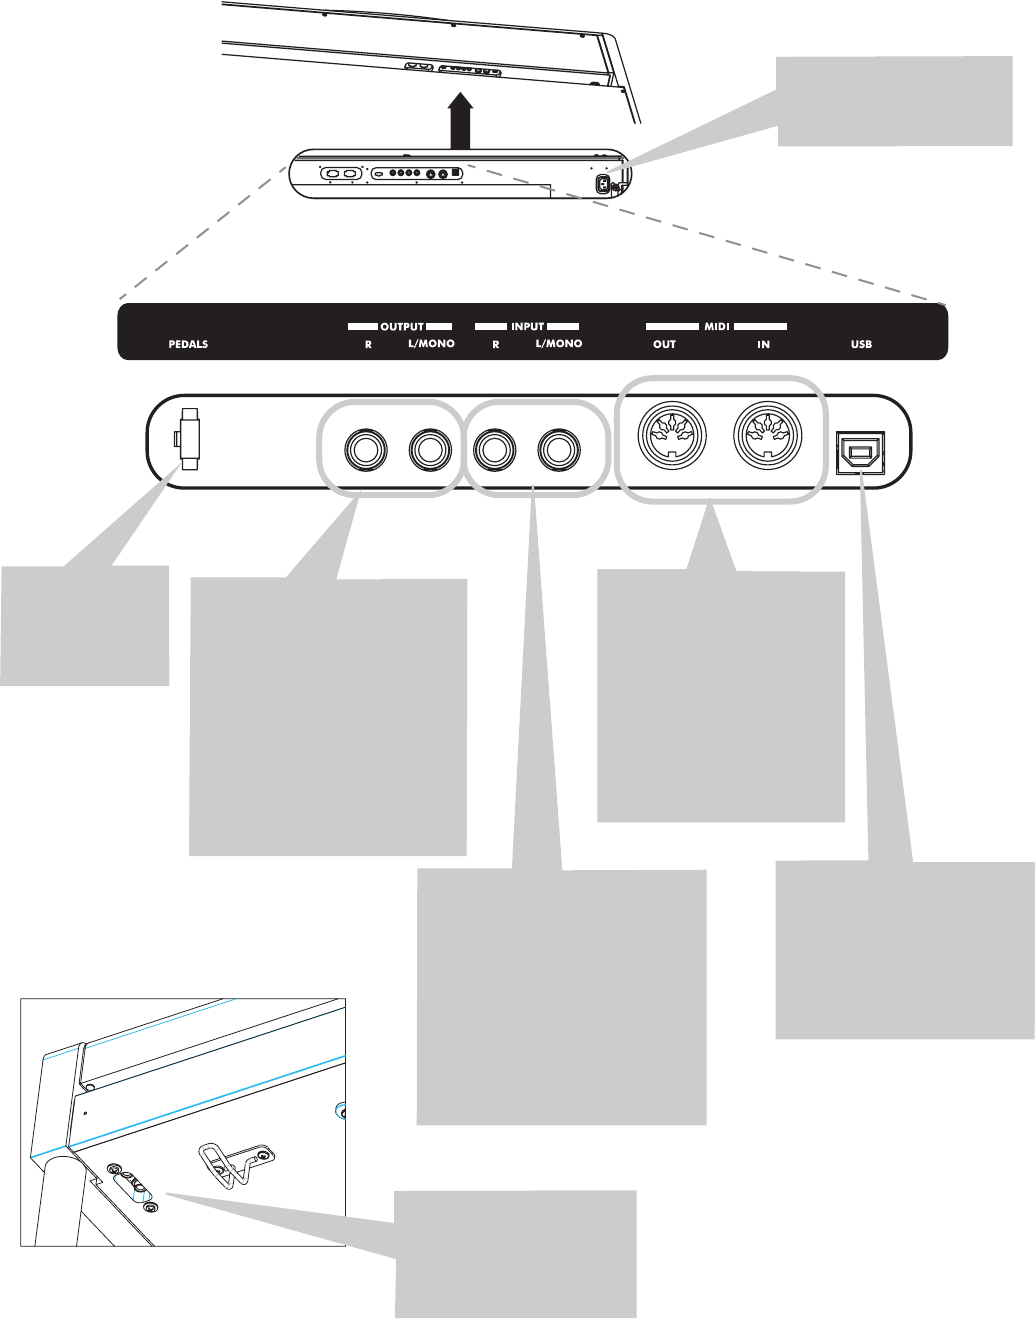
Connections
>
8
Headphone Hook
Connections
MIDI (OUT, IN) connectors:
Connectors that are used to
connect other MIDI devices
(sequencer, keyboards, etc.).
OUT: Data output (to be
connected to the MIDI IN
connector of another MIDI
device). IN: Data input (to be
connected to the MIDI OUT
connector of another MIDI
device).
Pedals connec-
tor:
Connect the
supplied pedals
to this connector.
OUTPUT (L/MONO, R) connec-
tors:
Audio outputs. Connect
these connectors to an external
amplifying system. (With a hi-fi
system use the LINE, AUX, CD or
TAPE connectors, not the
PHONO connector). To amplify
the C-720 in mono, connect the
single L/MONO connector. Use
the MASTER VOLUME knob to
set the output volume.
USB connector:
Type B (slave),
USB 1.1-compliant, standard
connector. Connects to a per-
sonal computer (PC or Mac).
Can be used for data transfer
(see page 53), or USB Over
MIDI use (see page 56).
PHONES connectors:
Con-
nect one or two pairs of
headphones to these jacks.
The integrated speakers
will turn off.
INPUT (L/MONO, R) connectors:
Line audio inputs. Connect to
these connectors an external
audio source, such as a CD, MP3
or tape player, or another key-
board. To connect a microphone,
you need an external microphone
preamplifier or a mixer.
Warning:
Avoid connecting the
output of a power amplifier to
these inputs!
MAINS socket:
Connect
the power cord to this
connector.
C720_English.fm Page 8 Tuesday, October 10, 2006 4:14 PM