
Electronic Keyboard User Manual


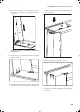
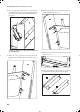

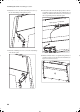
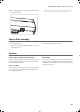

Table Of Contents
- Introduction
- Main features
- Wide range of sounds
- Performances
- Four zones keyboard
- Touch control
- Pedal effects
- Piano eXperience
- One-hundred eighty-five songs
- SongBook included
- Onboard recorder
- Metronome
- Data transfer via USB
- MIDI capabilities
- MIDI over USB
- Temperaments
- Adjustable pitch
- Effects
- Powerful integrated amplification
- Two sets of headphones
- Main features
- Control panel
- Connections
- Before you begin
- Basic functions
- Using performances
- The metronome
- Playing back a song
- Recording a song
- Quick recording procedure
- Step 1: Entering the Record mode
- Step 2: Selecting sounds
- Step 3: Setting the record options
- Step 4: Setting the time signature and tempo
- Step 5: Recording
- Step 6: Second-pass recording
- Changing sounds to a recorded song
- Changing tempo to a recorded song
- Pedal Punch recording
- Auto Punch recording
- Saving the song
- Editing a song
- Editing sounds and performances
- Accessing the Sound edit mode
- Exit from the Sound edit mode
- Saving a sound
- Saving a performance
- Setting the volume
- Adjusting the panning
- Adjusting the effects
- Setting the reverb effect
- Setting the chorus or modulation effect
- Setting the insert effects
- Setting the octave transposition
- Adjusting the fine tune
- Programming the pedals
- Selecting a scale
- Resetting the current sound and performance
- Global settings
- Accessing Global edit
- Exit from the Global edit mode
- Touch settings
- Turning the internal speakers on or off
- Master tuning
- Brilliance
- Default split point
- Assigning functions to the pedals
- Quarter Tone (SubScale realtime programming)
- Fast Play
- Mute Level
- Turning the keyboard on or off (Local Control)
- MIDI Clock
- MIDI IN Channels
- MIDI OUT Channels
- MIDI Filters
- Data transfer via the USB port
- Erasing songs from the User Song album
- General Reset
- System version number
- MIDI
- Installing the Korg USB MIDI Driver
- Assembling the stand
- Appendix
- Sounds
- Performances
- Effects
- Songs
- Error messages
- Write Protect
- Out of Memoy
- Maximum song length reached
- Loading Song Error
- USB Working Wait please
- Memory Full
- Invalid Name
- Song Exists Execute
- Record Mode Not Allowed
- Song Modified Save?
- Sound Modified Save?
- Perf. Modified Save?
- Globals Modified Save?
- Save Global Failure
- Save Preset Failure
- Save Midi Failure
- General Reset Wait Please
- General Reset / nn%
- Troubleshooting
- Polyphony
- Technical specifications
- MIDI Implementation Chart
Assembling the stand > Assembling procedure
65
13.Apply the hoods (e) to the rounded sides of the side pan-
els.
14.Attach the instrument. Warning: The side panels are easily
scratched; please use caution.
Lift the instrument with both hands, being careful to
keep them not closer than 70mm from both ends of the
piano to avoid pinching. Position the screw heads pro-
truding from the inside of the left and right side panels, so
that they are aligned with the grooves at the left and right
ends of the instrument. and gently lower the instrument
onto the stand. If the instrument is aligned correctly, the
screws on the inside of the side panels will fit firmly into
the grooves.
Warning: Carefully lower the left and right ends of the
instrument evenly, keeping the instrument at level, and
being careful not to pinch your hand or drop the instru-
ment. Lifting only one side is very dangerous and may
also damage the metal fixtures of the instrument itself.
You must raise or lower both left and right ends of the
instrument simultaneously, keeping the instrument at
level.
You can perform this step more easily if you use your body
to apply pressure to the side panel of the stand while slid-
ing the instrument onto the stand.
Make sure that there are no uneven gaps between the top
surface of the instrument and the top of the side panels.
If you notice any unsightly gap, make adjustments by
loosening the screws (a) that fasten the side panels to the
pedal beam, front bar and speaker box.
If there is a very noticeable gap between the instrument
and the side panels of the stand, or if the gap is uneven, it
may be that the instrument was not placed correctly on
the stand. If so, lift up the entire instrument and place it
correctly on the stand.
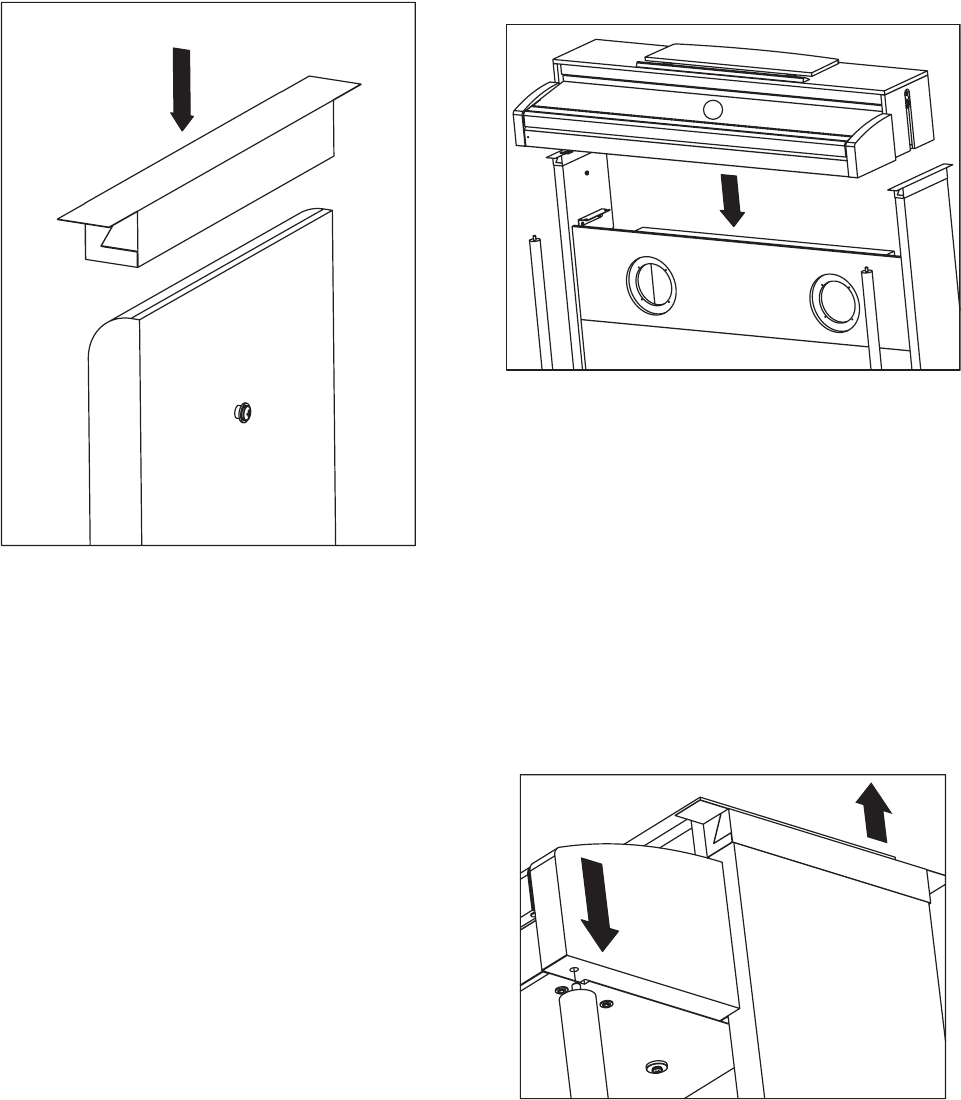
15.Finally, remove the cardboard hoods and save them in a
safe place for future use. After removing the hoods, the
bolts on top of the metal columns of the stand will fit the
corresponding holes under the piano.
Warning: Be very careful not to pinch your fingers
between the piano and the stand.
e
F
remove
C720_English.fm Page 65 Tuesday, October 10, 2006 4:14 PM