Owner’s Manual 1
Precautions Location Using the unit in the following locations can result in a malfunction. • In direct sunlight • Locations of extreme temperature or humidity • Excessively dusty or dirty locations • Locations of excessive vibration • Close to magnetic fields Power supply Please connect the designated AC adapter to an AC outlet of the correct voltage. Do not connect it to an AC outlet of voltage other than that for which your unit is intended.
Table of Contents Introduction - - - - - - - - - - - - - - - - - - - - - - - - - - - - - - - - - - - Unpacking your CR-4 - - - - - - - - - - - - - - - - - - - - - - - - - - - - - About this manual - - - - - - - - - - - - - - - - - - - - - - - - - - - - - - - Features of the CR-4 - - - - - - - - - - - - - - - - - - - - - - - - - - - - - - A few dos and don’ts - - - - - - - - - - - - - - - - - - - - - - - - - - - - - About multitrack recording - - - - - - - - - - - - - - - - - - - - - - - - - - About the Ampw
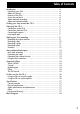
Introduction ............... Unpacking your CR-4 When you first open the packing for your CR4, you should find the following (as well as this manual): • The CR-4 itself • An AC power adapter • Your warranty card and other service information. Contact your KORG dealer if any of these items are missing. Save the packing in case you ever need to return the CR-4 for service. Only use the AC adaptor supplied with your CR-4, and make sure that the voltage marked on the adapter matches your household AC voltage.
Introduction • Avoid smoking, eating or drinking over the CR-4. Smoke particles, food crumbs and spilled liquids are the enemies of fine audio gear. • Use the best possible new cassettes (Type II) wherever possible, for high quality results. • Use shorter tapes whenever you can. Avoid C-90 (or longer) tapes if possible because the tapes are thin, and may stretch or even break. Because the CR-4 only plays tapes in one direction, you will get half the stated recording time on a tape.
Finding your way around the CR-4 Use this “road map” as a quick guide to find important features of your CR-4. Connect the AC power adapter here, and turn the CR-4 on and off with this switch Stereo mastering cassette, CD, etc. is connected here Speakers: turn these on and off with the rear panel switch. You can also use headphones as an alternative monitoring method. 4-track cassette deck and transport controls. Cassette transport controls are just the same as on any cassette deck.
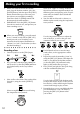
Setting up the CR-4 To use the CR-4, you need to make enough room on a level firm surface for the unit itself, and also leave enough space for connections. There are two kinds of connections to make (as well as the power connection): the audio connections to the CR-4 and the connections from the unit. You may want to look at the “road map” (→p.6) before going much further. ............... ...............
Setting up the CR-4 You may want to take up any slack in the tape cassette, using a pencil, before you load it into the CR-4. 1 Lift the cassette lid (use your fingers— there’s no eject button). 2 Mark the tape with your project (song) name and the date, and add “CR-4” so that you know in the future that it’s a multitrack tape. 3 Insert the tape, fully rewound to the start (with the full spool on the left side). It’s a good idea to always use the same side (side A) of tapes for multitrack recording.
Making your first recording For this recording, let’s assume that you are starting with a bass and drum part on the first two tracks and the drum sounds will come from a rhythm (drum) machine. The bass guitar will be recorded on track 1, and the drum part on track 2. There’s also one guitar part (track 3) and one vocal part (track 4). Of course, your arrangement may be different, but we suggest you read through and follow this example as closely as you can. We’ll record the bass using the Ampworks effects.
Making your first recording 8 9 When you reach the end of the rhythm track, stop the rhythm machine, press the [PAUSE] button, and then press the [STOP] button. Rewind the tape to the zero position (where you started the recording). Turn down track 2’s [TRIM] control and disconnect the rhythm machine . There is no “right” or “wrong” model to choose here; different amplifier models suit different guitars and playing styles. Experiment until you find the basic sound that suits you best.
Making your first recording ............... ............... Recording a guitar Recording vocals This is almost the same as recording the bass. Use track 3 for the guitar part. Unplug the bass from input 1, and connect the guitar to input 3. Adjust the [TRIM] as you did for the bass (and don’t forget to turn down the [TRIM] on track 1). You will probably want to choose another Ampworks amp/speaker combination and effect for the guitar as well as adjusting the tone controls, etc. (→p.14).
Making your first recording ............... Mixdown For mixdown, it’s a good idea to use speakers, rather than headphones, so turn the speakers back on. Unplug the headphones to achieve the best sound quality from the [LINE OUT]. Mixing levels When you’re mixing down, make sure that the master meter’s [+6] indicator is only lighting in the louder passages. If it is continuously lit, you will overload the amplifier of the CR-4 and cause distortion.
More advanced techniques ............... 3 The CR-4 allows you to record four tracks at once. The example we gave above only recorded one track at a time. If you are recording a group of musicians, you can record more than one track at once, and adjust the balance later. You can record on a pair of tracks (either 1+2 or 3+4). Press one [REC/OL] button, and then the other [REC/OL] button of the pair to arm.
Ampworks effects ............... ............... These rotary dials allow you to choose a model to add life to your playing, as well as allowing you to select a digital effect. What is REMS ( )? (Resonant structure and Electronic circuit Modeling System) is KORG’s proprietary sound modeling technology which precisely reproduces the complex character and nature of both acoustic and electric instruments as well as electronic circuits in real world environments.
............... Effects In addition, there are eleven digital effects you can apply to your playing and vocals. These are listed here: COMP WAH CHORUS FLANGE PHASER TREM ROTARY DELAY REVERB CHO+DL CHO+RV Produces consistent levels and sustain Auto wah, applying a wah effect that responds to picking. When the [EFF.DEPTH] control is in the left half, this effect produces a down sweep, and when in the right half, produces an up sweep. Vintage chorus. Vintage flanging. Vintage phasing. Vintage tremolo.
Further uses for the CR-4 ............... Using the CR-4 as a guitar combo To use the CR-4 as a very portable guitar combo, with built-in amp modeling and builtin effects: 1 Connect your guitar to track 1. Press the [REC/OL] button and adjust the [TRIM] and fader levels (→p.10). 2 Switch track 1’s [EFFECT] switch on, and select your amp/speaker model and effects (→p.14). 3 Now you can play. Adjust the overall volume with the [MASTER] fader. ...............
............... Cassette recorder Track format Head configuration Motor type Tape speed Wow and flutter Fast wind time Tape 4 tracks, 4 channels 1 x 4-track record/replay head (Permalloy) 1 x 4-track erase head (ferrite) 1 x DC motor (capstan and reel motor) 1 7/8 in./sec (4.76 cm/ sec) 0.
Block Diagram INOUT 1 -10dBV/-50dBV INOUT 2 -10dBV/-50dBV INOUT 3 -10dBV/-50dBV INOUT 4 -10dBV/-50dBV TRIM TRIM TRIM TRIM CH1 OL CH2 OL CH3 OL CH4 OL A/D EFF EFFECTOR EFF SW 1 EFF SW 2 EFF SW 3 EFF SW 4 D/A REC FUNCTION TRK1 TRK2 TRK3 TRK4 LEVEL TAPE OUT 4ch RECORDER MTR REC sig PAN PAN PAN PAN R L L R L R R L MASTER LEVEL SPEAKER SW ON ON OFF OFF METER -10dB -5dB 0dB +6dB -10dBV LINE-OUT L R HEAD-PHONE SUB MAIN L R 18 3
D00802300A Owner’s Manual IMPORTANT NOTICE TO CONSUMERS This product has been manufactured according to strict specifications and voltage requirements that are applicable in the country in which it is intended that this product should be used. If you have purchased this product via the internet, through mail order, and/or via a telephone sale, you must verify that this product is intended to be used in the country in which you reside.