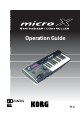
Operation Guide E 1
Precautions Location Using the unit in the following locations can result in a malfunction. • • • • • In direct sunlight Locations of extreme temperature or humidity Excessively dusty or dirty locations Locations of excessive vibration Close to magnetic fields Power supply Please connect the designated AC adapter to an AC outlet of the correct voltage. Do not connect it to an AC outlet of voltage other than that for which your unit is intended.
Thank you for purchasing the Korg microX Synthesizer/Controller. To help you get the most out of your new instrument, please read this manual carefully. About this manual The owner’s manuals and how to use them The microX come with the following owner’s manuals. • Operation Guide • Parameter Guide (included in the CD-ROM) Operation Guide Please read this first.
Table of Contents Precautions............................................................... ii About this manual ....................................... iii Quick Start .........................................1 Simple program editing ............................. 43 Performance Edit................................................43 REALTIME CONTROLS [1], [2], [3], [4], [SELECT] .............................................................43 Saving your edits.............................................
Using and Editing Multi sets.......... 69 Saving a user arpeggio ....................................104 Synchronizing the arpeggiator.......................105 MIDI considerations ................................... 69 Selecting a multi set ...........................................69 Using Drum Kits............................ 107 Assigning a program to a track, and setting the volume and pan ...........................................70 What is a Drum Kit? ........................................
vi
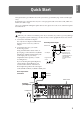
Quick Start This Quick Start is provided for those who just want to get started trying out the sounds right away. It explains how to set up the microX, how to select programs and control the sound, and how to listen to the demo songs. Make all your connections with the power off (on all units!). If you don’t, you may damage your speaker system or damage your microX and/or other equipment. Please use caution. 1. Connect the included AC adapter.
Quick Start 3. Turn the microX’s [VOLUME] knob down (to the left). Turn on your audio monitor system and set the volume to a normal level. 4. Turn on the microX by pressing the power switch located on the rear panel. 5. Slowly raise the microX’s [VOLUME] knob to an appropriate volume. Playing programs and combinations By default, Combination mode will be selected when you turn on the power. Play the keyboard, and you will hear the sound of bank A combination number 000.
For example, to select bank B, press the PROGRAM [B] button. The [B] button will light, and the name Bank B will appear in the left of the display. The [GM] button operates differently from the other bank buttons. Each time you press this button, the bank will switch in the order of G → g(d) → G → g(d) ... etc. The programs are organized into banks of 128 (except for g(d)). Select the desired bank, and then select a program number within that bank. 5. Play the keyboard to hear the program you selected.
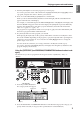
Quick Start For example if you press the [CATEGORY] button and then press the PROGRAM [E] button, you’ll be able to choose only from programs in the Keyboard category. The Keyboard category contains programs such as acoustic piano, and electric piano etc. You can also use the [PAGE+][PAGE–] buttons to step through the categories one by one. 3. By using the [VALUE] dial or the ClickPoint [π][†] to select programs, you can step through the programs in the same category. 4.
Quick Start Playing programs and combinations 5. Play the keyboard to hear the combination you selected. You can operate the microX’s joystick, OCTAVE [†][π], and realtime controllers to add expressive variation to your performances. Joystick You can use the joystick to vary the pitch or adjust the depth of modulation. The actual result will depend on the program and combination, but these controllers are normally used to apply the following effects.
Quick Start REALTIME CONTROLS [1], [2], [3], [4], [SELECT] Use the [SELECT] button to select realtime controller mode A/B/C, and use knobs [1]–[4] to control the tone, effects, MIDI control changes, and arpeggiator etc. while you perform. Use these knobs when you want to modify the sound while performing, or to make simple edits. [SELECT] button Knobs [1]–[4] Here we’ll explain how to use the realtime controllers in Program mode.
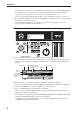
In Program mode you can use one arpeggiator. In Combination mode and Multi mode you can use two arpeggio patterns simultaneously (dual polyphonic arpeggiator). This gives you a variety of possibilities, such as applying separate arpeggio patterns to a drum program and a bass program, or using splits or velocity to switch between arpeggio patterns. Here we’ll explain how to use the arpeggiator in Program mode.
Quick Start Listening to the demo songs The microX contains demonstration songs. Take a moment to listen to these demo songs to experience the diverse sounds and rich expressive potential of the microX. 1 2, 3 4.1 4.2 5 1. Hold down the [CATEGORY] button and press the [AUDITION] button. The Demo Song Player page will appear. 2. Press the [AUDITION] button to begin playback. 3. Press the [AUDITION] button once again to stop playback. 4.
Quick Start Main features Filter/synthesis section: • 24 dB/oct Low Pass Resonance type or 12 dB/ oct Low Pass & High Pass type filters can be used. A wide variety of filter effects can be achieved, from active sounds with aggressive resonance to subtle tones using a high pass filter. • A broad range of editing parameters gives you control over every aspect of the sound.
Introduction A combination allows you to use layers, splits, or velocity switching etc. to combine up to eight programs together with the effects and the two arpeggiators, in order to create complex sounds that could not be produced by a program. You can also create combis that include external tone generators.
7 8 3 4 Appendices 13 2 Other functions External control 11 12 Drum Kit 10 9 Arpeggiator 5 Global 1 Effect 14 6 Multi Combination Program Setup Quick Start Front and rear panel Front panel Introduction Front and rear panel 11
Introduction 1. [VOLUME] knob 5. MODE/BANK Select This adjusts the volume of the (MAIN OUTPUT) L/MONO, R jacks, as well as the volume of the headphone jack. Use these buttons to select banks and enter modes. The microX has four modes. (☞p.19) 2. REALTIME CONTROLS [SELECT] button [1]–[4] knob Use the [SELECT] button to choose one of the realtime controller modes - A/B/C - and use knobs [1]–[4] to control the tone, effects, MIDI control changes, and arpeggiator etc. while you perform. (☞p.
When you are in a page other than 0 of each mode, you can press this button to move to page 0 of that mode. If you press the [EXIT/CANCEL] button while pressing the ClickPoint center, the selected value will be reset to 0 or the minimum value. While the category menu is displayed, you can use these buttons to step through the categories one by one. (☞p.38) When a dialog box is open, this button will cancel the settings made in the dialog box and close the dialog box (corresponds to the “Cancel”).
Introduction Rear panel 5 4 3 2 1 1. AUDIO OUTPUT What is USB? Connect these outputs to the input jacks of your amp or mixer. In addition to the (MAIN OUTPUT) L/MONO and R main stereo audio outputs, the microX provides two individual audio outputs. (☞p.25) USB stands for Universal Serial Bus, and is an interface for transferring data between a computer, a keyboard and/or peripheral devices. MAIN OUTPUT L/MONO, R jack INDIVIDUAL OUTPUT 1, 2 jack 2.
For details on selecting and executing a utility command, see “4. Selecting and executing a Utility function” (☞p.21). From the left, this area shows the mode name, page number: name, tab name, and the parameter name of the edit cell. Mode name Page number:name Tab name Parameter name When you select a utility menu command etc., a dialog box will open. Use the ClickPoint [√][®][π][†] to select parameters. To enter a parameter value, use the [VALUE] dial, the ClickPoint [π][†].
Introduction * Scroll bar This indicates that the list contains more selections or parameters than can be shown in the screen at one time. Use the ClickPoint [π][†] to move within the list. Scroll bar * Page menu In Combination, Program, Global, or Multi modes, pressing the [MENU/OK] button will display a list of the pages in that mode. To select a page, use the ClickPoint [√][®][π][†] to select the desired page and press the center. (☞p.
Program mode Programs are the basic sounds of microX. In Program mode, you can: Global mode Global mode lets you make overall settings for the entire microX, and edit arpeggiators, drum kits and external control sets.
Introduction PROGRAM MODE OSC 1 Multi Sample - H Drum Kit Insert / Master Effect Multi Sample - L MFX 2 PITCH1 FILTER1 OSC 2 IFX AMP1 MFX 1 MEQ Multi Sample - H Multi Sample - L Arpeggiator PITCH2 FILTER2 AMP2 GLOBAL MODE DRUM KIT Key Assign Drum Sample / Sample - H Drum Sample / Sample - L ARPEGGIATOR PATTERN COMBINATION MODE TIMBRE 1 PROGRAM TIMBRE 2 PROGRAM TIMBRE 3 PROGRAM TIMBRE 4 PROGRAM TIMBRE 5 PROGRAM Insert /Master Effect IFX TIMBRE 6 PROGRAM User Pattern: Preset-0 - 4
Quick Start Basic operations Introduction Basic operations After you’ve powered-on the microX, here’s how to perform basic operations such as selecting modes and pages. For example if you’re editing a program in Program mode, and you press a different PROGRAM [A]–[GM] button, the program will change and the settings you had been editing will disappear. The same is true for Combination mode, and the settings you had been editing will disappear if you press a different COMBINATION [A]–[C] button.
Introduction 2. Use the ClickPoint [√][®][π][†] to select the page you want to view. 3. When you’ve made your selection, press the center of the ClickPoint. You will jump to the selected page, and that page will appear. As an example here, try selecting “Key Zone.” The 5: Ed–Key Zone page will appear. Note: The page that appears will be the page of the tab you selected most recently.
If you edit the settings that are recalled by pressing the [COMPARE] button (i.e., the settings that are written into memory), the LED will go dark, and it will not be possible to return to the previous edits by pressing the [COMPARE] button again. When you’re finished editing, you can save your changes if necessary. The Compare function is not available in Global mode. 4.
Introduction 22
Quick Start Introduction Setup 3. Plug the power cable into an AC outlet. 4. To prevent the plug from being pulled out accidentally, wrap the AC adapter cable through the cable hook located on the rear of the microX. Be careful not to bend the base of the plug unnecessarily. The display will show the model name, software version. (The following graphic shows the factory-set display. The version number is subject to change without notice.
Setup Turning the power off After you’ve finished editing, be sure to write (save) your changes. If you edit a program and then select a different program or turn off the power, the changes you made will be lost. The same is true for a combination or multi set. The settings you edit in Global mode are remembered as long as the power is on, but will be lost when you turn off the power. 1. Turn the microX’s [VOLUME] knob toward the left.
Here, you can connect a set of amplified monitor speakers or your audio system to output microX’s sound. Connecting the MAIN OUTPUT L/MONO and R These are the main outputs. They are unbalanced phone jacks. These are the main stereo outputs; their volume is controlled by the [VOLUME] knob. All of the factory Programs and Combis are programmed to play through these outputs.
Setup Headphones Powered monitors PHONES Mixer INPUT INPUT Connecting a damper pedal, foot switch, or foot pedal By connecting an optional damper pedal, foot switch, or foot pedal, you can control even more functions and effects. 1 L/MONO R 2 PEDAL Headphones 1. When using headphones, plug them into the headphones jack located on the front panel. Use the [VOLUME] knob to adjust the volume of the headphones.
Connecting a computer If you connect a separately sold EXP-2 foot controller or XVP-10 expression/volume pedal to the ASSIGNABLE PEDAL jack, you can use it to apply modulation to sounds or effects, or to adjust the overall volume. You can connect the microX to your computer and use it as both an input keyboard and a MIDI sound module. This pedal will always function in the same way regardless of the program, combination, or multi set you’ve selected.
Setup • Operating system Microsoft Windows XP Home Edition, Professional or x64 Edition (The driver for x64 Edition is a Beta version.) Windows XP: Installing the KORG USB-MIDI Driver and the editor software Macintosh: microX/X50 application installation • Computer The microX application installer automatically installs the KORG USB-MIDI Driver Tools and microX Editor/Plug-In Editor that are provided on the included CD-ROM.
Quick Start Connecting a computer Introduction If you’ve made settings as shown in the screen shot for step 2, the KORG USB MIDI Driver Tools Installer screen will appear first. • Click [Next >]. 6. When all the selected applications have been installed, click [Finish] to exit the installer. For example if you want to install the standalone version, click [Install Stand-alone version].
Setup Then the standard driver will be installed automatically. Note: For details on installation and setup, and on uninstallation, see the “Installation manual” (HTML) on your computer. To view the “Installation manual,” click from your taskbar’s [Start] → [All Programs] → [KORG] → [KORG USB-MIDI Driver Tools] → [Installation manual]. About the microX and driver ports 3.
2. In the CD-ROM, navigate to the “KORG USBMIDI Driver” folder, and double-click “KORG USB-MIDI Driver.pkg” to start up the installer. 3. Depending on the version of your operating system, a confirmation dialog box may appear at this point. If so, enter your password and click [OK]. When the installer starts up, the following screen will appear. Click [Continue].
Setup 3. Follow the on-screen instructions to install application. See “Installing the KORG USB-MIDI Driver” (☞p.31). 4. When the installation has been successfully completed, click [Close] to exit the installer. About the microX external control templates See “microX External Control Template List” (PDF) for details on the control change (CC#) settings assigned by the preloaded external control templates and the application settings to which they correspond.
Sound generator section Trigger Sequencer or computer (Echo Back on) Arpeggiator OFF Keyboard ON MIDI OUT USB This connection is broken when you turn Local Control off. MIDI Filter “Exclusive” setting If you want the microX to transmit and receive system exclusive data, you must check the GLOBAL 1: MIDI page MIDI Filter “Exclusive” check box. Check this box if the microX is connected to your computer and you want to edit the microX from your computer (or bi-directionally).
Setup Example connections when using the microX Editor/Plug-In Editor 3. Use the ClickPoint [√][®][π][†] to select a page, and press the ClickPoint center. • Local Control On If you want to mix the microX’s audio signals with the audio signals sent from your host application via your audio interface, or with audio signals from another sound module, make connections as shown below. • MIDI Filter Exclusive Powered monitors • Convert Position Choose “MIDI” if you want to make these settings.
About MIDI MIDI stands for Musical Instrument Digital Interface, and is a world-wide standard for exchanging various types of musical data between electronic musical instruments and computers. When MIDI cables are used to connect two or more MIDI devices, performance data can be exchanged between the devices, even if they were made by different manufacturers.
Setup 36
· Turn the [VALUE] dial. · Press the center of the ClickPoint to highlight the field, then use [π][†] to select a program, and press the center to finalize your selection. · Use the PROGRAM [A]–[GM] buttons to select a program bank. Selecting programs by program category You can select programs by categories such as piano or drums. (☞p.38) Multi Using “Program Select” to select a program Bank number Program Select (program number and name) Tab 2.
Playing and Editing Programs For example, to select bank B, press the PROGRAM [B] button. The [B] button will light, and the name Bank B will appear in the left of the display. • Each time you press the [GM] button, the bank will alternate as shown below. G→g(d)→G→g(d)→G… Selecting by Category You can select Programs from within a category, such as keyboard, organ, bass, and drums. When shipped from the factory, the preloaded Programs are organized into 16 categories.
This lets you change Programs without using your hands–great for quick Program changes in live performance situations. To set this up: 1. Connect a foot switch to the rear-panel ASSIGNABLE SWITCH jack. Use a simple on/off footswitch, such as the optional KORG PS-1. 2. Press the [GLOBAL] button to enter Global mode. 3. Press the [EXIT] button to access the GLOBAL 0: System page. 4. Press the [PAGE+] button to access the Foot tab.
Playing and Editing Programs microX Bank # microX Program # Bank Select CC#0 Bank Select CC#32 Program # A 0 – 127 63 0 0 – 127 B 0 – 127 63 1 0 – 127 C 0 – 127 63 2 0 – 127 D 0 – 127 63 3 0 – 127 E 0 – 127 63 4 0 – 127 1 – 128 121 0, 1 – 9 0 – 127 1 – 128: R 56 0 0 – 127 1 – 128: (XG) R 0 0, 1 0 – 127 0 0 0 – 127 1 0 0 – 127 1 – 128 120 0 0 – 127 1 – 128: R 62 0 0 – 127 G 1 – 128: (GS) R g(d) Note: In bank G, program numbers 000 through 127 corres
You can press the OCTAVE [†][π] buttons simultaneously to recall the written (saved) settings.
Playing and Editing Programs The microX will automatically sense when a halfdamper is connected to the rear-panel DAMPER jack. For proper operation, you will also need to calibrate the pedal, using the “Half Damper Calibrate” command in the Global page menu. (☞PG p.77) Assignable Foot Switch This lets you use a simple footswitch, such as the Korg PS-1, as an assignable controller.
2. Press the [PAGE+] button (or [PAGE–] button) to access the PROG 0: Play, Perform. Edit page. 3. Use the ClickPoint [√][®][π][†] to select the performance editor parameter you want to adjust. 4. Use the [VALUE] dial etc. to adjust the value. (☞p.20) Octave: Indicates the octave setting. Pitch Stretch: Simultaneously adjusts the transpose and tune settings of the oscillator. This allows you to produce a variety of tonal changes without losing the character of the original sound.
Playing and Editing Programs Note: If CC#70–79 are assigned to REALTIME CONTROLS A-mode or B-mode, the sound edited by knobs [1]–[4] can be saved by the Program Write operation (☞p.45). [SELECT] button Adjusting the cutoff frequency of the high-pass filter will modify the thickness of the sound from which the low frequency range has been filtered out. Level Knobs [1]–[4] LPF 2. Rotate the desired knob to control the sound, etc. See the explanations that follow.
Introduction note-off Release Level Sustain Level B-mode controls You can control parameters such as volume, portamento time, pan or filter and amp EG, pitch LFO, and master effect send levels etc. The B-mode function settings are made for each individual program, combination, or multi set. You can specify the B-mode functions separately for each individual program, combination, or multi set.
Playing and Editing Programs Detailed Editing with Programs You can create your own original sounds by editing the factory Programs, or by initializing a Program (Bank E 127: Init. Program) and starting from scratch. You can save these Programs into any bank other than Bank G or g(d), which cannot be modified. Before you begin editing The three attributes of sound: pitch, tone, and volume Sound has three basic attributes; pitch, tone, and volume.
Overview of editing pages In the PROG 0: Play page you can select and play programs, and use the performance editor or realtime controllers to make simple edits to the sound. You can also adjust the arpeggiator settings. Pressing [COMPARE] button again returns you to the version you are editing, and the LED will go out again. If you edit while the COMPARE LED is lit, the button will again go dark and your previous edits will be lost. • Pitch settings. Pitch EG settings.
Playing and Editing Programs Basic oscillator settings EGs will not re-trigger, so that you can move from note to note in a true legato fashion. If the previous note is released before the next note is played, the note will trigger normally. Program type setting (single, double, drum kit) Try switching between Poly and Mono, and listen to the results. Here you can specify the type of program (whether to use one oscillator, two oscillators, or a drum kit).
3. Specify the basic pitch of the oscillator. This is set by the “Octave” parameter. Using velocity to switch between oscillator 1 and 2 You have now assigned the “High” and “Low” multisamples. Next we’ll set the velocity range. For example if you set “Velocity SW L→H” to 100, playing the keyboard softly will sound the “Low” multisample, and playing strongly will sound the “High” multisample. 6. Adjust the “Level” for High and Low multisamples to set their volume balance.
Playing and Editing Programs Copying settings between OSC1 & OSC2 Many of the Program parameters can be set differently for OSC1 and OSC2. These include all of the parameters on: • All of the tabs on the Ed–Pitch page, except for the Pitch EG • All of the tabs on the Ed–Filter page • All of the tabs on the Ed–Amp page 5. Specify the basic pitch of the oscillator. For a drum kit, set “Octave” to +0 [8'].
note-on Attack Level Slope Time Release Time For more information on LFOs, see “PROG 3: Ed– LFOs” (☞PG p.14). All of these parameters control the way that the LFO itself works. In order for the LFO to actually affect the sound, you can use the dedicated LFO routings on the Filter, Pitch, and Amp pages, or use the LFOs as AMS sources for a wide variety of parameters. Frequency Modulation AMS can be used to vary the LFO speed.
Playing and Editing Programs Controlling Pitch Here you can specify how the pitch of the multisample selected for the oscillator will change. Pitch EG and LFO settings allow the pitch to varied over time. Note: To specify the basic pitch of the multisample, use the “Octave” parameter in the PROG 1: Ed– Basic, OSC1 or OSC2 page.
High pass filter Level High Pass Setup microX provides Filter1 for OSC1 and Filter2 for OSC2. For each of these filters, you can select from two types (Low Pass Resonance or Low Pass & High Pass). Filter2 can be used if “Mode (Oscillator Mode)” is set to Double. 12dB/oct Frequency Program The filters allows you to diminish or emphasize specified frequency areas of the sound. The tone of the sound will depend significantly on the filter settings.
Playing and Editing Programs “Resonance” specifies the resonance level. This boosts the overtones in the region of the specified “Frequency,” giving the sound a distinctive character. • “Int. to A” and “Int. to B” adjust the effect that keyboard tracking will have on filters A and B. For more details, see “4–2a: Keyboard Track” (☞PG p.17).
Introduction Quick Start Using the Amp section Applying modulation to the amp Program In addition to the EG, LFOs, and Key Track, you can use two AMS sources to modulate the filters. For instance, you could use the joystick to change the brightness. Setup AMS modulation This lets you vary the volume relative to the note you play. For more details, see “Keyboard Track” (☞p.54).
Playing and Editing Programs Every instrument has its own characteristic volume envelope. This is part of what gives each instrument its identifiable character. Conversely, by changing the volume contour–for instance, applying a string-like Amp EG curve to an organ multisample– you can produce interesting and unusual sounds. If this is checked, the Program can use a different pan position for each drum sound, as specified by the Drum Kit.
Playing combinations Selecting combinations There are several different ways to select Combinations. Each one is convenient in a different way: • Selecting combinations from the front panel: Using “Combi Select” to select a program · Turn the [VALUE] dial. · Press the center of the ClickPoint to highlight the field, then use [π][†] to select a program, and press the center to finalize your selection. · Use the COMBINATION [A]–[C] buttons to select a combination bank.
Playing and Editing Combinations • Press the center of the ClickPoint to highlight the field, then use [π][†] to select a program, and press the center to finalize your selection. Using a footswitch to select Combinations 4. Press a COMBINATION [A]–[C] button to switch banks. You can assign a footswitch to step through Combinations one by one, either going up (0, 1, 2, 3, etc.) or going down (3, 2, 1 etc.).
These controls let you modify the tone, pitch, volume, effects, etc. in realtime while you play. Introduction Setup Just as in Program mode, you can use controllers such as the joystick, OCTAVE [†][π] buttons, and REALTIME CONTROLS [1]–[4] to add a broad range of expression to your playing in Combination mode. For more details, see “Using Controllers” (☞p.59). REALTIME CONTROLS [1], [2], [3], and [4] will also function as external controls.
Playing and Editing Combinations Simple combination editing You can edit any of the Combinations shipped with microX, or you can start with an initialized Program to create sounds from scratch. On the microX, you can use the edit of COMBI 0: Play page and the realtime controller knobs and switches of the front panel to make simple changes to a program without having to enter the editing pages that contain the detailed editing parameters. 1. Press the [UTILITY] button to access the utility menu. 2.
Adjusting the volume while preserving the volume balance between timbres 1. Press the [UTILITY] button to access the utility menu. 2. Use the ClickPoint to select “Write Combination,” and then press the ClickPoint center. The Write Combination dialog box will appear. 1. Press the [UTILITY] button to access the utility menu. 2. Use the ClickPoint [π][†] to select “Hold Balance,” and press the ClickPoint center. The upper right of the display will indicate “Hold Bal.
Playing and Editing Combinations Detailed Editing with Combinations You can edit any of the preloaded combinations or start with an initialized Combination (Bank C 127: Init. Combination) to create your own original sounds. You can use the factory Programs to create new Combinations, or use your own custom Programs. You can write (save) these combinations in any bank A–C.
0: Play • Select and play combinations. • Select a program for each timbre, and set status, pan, and level. (Same as the 1: Ed– Tone Adjust parameters; can be edited from either page.) • Select an arpeggio pattern and make settings. • Select an external control set. 1: Ed–Tone Adjust • Select a program for each timbre, and set status, pan, and level. • Use Tone Adjust to adjust parameters. • MIDI, OSC, Pitch, Delay, and Scale settings 2: Ed–Timbre Param for each timbre.
Playing and Editing Combinations MIDI filter settings Here you can specify whether the MIDI data sent and received by timbres 1–8 will be filtered. Layers, Splits, and Velocity switches Within a Combination, you can use note number and velocity to determine which Timbres will sound. If a check box is checked, the corresponding MIDI data can be sent and received. If “Status” is INT, movements of the microX’s controllers or incoming MIDI data will apply an effect for the program of that timbre.
the sound will change gradually instead of changing suddenly. Introduction Keyboard X-Fade (keyboard crossfade): As you play from low notes to high notes, the volume of A will fade out, and the volume of B will fade in. Program B Program A Quick Start Layers, Splits, and Velocity switches Timbre 1 Piano Timbre 2 Brass Timbre 3 Strings C–1 B3 C4 5. The COMBI 5: Ed–Key Zone, Review page shows a graphic indication of the region of keys (or note data) for which timbres 1–8 will play.
Playing and Editing Combinations Velocity Zone Slope Similar to Key Zone Slopes, as described above, these let you fade in and fade out sounds gradually over a velocity range, instead of a simple hard switch. We’ll assume that you are continuing to edit from the preceding example. 1. Access the COMBI 6: Ed–Vel Zone, Vel page. 2. In the case of the above example, you could set the velocity zones of the two Timbres so that they partially overlap. 3. Access the COMBI 6: Ed–Vel Zone, Slope page. 4.
Quick Start Altering Programs to fit within a Combination Delay and scale settings You can make these settings in COMBI 2: Ed–Timbre Param, Pitch. You can make these settings in COMBI 2: Ed–Timbre Param, Other. Transpose, Detune (BPM Adjust) Delay These parameters adjust the pitch of the timbre. You can set some Timbres so that they don’t sound immediately at note-on. This can create cool effects, and more dramatic layers.
Playing and Editing Combinations Reso.HP: Adjusts the resonance level of the low pass filter or the cutoff frequency of the high pass filter for program OSC 1/2. The parameter that is controlled will depend on the filter type specified for the program. F EG Int: Adjusts the filter EG intensity (the depth of the filter EG) for program OSC1/2. A EG A: Adjusts the EG attack times of the program OSC 1/2 filter and amp.
Quick Start for Ext-Seq: Choose this if you’re using the microX as a multi-timbral sound module. When you switch multi sets on the microX, program changes and other MIDI messages will not be transmitted even by tracks whose “Status” is EXT or BTH. You can make settings such as volume and pan for each of these tracks. You can also use realtime controllers to vary the sound. for Master: Choose this if you’re using the microX as a master keyboard.
Using and Editing Multi sets Other ways to select a multi set You can’t use a foot switch connected to the ASSIGNABLE SWITCH jack to change multi sets. For details on how to select a multi set via MIDI, see p.77. Assigning a program to a track, and setting the volume and pan Selecting a track program from the microX 1. Access the MULTI 0: Play, Program page. This page shows all 8 Tracks at once, including their Program assignments, volume, pan, play/ mute, solo, and more. If “Status” (☞p.
A setting of C064 is center, L001 is far left, and R127 is far right. With a setting of RND, the stereo location will change randomly between left and right each time a note is played. ● — ● × — BTH ● ● ● — For more details, see “Status” (☞PG p.61). Bank select (when Status = EX2) If the “Status” is EX2, the LSB value and MSB value of the “Bank Select MSB/LSB” will be enabled, and the bank number you specify here will be transmitted via MIDI.
Using and Editing Multi sets Copying the settings of a combination to a multi set You can copy the settings of a combination to a multi set. If you have a favorite combination, this function provides a convenient way to copy those sounds to the tracks of a multi set. Note: Set the global MIDI channel (GLOBAL 1: MIDI, “MIDI Channel”) to 01. 1. Select a multi set. (☞p.69 “Selecting a multi set”) 2. Choose the “Copy From Combi” utility. A dialog box will appear. 3.
A multi set has sixteen tracks. Each track consists of one program, and parameters such as keyboard zone, velocity zone, mixer settings, MIDI channel, and filter settings. See the illustration “Multi set structure and corresponding pages.” • The Tone Adjust function lets you make detailed adjustments to the program used by each track. Introduction • The “PLAY/MUTE” setting lets you quickly mute or un-mute a desired track. Setup • You can copy the settings of a combination to a multi set.
Using and Editing Multi sets There is one insert effect and two master effects, and for each of these you can choose one of 89 effect types. The master EQ is a stereo three-band EQ. The effect settings created and saved with a program in Program mode are not used in Multi mode. Effect settings are made independently for the Multi set. Arpeggiator A multi set can use two arpeggiators (dual polyphonic arpeggiators).
You can use keyboard regions and velocity to switch between different tracks in a combination, just as you can in a combination. For more details, see “Layers, Splits, and Velocity switches” (☞p.64). Saving your edits Once you’ve tweaked the sound to perfection, you’ll want to save your work. To save your edits: 1. Press the [UTILITY] button to access the utility menu. 2. Use the ClickPoint to select “Write Multi,” and then press the ClickPoint center.
Using and Editing Multi sets You can store 128 of these multi sets in the microX. Tracks 1–16 consist of the following “setting parameters,” and will transmit and receive the “performance data” listed below. external MIDI sequencer. By receiving this data, you can change the setting of the multi set during the playback. ** You can use performance data (MIDI RPN data) to change the settings of a multi set during playback. MIDI tracks 1–16 Setup parameters Bank/Program No.
Note: In order to select programs via MIDI program changes, the track’s “Status” must be set to INT. The MIDI channel of a track is specified by MULTI 2: Track Param, MIDI “MIDI Channel.” When a program change is received on a MIDI channel that matches the channel setting of a track, the program will change if the “Status” of that track is INT. However, program changes for a track will also depend on the “Program Change” setting.
Using and Editing Multi sets 78
Send PROG 9: Ed–MasterFX • Master Effect selection and settings. • Master EQ settings. Send Amplifier OUTPUT L/MONO, R Insert Effect Master Effect 1,2 Return Master EQ OUTPUT L/MONO, R Combination mode, Multi mode In Combination mode, and Multi mode, the insert effect can be applied to each timbre/track. The master effects are used to apply overall spatial processing, and the master EQ is used to make overall adjustments in tone.
Effects settings Limiters (03: St.Limiter–04: Mltband Limit) limit the level of the input signal to a maximum level that you specify. Exciters (11: St.Exct/Enhcr) give the sound greater clarity and definition. Enhancers sharpen the outline of the sound, bringing it to the front of the mix. By using these appropriately, you can bring out sounds that were unclear or easily lost in the mix. Distortion (06: OD/HiGain Wah) distorts the sound.
Routing The structure of the insert effect, master effects, and master EQ is the same in each mode. However, the routing will determine how the oscillator output of the program is sent to the insert effect and the master effects. As an example, here’s how to specify the routing and make effect settings in Program mode. 1, 2, 1/2: The output will be sent to (INDIVIDUAL OUTPUT) 1 or 2. (See diagram below) 2. Set “BUS Select (All OSCs)” to specify where the oscillator output will be sent.
Effects settings BUS Select (All OSCs) = 1/2 PROG 8: Insert FX Pan OSC 1 PROG 9: Master FX IFX / Indiv.
L/R BUS Send1 Send2 stereo MFX1 mono stereo Chain Direction L/R BUS MFX Chain =On 2. In “Master Effect 1” and “Master Effect 2,” select the type of each master effect. You can press the [CATEGORY] button and choose an effect from six categories. Note: The input/output of the master effect is mono-in/stereo-out. Even if you select a stereoinput type effect, the input will be monaural. 3. In “MFX1 On/Off” and “MFX2 On/Off,” switch each master effect on/off.
Effects settings OUTPUT. Choose this setting if you want to send the sound in series through the master effects at the send level specified by “MFX Send.” (See diagram below) Effect settings in combination, and Multi Routing In Combination and Multi modes, you can specify the routing of each timbre/track to the insert effect and master effects. These settings are made in the same way in each of these modes. We will be using the example of Combination mode in our explanation here. 3.
You can specify the MIDI channel that will control the insert effect dynamic modulation (Dmod) and the “Pan” (CC#8), “Send 1 (MFX1),” and “Send 2 (MFX2)” settings that follow the insert effect. 1. As described in the procedure for “Effect settings for a program” (☞p.81), set “IFX” to 49: LCR BPM Delay. Verify that a delay sound is being output. An asterisk “*” is shown at the right of Ch01–16 for the channel numbers of timbres that are routed to IFX.
Effects settings time will change in synchronization to any changes you make in the arpeggiator tempo. 2. Return to the PROG 8: Ed–InsertFX, IFX page, and set the C Fb (C Delay Feedback) “(Source)” to SW1 #82. 3. Set “(Amount)” to +30. 4. (Move the joystick up.) Press the foot-switch; the feedback level will increase, and the delay sound will continue for an extended time. The “(Amount)” setting determines the feedback level when the foot-switch is pressed.
• User registered scale settings. Specify 16 octave scales, and one allnote scale. 3: Category Name • Edit category names for programs and combinations 4: DKit • Edit drum kits 5: Arp.Pattern • Edit user arpeggio patterns. 6: Ext Control • External control settings. Assign CC# to REALTIME CONTROLS knobs For details on how to access each page, tab or utility command, and how to edit the values, see “Basic operations” (☞p.19).
Global Mode Linking the arpeggiator to programs and combinations You can specify whether the arpeggiator settings written to a program or combination will also be selected when you select that program or combination, or whether the arpeggiator settings will remain in their current state when you switch the program or combination. When the microX is shipped from the factory, the former setting is selected.
MIDI-related settings 1: MIDI The user scales you create here can be used by specifying the scale for a program, for each timbre of a combination, or for each track of a Multi set. You can choose these scales from the following pages. Mode Program Program Page 1: Ed–Basic, Program Basic Combination 2: Ed–TimbreParam, Other Multi 2: Track Param, Other Here’s how to set the scale type for each track in Multi mode. Arpeggiator 1. Create a user octave scale or a user all notes scale.
Global Mode 4. If you want the Track to use the scale saved with its individual Program, check the track’s “Use Prog’s Scale” check box. Tracks that are not checked will use the scale specified by Scale “Type” (Multi’s Scale). 5. Set “Type” (Multi’s Scale) to select the scale for the currently selected song. Setting category names 3: Category Name Program, Combination Category The Category Name pages let you assign names to the Program, and Combination categories. (☞PG p.
UP, DOWN, ALT1, ALT2, RANDOM Preset arpeggio patterns U000–250 With the factory settings, this contains a variety of preloaded user arpeggio patterns. You can create and write your own user arpeggio patterns. Quick Start 2. As described in the following sections “Arpeggio controllers” and “Editing arpeggio settings that appear in the display” (☞p.92), move the controllers or modify the parameters to change the way in which the arpeggios are played.
Arpeggiator settings Adjusting the arpeggiator tempo (TEMPO) 1. Press the REALTIME CONTROLS [SELECT] button to make the right “C” LED light. 2. Rotate the [4] (TEMPO) knob to adjust the tempo. The “ =” value in the upper right of the display will change. You can set this in the range of 40–240. The LED located above the [ARP ON/OFF] button blinks at quarter-note intervals of the timing you specify. You can also set the timing from within the display.
Quick Start Arpeggiator features in Program mode Introduction Preset-3: ALT2 ALT2 RANDOM Program Selecting an arpeggio pattern (Pattern) An arpeggio pattern can be selected from preset arpeggio patterns Preset-0–Preset-4 and user arpeggio patterns U000–250. With the factory settings, U000–250 contain a wide variety of preload user arpeggio patterns. Preset-1: DOWN DOWN • Use the ClickPoint to select “Reso,” and then use the [VALUE] dial to specify the spacing between the arpeggiated notes.
Arpeggiator settings “Sort” is different than selecting the arpeggiator pattern. “Sort” specifies whether the notes of the arpeggio will be sounded in order of their pitch (regardless of the order in which they were played) or in the order in which you played them. Checked: When you take your hands completely off of the keyboard, the arpeggio pattern will immediately start over from the beginning in sync with the first key you press.
Specifying the range of notes in which the arpeggiator will operate (Key Btm, Key Top) “Key Btm,” “Key Top”: The arpeggiator will operate when you play keys within the specified range. Keys outside of this range can be played in the normal manner, and will not be affected by the arpeggiator on/off. For example if you set “Pattern” to Preset-0: UP, check “Latch,” set “Key Top” to B3, and “Key Btm” to C-1, playing a note B3 or lower will trigger the arpeggiator.
Arpeggiator settings Note: The [ARP ON/OFF] button and the REALTIME CONTROLS C-mode [1] (ARP-GATE), [2] (ARP-VELOCITY), [3] (ARP-LENGTH), and [4] (TEMPO) knobs are valid for both arpeggiators A and B. Their state will be memorized when the combination is written. Checking the structure of a user arpeggio pattern Let’s see how arpeggiators of the combination is constructed. 1. Select combination C053: Echo Jamm, and look at the Arp. Play A page and Arp. Play B page.
Arpeggiator settings 1. Select COMBI 0: Play, Prog page. Select programs for the timbres that you wish to use. For this example, select any desired program for timbres 1–4. 2. Select COMBI 2: Ed–TimbreParam. MIDI page. For the timbres that you will be using, set “Status” to INT, and set “MIDI Channel” to Gch or to the global MIDI channel (set in GLOBAL 1: MIDI “MIDI Channel”). For this example, set timbres 1–4 to a “Status” of INT, and timbres 5–8 to a “Status” of Off.
Arpeggiator settings Setting examples Combination B071: “In The Pocket” Although this is a somewhat sophisticated editing technique, we will describe the settings of one of the preset combinations as an example. Select and play combination B071: “In The Pocket.” Combination B021: Urban Nature RnB Select combination B021: Urban Nature RnB, and play it. Before you play, make sure that the global MIDI channel (GLOBAL 1: MIDI “MIDI Channel”) is set to 01. • Arpeggiator A is assigned to T (timbre) 4 and 5.
User arpeggio patterns: There are 251 patterns U000–U250 - which can develop chords or phrases in a wide variety of ways, based on the pitches that you play on the keyboard or the timing at which you play them. In GLOBAL 5: Arp.Pattern you can modify these user arpeggio patterns, or create a new user arpeggio pattern from an initialized condition. Edited user arpeggio patterns can be written to internal memory areas U000–U250.
Arpeggiator settings Editing a user arpeggio pattern in Program mode If you enter this mode from the Program mode, your editing will apply to the arpeggio pattern specified for the selected program. 7. The “Type (Arpeggio Type),” “Octave Motion,” and “Fixed Note” parameters specify how the arpeggio will be developed. These settings can be changed during or after editing. 8. Access the Edit page. 1.
1. Set “Step (Step No.)” to 01, and press the center of the ClickPoint. 2. Select Tone 0, and press the center of the ClickPoint. 3. Use the ClickPoint [®] to change “Step” to 02, and enter Tone 1. 4. In the same way, change “Step” to 03 and enter Tone 2. 5. Set “Step” to 04 and enter Tone 1. 6. Set “Step” to 05 and enter Tone 3. Note: Before you set “Gt (Gate),” move the REALTIME CONTROLS C-mode [ARP-GATE] knob to the center position (12 o’clock).
Arpeggiator settings Other examples of creating a user arpeggio pattern Chordal pattern Melody pattern 1. Set “Step (Step No.)” to 01, and press the center of the ClickPoint. 1. Set “Step (Step No.)” to 01, and press the center of the ClickPoint. 2. Select Tone 0, and press the center of the ClickPoint. 2. Select Tone 0, and press the center of the ClickPoint. 3. Use the ClickPoint [®] to change “Step” to 03, and enter Tones 1, 2, 3, and 4. (We won’t enter a tone in Step 02.) 3.
Choose “Step (Step No.)” 01, 02, 03, 05, 06, and 07, and enter Tone 02 for each of these steps. 7. Input the open hi-hat (Tone03). Tone No. Fixed Note No. 00 C2 (kick) 01 F2 (snare) 02 F#3 (closed hi-hat) 03 A#3 (open hi-hat) The drumsamples that correspond to each note number will differ depending on the drum kit. After you’ve used the keyboard to find the drum sound you want to use, you can enter “Fixed Note No.” 3. Access the Edit page. Each Tone in the display will be shown as a small circle.
Arpeggiator settings Dual polyphonic arpeggiator editing in Combi and Multi modes Here we will use a combination as an example in our explanation. The same procedure applies when editing an arpeggio pattern in Multi mode. If you have entered this mode from the Combination mode, the arpeggio pattern selected by the combination will be affected by your editing. 1. In Combination mode, select a combination that uses the arpeggio pattern you wish to edit.
If this is checked, the arpeggiator will immediately start playing from the beginning from the first note-on you play after all the keys had been previously released. If this is unchecked, the arpeggiator will operate in synchronization with the internal or external MIDI clock. Synchronization to the MIDI Start message • When the arpeggiator is on and operating, receiving a MIDI Start message will cause the arpeggiator to reset to the beginning of the pattern. (This has no relation to the “Key Sync.
Arpeggiator settings 106
Drum Kit memory structure The microX has 49 Drum Kits, divided into Internal, User, and GM (General MIDI) groups as shown below. You can edit or write into any of the locations except for the GM bank, which cannot be erased. If you want to start with a GM bank drum kit and edit it, use the “Copy Drum Kit” utility to select a drum kit and copy it to the USER bank. Drum Kit banks Bank No.
Using Drum Kits Saving and comparing data • The edits you make in Global mode will be lost when the power is turned off, so you need to write (save) your edits if you want to keep these changes. Four types of data are handled in Global mode: user drumkit settings (GLOBAL 4), arpeggiator settings (GLOBAL 5), external control settings (GLOBAL 6), and all other global settings (GLOBAL 0–3). You can save each type of data into its own memory area. • Note that Compare can’t be used in Global mode.
The Low drum sample will sound when you play a key less strongly than the specified velocity value, and the High drum sample will sound when you play more strongly. For example if you set “Velocity SW L→H” to 100, the drum sample assigned to “Low” will sound when you play the keyboard softly, and the multisample assigned to “High” will sound when you play strongly. Note: If you don’t want to use this function, set “Velocity SW L→H” to 001. Only the High drum sample will sound.
Using Drum Kits Controlling effects for each key A drum kit lets you set the insert effect and master effect send for each key. 1. Access the PROG 8: Ed–InsertFX, BUS page. 2. Make sure that the “Use DKit Setting” check box is checked. When “Use DKit Setting” is checked, the Program will use the “BUS Select” and Effects Send settings for each key of the Drum Kit. When “Use DKit Setting” is unchecked, the Program will ignore the Drum Kit’s “BUS Select” and Effects Send settings. 3.
Using external controls Selecting external controls Note: Before you continue, adjust your settings so that the microX can send MIDI data to your computer application or MIDI device. 1. Press a PROGRAM [A]–[GM] button. (The button will light.) We’ve selected Program mode as an example here, but you are free to select Combination or Multi mode if you wish. Quick Start Note: The microX’s keyboard and other controllers will operate as usual. 6. Enter Combination or Multi mode, and operate the knobs.
External control settings External control setups You will use Global mode to create external control setups. • The content that you edit in Global mode is preserved until you turn off the power, but will be lost when the power is turned off. There are four types of data that you manage in Global mode; user drum kit settings (GLOBAL 4), user arpeggio patterns (GLOBAL 5), external control settings (GLOBAL 6), and all other global settings (GLOBAL 0–3). You can write each of these into its own memory area.
1. Press the [GLOBAL] button to enter Global mode. (The button will light.) 2. Press the [EXIT] button. You will be in the GLOBAL 0: System page. 3. Press the [UTILITY] button to access the Utility menu. Quick Start When rearranging programs, you need to be aware that if you write them to another bank or number, any combination that had used the program formerly occupying the writing destination will sound differently. For example if you want to load combination A000 into C127, proceed as follows.
Other functions Assigning a name (Rename) You can modify the name of any program, combination, multi set, category, arpeggio pattern, etc. The following table shows the items that you can rename, and the corresponding page. Item to rename Page Program name PROG 0...9 Utility: Write Program Combination name COMBI 0...9 Utility: Write Combination Multi set name MULTI 0-1 Utility: Rename Track • You can enter text using just the ClickPoint.
Program PROG 7: Ed–Arp/Ctrls, Controls Combination COMBI 7: Ed–Arp/Ctrls, Controls Multi MULTI 7: Arp/Ctrls, Controls • The default assignments for knobs 1–4 are Knob Mod.1 (CC#17), Knob Mod.2 (CC#19), Knob Mod.3 (CC#20), and Knob Mod.4 (CC#21), respectively. For a complete list of the possible assignments, see “Knobs 1…4 B Assign” (☞PG p.162). Here’s an example of how to set up knob [1] to control a Program’s filter and amp EG attack time: 1. Press the [PROG] button to enter Program mode. 2.
Other functions 116
Quick Start Combinations COMBI 0...9 Utility: Write Combination • Send a MIDI data dump to a MIDI data filer or similar device Multi sets MULTI 0...9 Utility: Write Multi Global settings GLOBAL 0...3 Utility: Write Global Setting Drum kits GLOBAL 4 Utility: Write Drum Kits Writing data into the microX Arpeggio patterns GLOBAL 5 Utility: Write Arpeggio Patterns Data areas that you can write External control GLOBAL 6 Utility: Write Ext.
Appendices About the Edit Buffer Memory in Global mode About the memory in Program, Combination, and Multi modes When the power is turned on, the Global mode data is called from internal memory into the Global mode memory area. Then when you modify the parameters in Global mode, the data in the memory area will be modified. If you wish to save this modified data in the internal memory, you must first Write (save) it.
Due to changes in the surrounding temperature, the display may on rare occasions be difficult or impossible to read. If this occurs, perform the following procedure. 1. While holding down the [EXIT/CANCEL] button, press the [UTILITY] button. The [GLOBAL] button will blink, and the Global mode Update Global Setting dialog box will appear. If you are unable to read the display, or if the Update Global Setting dialog box does not appear, check whether the [GLOBAL] button is blinking.
Appendices In GLOBAL 0: System, Foot page, make sure that “Damper Polarity” or “Foot SW Polarity” is set correctly. ☞PG p.80 Noise or oscillation is heard When using the BPM/MIDI Sync. function to control the delay time of an effect, noise may occur in the delay sound. This noise is due to discontinuities in the delay sound, and is not a malfunction. Some effects, such as 015: St.AnalogRecd, generate noise intentionally. It is also possible to create oscillation using a filter with resonance.
If you wish to receive MIDI exclusive messages, is the GLOBAL 1: MIDI page MIDI Filter “Exclusive” box checked? ☞p.33 Does this instrument support the types of messages that are being sent to it? When using USB, sound processing is slow, or the tempo is unstable Is the MIDI driver installed for the USB port you’ve connected? → The driver must be installed for each USB port you use.
Appendices Specifications and options Specifications Operating temperature +0 – +40 °C (do not allow condensation) System Keyboard Sound Engine Programs Combinations Multi sets Drum Kits The number of … -Combinations -Programs -Multi sets -Drum Kits Effects Arpeggiators Controllers User Interface 122 HI (Hyper Integrated) Synthesis System 25 key Synthesis types HI (Hyper Integrated) Synthesis System Single mode 62 voices (62 oscillators) Maximum polyphony Double mode 31 voices (62 oscillators) W
Control Inputs MIDI USB Power Dimensions (W × D × H) Weight Power supply voltage Power Consumption Accessories 606 × 226 × 80 (mm) 2.4 kg Setup DC 12V 10W AC adapter, Operation guide, CD-ROM (microX Editor/Plug-In Editor, KORG USB-MIDI driver, Parameter guide, External Control Template) Multi Analog Program 1/4" phone jacks (unbalanced); [VOLUME] slider controls only the MAIN OUT L/ MONO and R jacks Output impedance 1.1kΩ stereo (L/MONO is 550Ω for mono) L/MONO, R: +12.
124 Note On Note Off Control Change Pitch Bend 0, 32 1, 2 4, 5, 7, 8, 10 11, 12, 13 64, 65, 66, 67 70 – 79 80, 81, 82, 83 93, 91, 92, 94, 95 6, 38 96, 97 98, 99 Aftertouch Polyphonic (Key) Monophonic (Channel) Velocity True Voice Memorized Messages Altered Mode Note Number: Default Changed Basic Channel Function microX: [Synthesizer/Controller] 9n, V=0 – 127 0 – 120 1 – 16 1 – 16 1 – 16 1 – 16 9n, V=0 – 127 0 – 127 0 – 127 3 Recognized Transmitted MIDI Implementation Chart Bank Sel
Appendices Variable Range Song Position Song Select Tune 0 – 127 0 – 127 123 – 127 0 – 127 0 – 127 0 – 127 *1 *1 *1 Corresponds to Arpeggiator control *1 Corresponds to Arpeggiator reset *E*4 *P RPN (LSB, MSB) *C, *3 Realtime Controls knobs 1–4 B-assign *C Ext.
Appendices Index A Alternate modulation 51 Amp 55 Amp EG 55 AMS 51 ARP ON/OFF 91 Arpeggiator 91 Adjusting the tempo 92 Link 88 On/Off 91, 97 Copying the settings of a combination (multi set) 72 D DAMPER jack 26 Damper pedal 26, 41 G Global mode 87 H Half-Damper 41 Demo song 8 HI (Hyper Integrated) synthesis system 9 Detune 67 High pass filter 53 Detuned sound 49 Dialog 15 I Arpeggio pattern 93 Initialization 99 User arpeggio pattern 99 Display 15, 119 Contrast 115 Insert effect 82, 84 ASSIGNA
R N Note Number 40 O OCTAVE 41, 88 Oscillator 48 Oscillator Mode 48, 107 P Page 15 Select 19 Page menu 16 Pan Drum Kit 110 Program 56 Timbre 60 Track 71 Parameter 15 Select 20 Performance Edit 43 Pitch 52 Varying the pitch according to keyboard position 52 V Reverse 49 VALUE controller 20 Routing 81, 82, 84 Velocity 33, 40, 49, 55, 87 S Value 20 Velocity Switch 64 Vibrato 52 Save 21, 117 Combination 61 Drum kit 110 External control 112 Multi set 75 Program 45 User arpeggio 104 Volume 42 Timbre
IMPORTANT NOTICE TO CONSUMERS This product has been manufactured according to strict specifications and voltage requirements that are applicable in the country in which it is intended that this product should be used. If you have purchased this product via the internet, through mail order, and/or via a telephone sale, you must verify that this product is intended to be used in the country in which you reside.