OWNER’S MANUAL MANUEL D’UTILISATION BEDIENUNGSANLEITUNG 取扱説明書
Precautions Location Using the unit in the following locations can result in a malfunction. • In direct sunlight • Locations of extreme temperature or humidity • Excessively dusty or dirty locations • Locations of excessive vibration • Close to magnetic fields Power supply Please connect the designated AC adapter to an AC outlet of the correct voltage. Do not connect it to an AC outlet of voltage other than that for which your unit is intended.
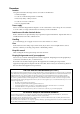
Introduction Thank you for purchasing the KAOSS PAD Entrancer audio/video processor. To ensure trouble-free enjoyment, please read this manual carefully and use the product as directed. Main features Use the X-Y touch-pad to freely control audio and video effects in a single performance.
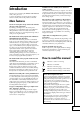
Parts and their function Top panel 3 2 1 5 6 7 8 4 10 9 11 12 13 14 1. [CONTROL SELECT] switch 2. [PEAK] indicator 10. [PAD MOTION / MUTE/FREEZE] lever 11. [HOLD] key 3. [LINE INPUT VOLUME] knob 4. [FX BALANCE] knob 12. [FUNCTION] key 13. [SAMPLE 1], [SAMPLE 2] keys 5. [PROGRAM/BPM] display 6. [PROGRAM/BPM] knob 14. [REC/STOP] key 15. [VIDEO 2] indicator 7. [PROGRAM MEMORY 1–8] keys 8. [TAP/BPM] key 9.
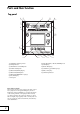
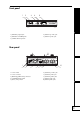
Front panel 1 2 3 4 5 1. [PHONES] output jack 2. [PHONES VOLUME] knob 4. [INPUT 2] S-video jack 5. [INPUT 2] video jack 3. [VIDEO SELECT] switch Rear panel 4 1 2 3 5 6 7 8 9 1. Power switch 6. [OUTPUT] S-video jack 2. Power connector 3. [MIDI IN], [MIDI OUT] connectors 7. [OUTPUT] video jack 8. [OUTPUT] audio jacks 4. [CONNECTION] switch 5. [NTSC/PAL] switch 10 9. [INPUT] video jack 10.
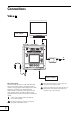
Connections Video DVD Player VIDEO MONITOR INPUT VIDEO OUTPUT VIDEO DC7V AC AC ADAPTER INPUT 2 VIDEO Video camera About video signals The KAOSS PAD Entrancer can be used with either NTSC or PAL video formats. Set the [NTSC/PAL] switch to the appropriate format setting for the video materials you will be using. The KAOSS PAD Entrancer will not operate correctly if the incorrect video signal format is selected. The KAOSS PAD Entrancer will not operate correctly with non-interlaced signals.
Audio Here’s an example of connections for applying effects to the audio input from devices connected to the KAOSS PAD Entrancer’s input jacks, and sending the processed sound from the output jacks.
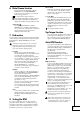
Operation 1. Turning on the power 1. Connect your equipment as described in the connection examples, and plug the AC adaptor into an AC outlet. 2. Press the [STANDBY] switch to turn on the power. The [PROGRAM/BPM] display will light. An image will appear on the connected TV monitor. To turn off the power Press the [STANDBY] switch once again. The result will depend on the effect you select.
6. Mute/Freeze function By moving the [PAD MOTION / MUTE/ FREEZE] lever to the MUTE/FREEZE position (toward yourself) you can perform the following operations. The current video image will freeze. The currently-input signal, sampling sound, or synth/drum sound will be cut. This lets you output only the effect sound (e.g., delay or reverb).
9. Storing settings to the [PROGRAM MEMORY] keys You can store your favorite settings to the [PROGRAM MEMORY 1–8] keys, and instantly recall those settings when desired. Settings that can be stored • Effect program • [HOLD] key on/off status and position (coordinates) • [FX BALANCE] knob setting • For the “BPM FX” group, the specified BPM value • For the “SAMPLE/PLAY” group, the [SAMPLE 1] and [SAMPLE 2] keys used • Pad motion Audio effect programs 60 and 90–99 do not store the state of the [HOLD] key.
12. Sampling and playing motion video 13. Sampling and playing a phrase You can sample a motion video clip and play it back while using an effect program and the touch-pad to control the video clip (for example by expanding or inverting it). If you have selected a program from the SAMPLE/ PLAY group, you can use the touch-pad to control the playback speed of the video, or even reverse the playback.
Playback The playback method will depend on the effect program you have selected. For a program in the “SAMPLE/PLAY” group 1. Select a program of the “SAMPLE/PLAY” group (90–99). 2. Press the [SAMPLE 1] or [SAMPLE 2] key that you want to play back. You will not hear the playback at this time. 3. When you touch the touch-pad, playback will occur according to the position you touch. The way in which the phrase plays back will depend on the program. (☞separate sheet “Effect Program List) 4.
MIDI functions What is MIDI? MIDI (Musical Instrument Digital Interface) is a world-wide standard for exchanging a wide variety of performance-related data between electronic musical instruments, effect processors, sequencers, etc. and computers. MIDI connections Use commercially available MIDI cables to send or receive MIDI messages. Connect the KAOSS PAD Entrancer’s MIDI connectors to the MIDI connectors of the external MIDI device to/from which you want to send/receive data.
MIDI message transmission/ reception settings The transmission and reception of each type of MIDI message can be switched on/off by pressing the key assigned to that type of MIDI message. Transmission/ reception is enabled if the corresponding key is lit, and disabled if the key is dark. (see the “Transmitted and received messages” table below) Some parameters are only transmitted, and others are only received.
FAQ Q1: A video effect is not applied when I touch the pad A: Check the following points. 1) Is the control lever in the correct position? >> The video effect is applied only when the control lever is in the COMBI or VIDEO mode. 2) Try adjusting the FX BALANCE knob. >> The FX BALANCE knob adjusts the video only if the control lever is set to VIDEO. 3) Is the PAL/NTSC switch in the correct position? >> You must turn off the power before changing the position of this switch.
Specifications Number of effect programs: 100 (video), 100 (audio), 100 (combination) Inputs: Video input jack 1 / RCA (phono style) jack Video input jack 2 / RCA jack or S-video jack (S-video jack takes priority) (The video input switch selects either video input jack 1 or 2) Line input jacks / stereo RCA jacks Video output jack / RCA jack S-video output jack / S-jack Line output jacks /stereo RCA jacks Headphone jack / stereo 1/4" phone jack Audio sampling frequency: 44.
15
Précautions Emplacement L’utilisation de cet instrument dans les endroits suivants peut en entraîner le mauvais fonctionnement. • En plein soleil • Endroits très chauds ou très humides • Endroits sales ou fort poussiéreux • Endroits soumis à de fortes vibrations • A proximité de champs magnétiques Alimentation Branchez l’adaptateur secteur fourni à une prise secteur de tension appropriée.
Introduction Nous vous remercions d’avoir choisi le processeur audio/vidéo KAOSS PAD Entrancer. Pour assurer un fonctionnement sans problème, veuillez lire attentivement ce manuel et utiliser le produit de la manière indiquée. Principales caractéristiques Utilisez le pavé tactile X-Y pour contrôler en toute liberté les effets audio et vidéo au cours d’une performance.
Nomenclature et fonctions Panneau supérieur 3 2 1 5 6 7 8 4 10 9 11 12 13 14 1. Commutateur [CONTROL SELECT] 2. Indicateur [PEAK] 10. Manette [PAD MOTION / MUTE/FREEZE] 11. Touche [HOLD] 3. Bouton [LINE INPUT VOLUME] 4. Bouton [FX BALANCE] 12. Touche [FUNCTION] 13. Touches [SAMPLE 1], [SAMPLE 2] 5. Écran [PROGRAM/BPM] 6. Bouton [PROGRAM/BPM] 14. Touche [REC/STOP] 15. Indicateur [VIDEO 2] 7. Touches [PROGRAM MEMORY 1~8] 8. Touche [TAP/BPM] 9.
Panneau avant 1 2 3 4 5 1. Sortie [PHONES] 2. Bouton [PHONES VOLUME] 4. Entrée S-vidéo [INPUT 2] 5. Entrée vidéo [INPUT 2] 3. Commutateur [VIDEO SELECT] Panneau arrière 4 1 2 3 5 6 7 8 9 1. Commutateur de mise sous/hors tension 6. Sortie S-vidéo [OUTPUT] 2. Prise d’alimentation 3. Prises [MIDI IN], [MIDI OUT] 7. Sortie vidéo [OUTPUT] 8. Sorties audio [OUTPUT] 4. Commutateur [CONNECTION] 5. Commutateur [NTSC/PAL] 10 9. Entrée vidéo [INPUT] 10.
Raccordements Vidéo Lecteur DVD VIDEO MONITOR INPUT VIDEO OUTPUT VIDEO DC7V AC AC ADAPTER INPUT 2 VIDEO Caméra vidéo A propos des signaux vidéo Le KAOSS PAD Entrancer peut être utilisé dans le format vidéo NTSC ou PAL au choix. Réglez le commutateur [NTSC/PAL] sur le format approprié correspondant aux appareils vidéo que vous utiliserez. Le KAOSS PAD Entrancer ne fonctionnera pas correctement si le format de signal vidéo incorrect est sélectionné.
Audio Voici un exemple de raccordements pour appliquer les effets au signal audio entrant des appareils branchés sur les entrées du KAOSS PAD, et transmettre le son traité vers les sorties.
Fonctionnement 1. Mise sous tension 1. Raccordez votre matériel comme décrit dans les exemples de raccordement et branchez l’adaptateur secteur sur une prise secteur. 2. Appuyez sur le commutateur [STANDBY] pour mettre l’appareil sous tension. L’écran [PROGRAM/BPM] s’allumera. Une image apparaîtra sur le moniteur TV raccordé. Pour mettre l’appareil hors tension Appuyez de nouveau sur le commutateur [STANDBY]. 2. Vérification de l’entrée vidéo 1. Produisez un signal vidéo avec un appareil raccordé. 2.
Transformer En utilisant la manette [PAD MOTION / MUTE/FREEZE] Pour activer/désactiver rapidement MUTE, vous pouvez créer un rythme à partir d’un son entrant sustain ; c’est ce qu’on appelle la technique “transformer” qui est souvent utilisée par les DJ. 7. Pad Motion Vous pouvez capturer une série de mouvements des doigts sur le pavé tactile, et reproduire ces mouvements en déplaçant la manette [PAD MOTION / MUTE/FREEZE] vers PAD MOTION.
9. Enregistrement des réglages sous les touches [PROGRAM MEMORY] Vous pouvez enregistrer vos réglages favoris sous les touches [PROGRAM MEMORY 1~8] et rappeler instantanément ces réglages quand vous le souhaitez.
La vidéo échantillonnée est perdue quand vous mettez l’appareil hors tension. Il n’est pas possible de sauvegarder une vidéo échantillonnée. Échantillonnage 1. Sélectionnez un des programmes 94-99 du groupe “SAMPLE/PLAY”. 2. Quand vous appuyez sur la touche [REC/ STOP], elle s’allume et l’enregistrement commence. L’enregistrement s’arrêtera lorsque vous appuierez de nouveau sur la touche ou lorsque la mémoire sera saturée.
4. Utilisez le bouton [FX BALANCE] pour régler le volume de reproduction. Si le bouton [FX BALANCE] est dans la position centrale, le son reproduit et le son entrant seront fournis dans un rapport 1:1. Avec le bouton à sa position extrême, seul le son échantillonné sera reproduit; le son entrant sera inaudible. Pour un programme en dehors du groupe “SAMPLE/PLAY” 1. Sélectionnez un programme en dehors du groupe “SAMPLE/PLAY”. 2.
Fonctions MIDI Qu’est-ce que MIDI ? MIDI (Musical Instrument Digital Interface) est une norme internationale pour l’échange d’une large gamme de données entre des instruments de musique électroniques, des processeurs d’effet, des séquenceurs, entre autres, et des ordinateurs.
Réglages de transmission/ réception des messages MIDI La transmission et la réception de chaque type de message MIDI peut être activée/désactivée en appuyant sur la touche assignée à ce type of message MIDI. La transmission/réception est activée si la touche correspondante est allumée, et désactivée si la touche est éteinte. (Voir le tableau “Signaux transmis et reçus” ci-dessous) Certains paramètres sont seulement transmis, et d’autres seulement reçus.
FAQ Q1: Un effet vidéo n’est pas appliqué quand je touche le pavé tactile A: Vérifiez les points suivants. 1) La manette de contrôle est-elle dans la position correcte ? >> L’effet vidéo est appliqué seulement quand la manette de contrôle est réglée sur le mode COMBI ou VIDEO. 2) Essayez de régler le bouton FX BALANCE. >> Le bouton FX BALANCE règle la vidéo seulement si la manette de contrôle est réglée sur VIDEO.
Spécifications Nombre de programmes d’effets: 100 (vidéo), 100 (audio), 100 (combinaison) Entrées: Prise d’entrée vidéo 1 / Prise RCA (type phono) Prise d’entrée vidéo 2 / Prise RCA ou S-vidéo (la prise S-vidéo prend la priorité) (Le commutateur d’entrée vidéo permet de sélectionner l’entrée vidéo 1 ou 2) Prises d’entrée ligne / Prises RCA stéréo Prise de sortie vidéo / Prise RCA Prise de sortie S-vidéo / Prise S-vidéo Prises de sortie ligne / Prises RCA stéréo Prise de casque / Jack stéréo 1/4" Fréquence d
15
Vorsichtsmaßnahmen Aufstellungsort Vermeiden Sie das Aufstellen des Geräts an Orten, an denen • es direkter Sonneneinstrahlung ausgesetzt ist; • hohe Feuchtigkeit oder Extremtemperaturen auftreten können; • Staub oder Schmutz in großen Mengen vorhanden sind; • das Gerät Erschütterungen ausgesetzt sein kann. • in der Nähe eines Magnetfeldes. Stromversorgung Schließen Sie das beiliegende Netzteil nur an eine geeignete Steckdose an. Verbinden Sie es niemals mit einer Steckdose einer anderen Spannung.
Einführung Vielen Dank, dass Sie sich für den AV-Effektprozessor KAOSS PAD Entrancer entschieden haben. Um den störungsfreien Betrieb sicherzustellen, lesen Sie sich das Handbuch sorgfältig durch, und verwenden Sie das Produkt wie vorgesehen. Hauptfunktionen Über das X-Y-Touch-Pad können Audio- und Video-Effekte bequem simultan gesteuert werden.
Teile und Funktionen Oberseite 3 2 1 5 6 7 8 4 10 9 11 12 13 14 1. [CONTROL SELECT]-Schalter (Steuerungsauswahl) 2. [PEAK]-Anzeige (Spitzenanzeige) 10. [PAD MOTION / MUTE/FREEZE]-Hebel (Pad-Bewegung/Stumm/Frieren) 3. [LINE INPUT VOLUME]-Knopf (Line-Eingangslautstärke) 11. [HOLD]-Taste (Halten) 12. [FUNCTION]-Taste 4. [FX BALANCE]-Knopf (FX-Balance) 5. [PROGRAM/BPM]-Display 13. [SAMPLE 1]-, [SAMPLE 2]-Taste 14. [REC/STOP]-Taste (Aufnahme/Wiedergabe) 6. [PROGRAM/BPM]-Knopf 7.
Vorderseite 1 2 3 4 5 1. [PHONES]-Ausgang 2. [PHONES VOLUME]-Knopf (Kopfhörer-Lautstärke) 4. [INPUT 2] S-Video-Eingang 5. [INPUT 2] Video-Eingang 3. [VIDEO SELECT]-Schalter (Videoauswahl) Rückseite 4 1 2 3 5 6 7 8 9 10 1. Netzschalter 6. [OUTPUT] S-Video-Ausgang 2. Netzanschluss 3. [MIDI IN]-, [MIDI OUT]-Anschluss 7. [OUTPUT] Video-Ausgang 8. [OUTPUT] Audio-Ausgänge 4. [CONNECTION]-Schalter (Verbindung) 5. [NTSC/PAL]-Schalter 9. [INPUT] Video-Eingang 10.
Anschlüsse Video DVD-Player VIDEO MONITOR INPUT VIDEO OUTPUT VIDEO DC7V AC AC ADAPTER INPUT 2 VIDEO Videokamera Informationen zu Videosignalen Der KAOSS PAD Entrancer unterstützt die VideoFormate NTSC und PAL. Wählen Sie mit dem [NTSC/ PAL]-Schalter das für Ihr Videomaterial geeignete Format. Wenn Sie nicht das richtige VideoEmpfangsformat einstellen, arbeite der KAOSS PAD Entrancer nicht ordnungsgemäß. Der KAOSS PAD Entrancer unterstützt keine Non-Interlaced-Signale. Anm.
Audio Das Beispiel zeigt, wie auf die Signale von Audiogeräten, die mit den Audio-Eingängen des KAOSS PAD Entrancers verbunden sind, Effekte angewendet werden und der verarbeitete Ton an die Ausgänge gegeben wird.
Betrieb 1. Einschalten des Geräts 1. Verbinden Sie Ihre Geräte wie in den Anschlussbeispielen dargestellt, und verbinden Sie das Netzteil mit einer Wandsteckdose. 2. Drücken Sie die [STANDBY]-Taste, um das Gerät einzuschalten. Das [PROGRAM/ BPM]-Display wird beleuchtet. Auf dem angeschlossenen TV-Bildschirm wird ein Bild angezeigt. Ausschalten des Geräts Drücken Sie erneut die [STANDBY]-Taste. 2. Prüfen des Video-Eingangs 1. Aktivieren Sie die Video-Wiedergabe über eines der angeschlossenen Geräte. 2.
Transformer Indem Sie mit dem [PAD MOTION / MUTE/ FREEZE]-Hebel die MUTE-Funktion ein- und ausschalten, können Sie einen „unterdrückten“ Klang erzeugen; dabei handelt es sich um die von DJs häufig verwendete „Transformer“Technik. 7. Pad Motion (Pad-Bewegung) Sie können Abfolgen von Fingerbewegungen auf dem Touch-Pad erfassen und diese anschließend wiedergeben. Setzen Sie dazu den [PAD MOTION / MUTE/FREEZE]-Hebel in die Stellung PAD MOTION. Das aktivieren bzw.
9. Speichern von Einstellungen für die [PROGRAM MEMORY]-Tasten Sie können die Tasten [PROGRAM MEMORY 1 ~ 8] mit Ihren bevorzugten Einstellungen belegen, sodass diese bei Bedarf jederzeit abgerufen werden können.
Sampling 1. Wählen Sie aus der Gruppe „SAMPLE/ PLAY“ ein Programm von 94 ~ 99. 2. Wenn Sie die [REC/STOP]-Taste drücken, leuchtet die LED der Taste auf, und die Aufzeichnung beginnt. Die Aufzeichnung endet, wenn Sie die Taste erneut betätigen oder die maximale Speicherkapazität erreicht ist. Anm. Wenn Sie im Pattern Display-Modus eine Effekt-Clipstruktur (40 ~ 59) auswählen, können Sie eine Struktur aufzeichnen. Drücken Sie die [SAMPLE 1]- oder die [SAMPLE 2]Taste, um das gesampelte Standbild aufzuzeichnen.
4. Passen Sie mit dem [FX BALANCE]-Knopf die Lautstärke der Wiedergabe an. Wenn sich der [FX BALANCE]-Knopf in der mittleren Stellung befindet, werden der Eingangston und der Ausgangston im Verhältnis 1:1 wiedergegeben. Wenn Sie den Knopf ganz nach rechts drehen, wird bei der Wiedergabe ausschließlich der Sample-Ton ausgegeben; der Eingangston ist in diesem Fall nicht zu hören. Für Programme, die nicht der Gruppe „SAMPLE/ PLAY“ angehören 1.
MIDI-Funktionen Was bedeutet MIDI? MIDI (Musical Instrument Digital Interface, Digitale Schnittstelle für Musikinstrumente) ist ein weltweit verbreiteter Standard für die Übertragung von leistungsbezogenen Daten von elektronischen Musikinstrumenten, Effektprozessoren, Sequenzern, etc. an Computer. MIDI-Anschlüsse Verwenden Sie zur Übertragung von MIDIMeldungen handelsübliche MIDI-Kabel.
Einstellungen für die Übertragung/den Empfang von MIDI-Meldungen Um die Übertragung- und Empfangsfunktion für MIDI-Meldungen zu aktivieren bzw. zu deaktivieren, drücken Sie die Taste, die dem jeweiligen Typ MIDIMeldungen zugewiesen ist. Übertragung und Empfang sind aktiviert, wenn die entsprechende Taste leuchtet (andernfalls ist die Funktion deaktiviert).
Häufig gestellte Fragen (FAQ) Q1: Beim Berühren des Pads wird der gewünschte Video-Effekt nicht ausgeführt A: Prüfen Sie folgende Punkte: 1) Befindet sich der Steuerungshebel in der richtigen Stellung? >> Video-Effekte werden nur ausgeführt, wenn der Hebel in der Stellung COMBI VIDEO befindet. 2) Ändern Sie die Einstellung des FX BALANCE-Knopfes. >> Mit dem FX BALANCE-Knopf kann die Videowiedergabe nur angepasst werden, wenn der Steuerungshebel sich in der Stellung VIDEO befindet.
Spezifikationen Anzahl von Effektprogrammen: 100 (Video), 100 (Audio), 100 (Kombination) Eingänge: Video-Eingang 1 / RCA (Phono)-Eingang Video-Eingang 2 / RCA-Eingang oder S-Video-Eingang (S-Video-Eingang prioritär) (Der Video Input-Schalter aktiviert entweder den Video-Eingang 1 oder 2) Cinch-Eingänge (Line) / Stereo-RCA-Eingänge Ausgänge: Video-Ausgang / RCA-Ausgang S-Video-Ausgang / S-Ausgang Cinch-Ausgänge (Line) / Stereo-RCA-Ausgänge Kopfhörerausgang / Stereo 1/4"-Telefonausgang Audio-Abtastrate: 44,1
15
安全上のご注意 ご使用になる前に必ずお読みください ここに記載した注意事項は、製品を安全に正しくご使用いただき、あなたや 他の方々への危害や損害を未然に防ぐためのものです。 注意事項は誤った取り扱いで生じる危害や損害の大きさ、または切迫の程 度によって、内容を「警告」、 「注意」の2つに分けています。これらは、あな たや他の方々の安全や機器の保全に関わる重要な内容ですので、よく理解 した上で必ずお守りください。 火災・感電・人身障害の危険を防止するには ・ 本製品に異物(燃えやすいもの、硬貨、針金など)を入れない。 ・ 温度が極端に高い場所(直射日光の当たる場所、暖房機器の近 く、発熱する機器の上など)で使用や保管はしない。 ・ 振動の多い場所で使用や保管はしない。 ・ ホコリの多い場所で使用や保管はしない。 ・ 風呂場、シャワー室で使用や保管はしない。 ・ 雨天時の野外などのような湿気の多い場所で、使用や保管はしな い。 ・ 本製品の上に液体の入ったもの(水や薬品等)を置かない。 ・ 本製品に液体をこぼさない。 図記号の例 記号は、注意(危険、警告を含む) を示しています。 記号の中には、具体的は注意
はじめに このたびは、AUDIO/VIDEO PROCESSOR KAOSS PAD entrancerをお買い上げいただきまして誠にありがとうご ざいます。 本機を末永くご愛用いただくためにも、 この取扱説明書を よくお読みになって正しい方法でご使用ください。 おもな特長 タッチ・パッドでエフェクトを自在にコントロール、音と映 像の空間を総合的に演出 横方向、縦方向と異なるエフェクト・パラメーターを同時に コントロール可能なタッチ・パッドを指先でこすったり、 タッ ピング(軽く叩く)、 なぞるなど「映像を演奏する」かのよう なコントロールが可能です。 映像を劇的に変化させる100種のビデオ・エフェクト・プ ログラム あらゆる映像に劇的なエフェクトをかけることのできる 100種もの即戦力ビデオ・エフェクト・プログラムを搭載。 フェード、 ワイプ、色調変更、映像の静止、 左右反転、上下転 倒、回転、拡大 / 縮小などの基本的なエフェクトから、分割 画面での表示、映像成分の反転、 砂嵐、単色合成、 ディレイ、 ストロボ、エンボス処理、 さらには回転しながらの縮小など トリッキーなものまで、多彩なエフェクト群を自
各部の機能と名称 トップ・パネル 3 2 1 5 6 7 8 4 10 9 11 15 1. [CONTROL SELECT]スイッチ 2. [PEAK]インジケーター 3. [LINE INPUT VOLUME]ノブ 4. [FX BALANCE]ノブ 5. [PROGRAM/BPM]ディスプレイ 6. [PROGRAM/BPM]ノブ 7. [PROGRAM MEMORY1 ∼ 8]キー 8. [TAP/BPM]キー 9. タッチ・パッド タッチ・パッドの取り扱いについて タッチ・パッドは強く押したり、 重いものを乗せたり絶対にし ないでください。乱暴に扱うとタッチ・パッドにヒビが入っ たり、割れることがあります。また、表面をとがったもので こすったり、押したりするとキズがつきますので、必ず指先 で操作してください。お手入れは、必ず乾いた柔らかい布 で軽く拭いてください。シンナーなどの有機溶剤は変形の 恐れがありますので、使用しないでください。 2 12 13 14 10.[PAD MOTION / MUTE/FREEZE]レバー 11.[HOLD]キー 12.
フロント・パネル 1 2 3 4 5 1. [PHONES]出力端子 2. [PHONES VOLUME]ノブ 3. [VIDEO SELECT]スイッチ 4. [INPUT 2]Sビデオ端子 5. [INPUT 2]ビデオ端子 リア・パネル 4 1 2 1. 電源スイッチ 2. 電源端子 3. [MIDI IN]、[MIDI OUT]端子 4. [CONNECTION]スイッチ 5. [NTSC/PAL]スイッチ 3 5 6 7 8 9 10 6. [OUTPUT]Sビデオ端子 7. [OUTPUT]ビデオ端子 8. [OUTPUT]音声端子 9. [INPUT]ビデオ端子 10.
接続 映像 DVD Player VIDEO MONITOR INPUT VIDEO OUTPUT VIDEO DC7V AC AC ADAPTER INPUT 2 VIDEO Video camera 映像信号について 本機は、 映像信号形式のNTSCとPALに対応しています。 使用する機材の映像信号形式を合わせて[NTSC/PAL] スイッチを切り替えてください。映像信号形式が適合して いないと、本機は正常に動作しません。また、本機はノン・ インタレース信号では正常に動作しません。 日本国内では“NTSC”が標準です。 [NTSC/PAL]スイッチの切り替えは、必ず電源を切っ た状態で行ってください。 4 コピー・ガード (プロテクト)信号の入った映像信号を 入力すると、正常に動作しません。 S入力端子に接続する機材の性能・特性によっては、 映像に縞状のノイズが出ることがあります。
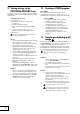
音声 本機の入力端子に接続した機器の音声にエフェクトをかけ て出力端子から出力して使用する場合の接続です。 CD PLAYER MIC4 MIC3 MIC2 MIC1 MIC6 MIC5 STEREO AUX RETURNS TAPE INPUT AUX SEND 1 1 MAIN OUTS TAPE OUTPUT L MICRO SERIES 1402-VLZ L 2 2 14-CHANNEL MIC/LINE MIXER R R LEFT(1/MONO) BAL OR UNBAL BAL OR UNBAL BAL OR UNBAL BAL OR UNBAL BAL OR UNBAL BAL OR UNBAL 60 MONO 10 60 +10dB -40dB +10dB -40dB +10dB -40dB TRIM TRIM TRIM TRIM U U AUX 1 +15 +15 -15 PAN +15 -15 AUX RETURNS RIGHT +28 CLIP +10 +7 ALT 3-4 +4 +
操作方法 1. 電源を入れる 1. 接続例を参考に使用する機材を接続し、ACアダ プターをコンセントに差し込みます。 2. [STANDBY]スイッチを押して、電源を入れま す。[PROGRAM/BPM]ディスプレイが点灯しま す。 接続した TVモニターに映像が表示されます。 電源を切るときは 再度[STANDBY]スイッチを押します。 エフェクトにより効果は異なります。 左に回しきるとエフェクトのかからない音(ドラ イ)になり、右に回しきるともっともエフェクトが かかった音(ウェット)になります。 [FX BALANCE]ノブでエフェクトのかかり具合 を調節して使用するときは[CONNECTION]ス イッチを DIRECT で使用します。 [PROGRAM/BPM]ディスプレイの表示について 現在選ばれているプログラムの番号や設定され ているBPM、 タッチ・パッドに触ったポイントの位 置(ポジション)が表示されます。 タッチ・パッド操作時:触っているポジション(1.1 ∼ 9.9、5.5でセンター)が表示されます。 2. 映像入力を確認する 1. 接続した機材から映像を出力します。 2.
6. ミュート/フリーズ機能 8. BPMを設定する [PAD MOTION / MUTE/FREEZE]レバーを MUTE/ FREEZE(手前側)に倒すことで以下の操作ができます。 現在の映像が静止します。 入力している信号やサンプリング音、 シンセ/ドラム 音がカットされます。ディレイやリバーブの残響音 などエフェクト音のみを出力することができます。 BPMを設定することで“ BPM FX”、 “ BPM PTN”グ ループのエフェクト・プログラムを選択したとき、BPMに 同期してエフェクト効果をかけることができます。効果の あるエフェクト・パラメーターについてはエフェクト・プログ ラム・リスト(→別紙)を参照してください。 トランスフォーマー [PAD MOTION / MUTE/FREEZE]レバーで MUTEのオン/オフを素早く繰り返すと、 DJテク ニックの1つである「トランスフォーマー」と同じ ように、入力された持続音でリズムを作り出すこ とができます。 7.
この機能はシーケンス・データと本機のリズムパ ターン・プログラムなどと同期させる機能ではあり ません。 外部MIDI機器からタイミング・クロックを受信し て動作しているときは、 タップ・テンポ、オート BPMは使用できません。 10. COMBIプログラムを作成する COMBI について [CONTROL SELECT]スイッチを[COMBI]に切り替えて タッチ・パッドを操作すると、映像エフェクトと音声エフェク トが同時に操作できます。 COMBIを記憶するには 1. [CONTROL SELECT]スイッチを[AUDIO]に 切り替え、 プログラムを選びます。 2. [CONTROL SELECT]スイッチを[VIDEO]に 切り替え、 プログラムを選びます。 3. [CONTROL SELECT]スイッチを[COMBI]に 切り替え、[FUNCTION]キーを押しながら、 割り 当てる[PROGRAM MEMORY]キーを約2秒 間押し続けると記憶されます。 9.
12. 動画をサンプリングして再生する 13. フレーズをサンプリングして再生 する 映像を記憶し、再生をして拡大や反転などをタッチ・パッド でコントロールすることができます。 SAMPLE/PLAYグループのプログラムを選択したとき は、再生スピードや逆再生などをタッチ・パッドを操作しな がら再生できます。 入力したフレーズを[SAMPLE 1]、[SAMPLE 2]キーの それぞれに録音し、 “ SAMPLE/PLAY”グループのプロ グラム(90∼99)を選択したときは、再生スピードや逆再 生などをタッチ・パッドでコントロールしながら再生できま す。 “SAMPLE/PLAY”グループ以外のプログラムを選択し たときは、[SAMPLE 1]、[SAMPLE 2]キーを押すとそ れぞれに録音したフレーズを再生することができます。 2 つのキーにそれぞれ約 6 秒間のモノラル録音ができま す。 電源をオフにすると記憶した映像は失われます。記憶 した映像を保存することはできません。 録画 1. [SAMPLE/PLAY]グループを選択します。 2.
フレーズの再生方法はプログラムによって違いま す。 (→別紙「エフェクト・プログラム・リスト」) 4. 再生音の音量を[FX BALANCE]ノブで調節しま す。 [FX BALANCE]ノブをセンターに合わせると再 生音と入力音が1:1で出力されます。ノブを最大 にすると再生時はサンプル音だけが出力され、 入 力音は聞こえません。 “SAMPLE/PLAY”グループ以外のプログラムの場合 1. “SAMPLE/PLAY” グループ以外のプログラム を選択します。 2.
MIDI の機能 MIDIを使う MIDIとは MIDIと は( Musical Instrument Digital Interface)の略で、電子楽器やコンピュータの 間で、演奏に関するさまざまな情報をやりとりす るための世界共通の規格です。 MIDIの接続 MIDI情報を送受信するには、市販のMIDIケーブルを使い ます。本機のMIDI端子と情報をやりとりする外部MIDI機 器の MIDI 端子に接続します。 MIDI IN端子: 他のMIDI機器からMIDIメッセージを 受け取ります。外部機器のMIDI OUT端子と接 続します。 MIDI OUT端子: 本機からMIDIメッセージを送りま す。外部機器の MIDI IN 端子と接続します。 本機はエフェクターとして使用する他に、本機から送信す るMIDIメッセージで、 シンセサイザーなどの外部MIDI機 器のリアルタイム・コントローラーとして使用できます。 また、本機とMIDIシーケンサーを接続し、 タッチ・パッドを 操作することによって送信するMIDIメッセージを、MIDI シーケンサーに記録することで、 タッチ・パッドの操作を再 現する
MIDIメッセージの送受信設定 各MIDIメッセージの送受信は、それぞれのMIDIメッセー ジが割り当てられた各キーを押してオン/オフを設定しま す。キーが点灯時は送受信が可能で、消灯時は送受信しま せん。 (→ p.
FAQ Q1:PADを触っても、映像エフェクトがかからない・・・。 A:下記の事項を確認してください。 1)コントロール・レバーで、 正しい選択をしています か? → コントロール・レバーが、COMBIまたはVIDEO モードのときに、映像エフェクトがかかります。 2)FX BALANCEボリュームを調整してみてくださ い。 → 映像に関するFX BALANCE ボリュームは、 コン トロール・レバーがVIDEOの状態でのみ調整す ることができます。 3)PAL/NTSCスイッチは、正しい位置にあります か? → 電源を切ってから正しい位置に変更し、 再度電源 を入れてください。 Q2:静止画のサンプリングがうまくできない・・・。 A:静止画サンプリングは、 コントロール・レバーが、 VIDEO モードのときのみ可能です。 → コントロール・レバーを、VIDEOモードにして、 MUTE/FREEZEレ バ ー で FREEZEしな が SAMPLE(1or2)ボタンを押すとサンプリングさ れます。 Q3:COMBIモードでVIDEOエフェクトが、静止画にしか かからない・・・。 A:静止画が再生中は、映像エフ
仕様 エフェクト・プログラム数: 100(映像)、100(音声)、100(コンビネーション) 入力: 映像入力端子 1/ピン・ジャックのみ 映像入力端子 2/ピン・ジャックまたはS端子ジャック (S端子優先) (映像入力端子 1か 2 のどちらかを、映像入力切替スイッチで選択) ライン・インプット端子 / ステレオ・ピン・ジャック 出力: 映像出力端子 /ピン・ジャック S 映像出力端子 /S 端子ジャック ライン・アウトプット端子 / ステレオ・ピン・ジャック ヘッドホン端子 / ステレオ・フォーン・ジャック 音声サンプリング周波数: 44.1kHz 音声 AD/DA: 20bitリニア MIDI: IN/OUT 電源: DC7V (専用 ACアダプター) 付属品: ACアダプター、 タッチ・パッド保護シ−ト 外形寸法: 240(W) ×247(D) ×83(H)mm 重量: 2.
2.RECOGNIZED RECEIVE DATA KPE1 MIDI IMPLEMENTATION 1.
(4) ALL DATA DUMP REQUEST R +----------------+--------------------------------------------------+ | Byte | Description | +----------------+--------------------------------------------------+ | F0,42,3c,6x | EXCLUSIVE HEADER KPE1(x:=F) or KP2(x:=7) | | 0000 1111 (0F) | ALL DATA DUMP REQUEST 0FH | | 1111 0111 (F7) | EOX | +----------------+--------------------------------------------------+ When this message is received, the ALL DATA DUMP(Function:50h) message will be transmitted by the same ID(KPE1:6Fh or KP
[Map Data (12byte)] 12byte = 7 * 1 + 5 --> 8 * 1 + (5 + 1) = 14byte (See TABLE 1-a) NOTE 3 : MAP DATA DUMP FORMAT a) When header is KPE1 ID. [Map. A 1(12byte)], ... ,[Map. A 8(12byte)] (See TABLE [Map. C 1(24byte)], ... ,[Map. C 8(24byte)] (See TABLE [Map. B 1(12byte)], ... ,[Map. B 8(12byte)] (See TABLE [Map. P 1(1058byte), ... ,[Map. P 24(1058byte)] (See TABLE 25776byte = 7 * 3682 + 2 --> 8 * 3682 + (2 + 1) = 29459byte b) When header is KP2 ID. [Map.1 (12byte)], ... ,[Map.
[AUDIO/VIDEO PROCESSOR] KOSS PAD entrancer MIDI Implementation Chart Function Basic Channel: Transmitted Recognized Default 1–16 1–16 Changed 1–16 1–16 Default Messages Altered Mode Note Number: 2003.7.
アフターサービス ■ 保証書 ■ 修理を依頼される前に 本製品には、保証書が添付されています。 お買い求めの際に、販売店が所定事項を記入いたし ますので、 「お買い上げ日」、 「販売店」等の記入をご 確認ください。記入がないものは無効となります。 なお、保証書は再発行致しませんので、紛失しないよ うに大切に保管してください。 故障かな?とお思いになったら、まず取扱説明書をよ くお読みのうえ、もう一度ご確認ください。 それでも異常があるときは、お買い上げの販売店、最 寄りのコルグ営業所、またはサービス・センターへお 問い合わせください。 ■ 修理時のお願い ■ 保証期間 お買い上げいただいた日より一年間です。 ■ 保証期間中の修理 修理に出す際は、輸送時の損傷等を防ぐため、 ご購入 されたときの箱と梱包材をご使用ください。 ■ご質問、ご相談について 保証規定に基づいて修理いたします。詳しくは保証書 をご覧ください。 本製品と共に保証書を必ずご持参の上、修理を依頼し てください。 アフターサービスについてのご質問、ご相談は、お買 い上げの販売店、最寄りのコルグ営業所、またはサー ビス・センターへ
IMPORTANT NOTICE TO CONSUMERS This product has been manufactured according to strict specifications and voltage requirements that are applicable in the country in which it is intended that this product should be used. If you have purchased this product via the internet, through mail order, and/or via a telephone sale, you must verify that this product is intended to be used in the country in which you reside.