OWNER’S MANUAL (p.4–27) MANUEL D’UTILISATION (p.28–51) BEDIENUNGSANLEITUNG (p.
Precautions Location Using the unit in the following locations can result in a malfunction. • In direct sunlight • Locations of extreme temperature or humidity • Excessively dusty or dirty locations • Locations of excessive vibration • Close to magnetic fields Power supply Please connect the designated AC adapter to an AC outlet of the correct voltage. Do not connect it to an AC outlet of voltage other than that for which your unit is intended.
Introduction Thank you for purchasing the KP3 KAOSS PAD dynamic effect/sampler. For troublefree enjoyment of the KP3’s fullest potential, please read this manual carefully and use the KP3 only as directed. Auto-BPM detect, MIDI Clock and Tap Tempo keep sample playback speed and tempo-based effects moving together. Samples and setting can be saved to Secure Digital (SD) cards, or saved to a computer via USB and reloaded quickly.
Parts of the KP3 and their functions Top panel 1. Display 2. [PEAK] indicator 3. [INPUT SELECT] switch 4. [INPUT VOLUME] knob 5. [FX DEPTH] knob 6. LEVEL slider (Sample Bank playback level—see page 14) 7. [HOLD] button 8. [SAMPLE BANK] buttons 9. [PROG] indicator 10. [BPM] indicator (Blinks when a BPM program is selected.) 11. [WRITE] button 1 2 3 4 5 6 12. [SHIFT] button 13. [PROGRAM/BPM] knob 14. [TAP/RANGE] button 15. [PROGRAM MEMORY 1–8] buttons 16. [AUTO BPM] button 17. [PAD MOTION] button 18.
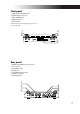
Front panel 1. [PHONES VOLUME] knob 2. [PHONES] output jack 3. [MIC TRIM] knob 4. [MIC] input jack 5. SD Card Slot The KP3 must be turned off before you insert or remove the SD card! 1 3 2 4 5 Rear panel 1. [MIDI IN], [MIDI OUT] connectors 2. DC 12V jack 3. [POWER] switch 4. [USB] jack 5. [CONNECTION] switch 6. [LINE OUT] jacks 7.
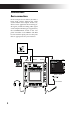
Connections Basic connections In the example shown below, the KP3 is being used “in-line” between the audio source and the mixer inputs. In this case, effects can be applied to the incoming audio signal, and the incoming audio signal can be sampled. In this type of application, the CONNECTION switch on the rear panel should be set to DIRECT. The KP3 has line and mic input jacks. Use the jacks that are appropriate for your situation.
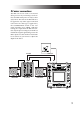
DJ mixer connections The KP3 can also be used as an external effect processor by connecting it to the effect send and return jacks on a DJ (or other style) mixer. This allows the KP3 effects to be applied to any audio signal connected to the mixer. For this type of application, the CONNECTION switch on the rear panel should be set to SEND. With this setting, the output from the KP3 will contain only the processed signal, and will not include the original signal being sent to the KP3's inputs.
Operation Using the power switch 1. Connect the KP3 to your other equipment as shown in the diagrams on the preceding pages, and connect the AC adapter to an electrical outlet. The BPM indicator will blink if you select a program that synchronizes to the BPM. NOTE Never use any AC adapter other than the included one. 2. Press the Power switch to turn the KP3 on. The display will light. To turn the KP3 off, press the Power switch once again to return it to the standby position.
Mute function Pad Motion Holding down the MUTE button will momentarily cut the input signal, but the effected signal will continue to play. Pad Motion allows you to record and playback the motion of your finger on the touch pad. This allows you to accurately reproduce the same complicated movements over and over again. In addition, the pad LEDs will provide a visual indication of the movement. You can even save pad motion recording as part of the Program Memory. (➝p.
Saving a pad motion Auto BPM detection To save the pad motion you've just recorded, write (or re-write) the current program into Program Memory (➝p.13) The KP3 can set the BPM value automatically by detecting the beat of the song. If the song's BPM changes, the KP3's BPM value will change in sync. 1. Press the AUTO BPM button to turn on Auto BPM detection. 2. The AUTO BPM button will light, and the BPM of the incoming audio source will be detected automatically.
MIDI Sync function Recalling The BPM of the KP3 can be set to follow MIDI Time Clock messages from an external MIDI device. Connect the MIDI OUT connector of an external MIDI device (such as a sequencer set to transmit MIDI time clock messages) to the MIDI IN connector of the KP3. 1. Press one of the PROGRAM MEMORY buttons (1–8); the settings stored in that memory location will be recalled. NOTE This function will not synchronize sequence data with the KP3’s rhythm pattern programs.
4. If you want to record a one-shot sample, press the same SAMPLE BANK button before reaching the specified BEAT. Sampling will end, and a one-shot sample will be created. The SAMPLE BANK button used for recording will light red. It will be easier to record a one-shot sample if you specify a longer setting such as “16.” 5. If the specified BEAT time elapses before you press the SAMPLE BANK button, sampling will end, and a loop sample will be created.
four-measure sample to create a one-measure loop. 1. The SHIFT button will light and the specified SAMPLE BANK button will blink green. 2. All eight PROGRAM MEMORY buttons will light (by default). By pressing the corresponding button you can turn on or off each sample slice. Resampling By resampling, you can create a sample that combines multiple existing samples, or create a new sample from an existing sample processed by an effect. You can resample to create both loop and one-shot samples.
assigns a control change to each controller. You can specify note numbers for the SAMPLE BANK buttons. GLCH (Global channel) SAMPA, B, C, D (Sample Bank buttons) PAD X, PAD Y, PAD T (Pad Touch) FX.DP (FX Depth knob) SLDR (Level/FX RELEASE Slider) HOLD (HOLD button) [6] PAD LED Prog: This turns on/off the function that displays the program name in the touch pad LED when a program change occurs.
SD card You can use an SD card to save or load data to and from the KP3’s internal memory. You can also load samples (WAV files or AIFF files) created on a computer into the KP3 by using a card. NOTE Before you can use the SD card, you must format it on the KP3. Don’t use your computer or digital camera to format (initialize) a card you plan to use with the KP3. If the card was formatted on a different device, it may not work correctly with the KP3.
Using SD memory cards Checking the total capacity of the card 1. Hold down the SHIFT button and press the PROGRAM MEMORY 1 (CARD) button. 2. Use the PROGRAM/BPM knob to select “InFo” (card capacity). 3. Press the PROGRAM/BPM knob; the display will indicate “NO.” 4. Use the [PROGRAM/BPM] knob to select “yes” and press the PROGRAM/BPM knob to format the card. When formatting is complete, the display will indicate “End.
cate “End.” Press the SHIFT button to return to normal operation. NOTE You won’t be able to save if the SD card is protected. Never turn off the power or remove the SD card while saving or formatting. Doing so may render the SD card unusable. MIDI functions What is MIDI? MIDI stands for Musical Instrument Digital Interface, and is a world-wide standard for exchanging a variety of performancerelated information between electronic musical instruments and computers.
Using the KP3 as an effect processor under MIDI control OUTPUT MIDI OUT LINE IN MIDI IN KORG ELECTRIBE MX Using the KP3 as a MIDI controller (EXT CTRL mode) MIDI OUT MIDI IN Changing the MIDI channel 1. Hold down the SHIFT button and press the PROGRAM MEMORY 5 (MESSAGE) button. 2. Use the PROGRAM/BPM knob to choose “GL.Ch” and then press the PROGRAM/BPM knob. The currently-specified MIDI channel is shown. 3. Use the PROGRAM/BPM knob to change the MIDI channel. 4.
4. Press the TAP/RANGE button (lit orange) to return to the MESSAGE parameter list. 5. At this point, you can either press the WRITE button (blinking) to save the changes you have made, or you can press the SHIFT button to exit without saving. Changing the MIDI message filter settings 1. Hold down the SHIFT button and press the PROGRAM MEMORY 4 (MIDI FILTER) button. The display will show the messages to be filtered. 2. Use the PROGRAM/BPM knob to select the message you want to filter.
Sharing data with your KP3 and computer The KP3 is equipped with a USB connector, and by connecting it directly to your computer you can transfer sample data and settings files saved on the card into your computer for backup. The USB connection allows you to use the KP3 as a USB-MIDI device that transmits and receives MIDI messages without having to connect the MIDI cables. NOTE When you’re in USB mode, you can press the SHIFT button to return to normal operation.
5. When you’re ready to disconnect the KP3, drag the drive from the desktop into the Trash. Then press the KP3’s SHIFT button to exit USB mode. NOTE When you’re ready to disconnect the KP3 from your computer, you must first exit USB mode and then disconnect the USB cable. About the contents of the card The following files and folders will be created in the root directory of the card. Files you can save SAMPLE Data GLOBAL Data PROGRAM Memory Set All Data 00–99.KPS 0–9.KPG 0–9.KPP 0–9.
Software Installation KP3 Editor Installing the software Supported operating systems Microsoft Windows XP Home Edition/ Professional Edition Service Pack 2 or later Compatible computers A computer that meets the operating requirements for Microsoft Windows XP and is equipped with a USB port Contents of the CD-ROM The included CD-ROM contains the following.
3. When you’ve installed all of the software you selected, exit the installer. 4. If necessary, install the KORG USBMIDI driver. For details on the installation procedure, refer to “Installing the KORG USB-MIDI driver” below. Installing the KORG USB-MIDI driver In order to use Sample Librarian/MIDI Editor via a USB connection, you must install the “KORG USB-MIDI driver” in your computer. You’ll use KORG USB-MIDI Driver Tools to install the KORG USB-MIDI driver. 1.
Installing the KORG MIDI driver and editor software for Mac OS X Installing the software 4. In the “What action do you want Windows to take?” choose [Ignore] or [Warn], and then click [OK]. If necessary, return this setting to its previous state when you’ve finished installing the KORG USB-MIDI driver. Here’s how to start up the individual installers for the KORG USB-MIDI or KP3 Editor software and install them separately. 1. Insert the included CD-ROM into your computer’s CD-ROM drive. 2.
Specifications Number of programs: 128 Input: Mic input jack / monaural phone jack Line input jacks / RCA phono jacks Output: Line output jacks / RCA phono jacks Headphone jack / stereo phone jack MIDI: IN, OUT USB: Type B Power supply: DC 12V 700mA Included items: AC adapter, touch pad protective sheet Weight: 1.3 kg / 2.87 lbs. Dimensions: 210(W) X 226 (D) X 49 (H) mm / 8.27"(W) X 8.90"(D) X 1.93"(H) * Appearance and specifications are subject to change without notice.
Précautions Emplacement L’utilisation de cet instrument dans les endroits suivants peut en entraîner le mauvais fonctionnement. • En plein soleil • Endroits très chauds ou très humides • Endroits sales ou fort poussiéreux • Endroits soumis à de fortes vibrations • A proximité de champs magnétiques Alimentation Branchez l’adaptateur secteur fourni à une prise secteur de tension appropriée.
Introduction Merci d’avoir fait l’acquisition du contrôleur d’effets dynamique/échantillonneur KP3 KAOSS PAD. Afin de pouvoir l’apprécier longtemps, sans problèmes, et tirer le meilleur parti de toutes ses possibilités, nous vous conseillons de lire attentivement le présent manuel et d’utiliser le KP3 seulement de la manière indiquée. tempo et la vitesse de reproduction de l’échantillon peuvent être synchronisés grâce aux fonctions Auto-BPM detect, MIDI Clock et Tap Tempo.
Eléments du KP3 et leurs fonctions Panneau supérieur 1. Affichage 2. Témoin [PEAK] (Crête) 3. Commutateur [INPUT SELECT] (sélecteur d’entrée) 4. Bouton [INPUT VOLUME] (volume entrant) 5. Bouton [FX DEPTH] (Profondeur de l’effet) 6. Potentiomètre [LEVEL] (niveau de lecture des échantillons de Sample Bank – voir page 38) 7. Touche [HOLD] (maintien) 8. Touches [SAMPLE BANK] 9. Témoin [PROG] 10. Témoin [BPM] (clignote quand un programme BPM est sélectionné.) 11. Touche [WRITE] 12. Touche [SHIFT] 13.
Panneau avant 1. Bouton [PHONES VOLUME] (volume du casque d’écoute) 2. Prise de sortie [PHONES] (prise pour casque d’écoute) 3. Bouton [MIC TRIM] (épuration des sons) 4. Prise d’entrée [MIC] (prise pour micro) 5. Fente pour carte SD Vous devez éteindre le KP3 avant d’insérer ou de retirer la carte SD ! 1 3 2 4 5 Panneau arrière 1. Bornes [MIDI IN], [MIDI OUT] 2. Prise DC 12V 3. Interrupteur d’alimentation [POWER] 4. Prise [USB] 5. Commutateur [CONNECTION] 6. Prises [LINE OUT] (sortie de ligne) 7.
Liaisons Liaisons de base Dans l’exemple ci-dessous, le KP3 est utilisé “en ligne” entre la source audio et les entrées de mixage. Dans ce cas, les effets peuvent être appliqués au signal audio entrant, et ce dernier peut être échantillonné. Dans ce type d’application, le commutateur CONNECTION du panneau arrière doit être réglé sur DIRECT. Le KP3 est muni d’entrées de ligne et micro. Utilisez celles qui conviennent le mieux à la situation souhaitée.
Liaisons d’un mélangeur DJ Vous pouvez également utiliser le KP3 comme processeur d’effets externe en le raccordant aux bornes d’envoi et de retour d’effets du mélangeur DJ, etc. Les effets du KP3 peuvent ainsi être appliqués à tout signal audio reçu par le mélangeur DJ. Pour ce type d’application, le commutateur CONNECTION du panneau arrière doit être réglé sur SEND.
Fonctionnement Mise sous tension 1. Raccordez le KP3 à vos autres appareils comme illustré sur les schémas des pages précédentes, puis branchez l’adaptateur secteur sur une prise de courant. REMARQUE Utilisez uniquement l’adaptateur fourni. Le témoin BPM clignotera si vous sélectionnez un programme synchronisé avec avec le BPM. 2. Appuyez sur l’interrupteur d’alimentation pour mettre le KP3 sous tension. L’afficheur s’allumera.
neau. Les LED du pavé tactile resteront allumées dans cette position. Fonction de coupure de son En maintenant enfoncée la touche MUTE, vous couperez momentanément le signal d’entrée, mais le signal affecté continuera à être joué. Effet Transformer En tapant rapidement sur la touche MUTE, vous pourrez créer des rythmes à partir d’un son d’entrée soutenu, comme dans la technique de DJ connue sous le nom de “transformer”.
“reproduction vers l’avant” ➝ “reproduction vers l’arrière”. Sauvegarde d’un mouvement Pour sauvegarder le mouvement que vous venez d’enregistrer, stockez le programme actuel dans la mémoire de programme (Voir p.37.) Réglage du BPM Qu’est-ce que le BPM ? BPM (Beats Per Minute) est le tempo du morceau exprimé sous la forme du nombre de temps (noires) par minute. Plus la valeur du BPM est élevée, plus le tempo est rapide. Affichage du BPM Quand vous mettez le KP3 sous tension, le BPM est réglé sur 120.0.
REMARQUE Ce réglage réalignera également le début de chaque échantillon. Désactivation d’AUTO BPM Appuyez sur la touche AUTO BPM de telle façon qu’elle s’éteigne. La fonction AUTO BPM sera désactivée et la valeur actuelle du BPM sera utilisée. Fonction de synchronisation MIDI (MIDI Sync) Il est possible de spécifier le BPM du KP3 pour qu’il suive les messages MIDI Time Clock provenant d’un appareil MIDI externe.
ficheur indiquera “[16]” (la valeur par défaut est 16 temps). Pour sortir de ce mode sans échantillonner, appuyez sur la touche SHIFT. REMARQUE la fonction AUTO BPM est automatiquement désactivée. 2. Utilisez le bouton PROGRAM/BPM pour spécifier la longueur de l’échantillon (en temps). L’affichage commutera entre [16], [8], [4], [2] ou [1] en fonction de ce réglage. 3. Quand vous êtes prêt à enregistrer, appuyez sur une des touches clignotantes SAMPLE BANK A, B, C ou D.
Réglage du point de début 1. La touche SHIFT s’allumera et la touche SAMPLE BANK spécifiée clignotera en vert. L’afficheur indiquera le réglage du point de début de la boucle. 2. Les touches SAMPLE BANK clignoteront en orange et le KP3 passera en mode d’attente d’enregistrement. 3. Suivez alors les instructions pour l’enregistrement de boucles et d’échantillons one shot au chapitre précédent.
Réglage des fonctions Si vous appuyez sur une des touches PROGRAM MEMORY 1~8, tout en maintenant la touche SHIFT enfoncée, vous pouvez exécuter plusieurs fonctions variées comme le formatage d’une carte ou l’enregistrement/rappel d’échantillons. Utilisez la procédure suivante pour accéder au réglage des fonctions et éditer leurs divers paramètres. 1. Appuyez sur une des touches PROGRAM MEMORY 1~8, tout en maintenant la touche SHIFT enfoncée. 2.
[8] EXT.CTRL Cette fonction vous permet d’utiliser le KP3 comme contrôleur MIDI. Les effets ne fonctionneront pas dans ce mode. Le KP3 transmettra les messages MIDI assignés à chaque contrôleur en utilisant l’éditeur PC inclus. Pour le pavé tactile, vous pouvez choisir entre huit groupes d’assignation de messages MIDI différents.
- Ne laissez pas une carte SD à portée de main des jeunes enfants qui pourraient la mettre dans leur bouche et l’avaler. - Veuillez lire soigneusement et observer les consignes du mode d’emploi fourni avec votre carte SD. A propos de la protection d’écriture sur une carte SD Les cartes SD ont un taquet de protection qui empêche l’effacement accidentel des données. Si vous mettez le taquet sur la position de protection, il sera impossible d’écrire ou d’effacer des données sur la carte ou de la formater.
3. Appuyez sur le bouton PROGRAM/BPM pour afficher “NO”. 4. Utilisez le bouton PROGRAM/BPM pour sélectionner “yes” et appuyez de nouveau sur le bouton PROGRAM/BPM pour formater la carte. Lorsque le formatage est terminé, l’afficheur indiquera “End”. Appuyez sur la touche TAP/RANGE (allumée en orange) pour revenir à la sélection d’un autre paramètre ou appuyez sur la touche SHIFT pour revenir au mode de fonctionnement normal. REMARQUE Tout le contenu de la carte sera perdu quand vous l’aurez formatée.
lectionner le numéro du fichier que vous souhaitez charger. Si vous chargez un fichier WAVE ou AIFF, sélectionnez le fichier souhaité. REMARQUE Dans le cas des fichiers WAVE ou AIFF, le KP3 reconnaîtra seulement les noms de fichiers constitués d’un numéro à deux chiffres plus une extension de fichier, comme “00.wav” ou “99.aif”. Si des fichiers .wav et .aiff dont le nom comporte les mêmes deux chiffres coexistent dans la carte, le fichier WAVE prendra la priorité.
Utilisation du KP3 comme processeur d’effets contrôlé par MIDI OUTPUT MIDI OUT LINE IN MIDI IN KORG ELECTRIBE MX Utilisation du KP3 comme contrôleur MIDI (mode EXT CTRL) MIDI OUT MIDI IN KORG ELECTRIBE MX Réglages MIDI Le KP3 n’est pas qu’un simple processeur d’effets. Il permet également de transmettre des messages MIDI, ce qui fait de lui un contrôleur en temps réel pour synthétiseur ou autre appareil MIDI externe.
point décimal s’allumera. Si vous assignez cette valeur, le contrôleur correspondant transmettra et recevra les mêmes messages Control change que l’autre contrôleur. 4. Appuyez sur la touche TAP/RANGE (allumée en orange) pour revenir à la liste des paramètres MESSAGE. 5. Vous pourrez alors appuyer sur la touche WRITE (clignotante) pour sauvegarder les changements effectués, ou appuyer sur la touche SHIFT pour quitter les réglages sans les sauvegarder. Réglages des filtres de messages MIDI 1.
Partage des données entre le KP3 et un ordinateur Le KP3 est muni d’une prise USB. En la raccordant directement à un ordinateur, vous pouvez transférer des données d’échantillons et des fichiers de réglage enregistrés dans la carte pour sauvegarde dans l’ordinateur. La liaison USB vous permet d'utiliser le KP3 comme appareil USB-MIDI pouvant transmettre et recevoir des messages MIDI sans que vous ayez à effectuer une liaison à l'aide de cordons MIDI.
Copiez les données souhaitées dans votre ordinateur. Vous pouvez aussi copier des données de votre ordinateur dans la carte. 5. Quand vous êtes prêt à débrancher le KP3, glissez-déposez l’icône du disque dans la corbeille. Appuyez ensuite sur la touche SHIFT du KP3 pour quitter le mode USB. REMARQUE Quand vous êtes prêt à débrancher le KP3, vous devez quitter le mode USB avant de débrancher le cordon USB.
KP3 Editor pour KP3 Windows XP REMARQUE Vous devez installer les outils du pilote KORG USB-MIDI si vous souhaitez utiliser KP3 Editor via une liaison USB. Systèmes d’exploitation supportés Microsoft Windows XP Home Edition/Professional Edition Service Pack 2 ou plus récent Ordinateurs compatibles Un ordinateur avec un port USB, conforme aux exigences de fonctionnement pour Microsoft Windows XP 3. Quand toutes les applications ont été installées, quittez l’installateur. 4.
sans signature numérique. Vérifiez les réglages de votre ordinateur comme indiqué dans “Déblocage de l’installation de pilotes non assignés”. 5. Quand vous avez terminé l’installation du pilote KORG USB-MIDI, quittez l’installateur. Si un message vous demande si vous souhaitez redémarrer maintenant votre ordinateur, cliquez sur “Oui” pour redémarrer. Pour les détails sur l’installation, le réglage ou la désinstallation du pilote KORG USB-MIDI, reportez-vous au manuel d’installation (HTML).
• Pilote KORG USB-MIDI Dossier “KORG USB-MIDI DRIVER” ➝ KORG USB-MIDI DRIVER.pkg •KP3 Editor Dossier “KP3 Editor” ➝ KP3 Editor.pkg 3. Suivez les instructions affichées à l’écran pour installer le pilote KORG USB-MIDI ou le logiciel KP3 Editor. REMARQUE Vous devez installer le pilote KORG USB-MIDI dans votre ordinateur si vous souhaitez utiliser KP3 Editor via une liaison USB. 4. Quand l’application sélectionnée a été installée, quittez l’installateur.
Vorsichtsmaßnahmen Aufstellungsort Vermeiden Sie das Aufstellen des Geräts an Orten, an denen • es direkter Sonneneinstrahlung ausgesetzt ist; • hohe Feuchtigkeit oder Extremtemperaturen auftreten können; • Staub oder Schmutz in großen Mengen vorhanden sind; • das Gerät Erschütterungen ausgesetzt sein kann. • in der Nähe eines Magnetfeldes. Stromversorgung Schließen Sie das beiliegende Netzteil nur an eine geeignete Steckdose an. Verbinden Sie es niemals mit einer Steckdose einer anderen Spannung.
Einleitung Vielen Dank, dass Sie sich für den KP3 KAOSS PAD dynamischen Effekt/Sampler entschieden haben. Um den störungsfreien Betrieb und optimale Ausnutzung des KP3 sicherzustellen, lesen Sie sich das Handbuch sorgfältig durch, und verwenden Sie den KP3 wie vorgesehen. Übersicht Der KP3 bietete Korgs KAOSS-Technologie, die es dem X-Y-Touch-Pad erlaubt, mehrere Effektparamater in Echtzeit zu steuern.
Teile des KP3 und ihre Funktionen Oberseite 1. Display 2. [PEAK]-Anzeige 3. [INPUT SELECT]-Wahlschalter 4. [INPUT VOLUME]-Knopf 5. [FX DEPTH]-Knopf 6. LEVEL-Schieberegler (Sample Bank Wiedergabepegel—siehe Seite62) 7. [HOLD]-Taste 8. [SAMPLE BANK]-Tasten 9. [PROG]-Anzeige 10. [BPM]-Anzeige (Blinkt, wenn ein Taktzahl-Programm gewählt ist.) 11. [WRITE]-Taste 12. [SHIFT]-Taste 1 2 3 4 5 6 13. [PROGRAM/BPM]-Knopf 14. [TAP/RANGE]-Taste 15. [PROGRAM MEMORY 1~8]-Tasten 16. [AUTO BPM]-Taste 17.
Vorderseite 1. [PHONES VOLUME]-Knopf 2. [PHONES]-Ausgang 3. [MIC TRIM]-Knopf 4. [MIC]-Eingangsbuchse 5. SD-Kartensteckplatz Das KP3 muss vor dem Einsetzen oder Abziehen der SD-karte ausgeschaltet werden! 1 3 2 4 5 Rückseite 1. [MIDI IN]-, [MIDI OUT]-Anschluss 2. DC 12V-Buchse 3. [POWER]-Schalter 4. [USB]-Buchse 5. [CONNECTION]-Schalter 6. [LINE OUT]-Buchsen 7.
Anschlüsse Grundlegende Anschlüsse Im unten gezeigten Beispiel wird der KP3 „inline“ zwischen der Audioquelle und den Mixer-Eingängen eingesetzt. In diesem Fall können Effekte an das eingehende Audiosignal angelegt werden, und das eingehende Audiosignal wird gesampelt. Bei dieser Anwendungsweise muss der CONNECTION-Schalter an der Rückseite auf DIRECT gestellt sein. Der KP3 hat Line- und Mic-Eingangsbuchsen. Verwenden Sie die für die Situation geeigneten Buchsen.
DJ-Mischpult-Anschlüsse Der KP3 kann auch als externer Effektprozessor eingesetzt werden, indem er an die EffectSend- und Return-Buchsen eines DJ- (oder anderen) Mischpults angesetzt wird. Diese erlaubt das Anlegen der KP3-Effekte an jedes am Mischpult angeschlossene Audiosignal. Für diese Anwendungsweise muss der CONNECTION-Schalter an der Rückseite auf SEND gestellt sein.
Betrieb Verwendung des Netzschalters 1. Schließen Sie den KP3 an Ihre anderen Geräte an, wie in der Abbildung gezeigt auf den Vorseiten gezeigt, und schließen dann das Netzteil an eine Steckdose an. HINWEIS: Es darf ausschließlich das beiliegende Netzteil gebraucht werden. 2. Drücken Sie den Netzschalter, um den KP3 einzuschalten. Das Display leuchtet auf. Zum Ausschalten des KP3 drücken Sie den Netzschalter erneut, um auf Standby zurückzuschalten. Wählen des Audio-Eingangs 1.
beim Drücken der HOLD-Taste. Die PadLEDs leuchten in dieser Position weiter. Mute-Funktion Wenn Sie die MUTE-Taste gedrückt halten, wird das Eingangssignal momentan unterbrochen, aber das betreffende Signal spielt weiter. FX Rlease-Funktion nicht verwendet, aber der Delay-Sound innerhalb des Effektprogramms verbleibt an dem Moment, wo Sie Ihren Finger vom Touch-Pad nehmen und produziert einen ähnlichen Effekt.
„Reverse-Wiedergabe“ ➝ „Vorwärts-Wiedergabe“ ➝ „Reverse-Wiedergabe“ . Speichern einer Pad Motion Zum Speichern der gerade aufgezeichneten Pad Motion schreiben (oder überschreiben) des aktuellen Programms in den Programmspeicher (->S. 61) Festlegen der Taktzahl (BPM) Was bedeutet BPM? Die Taktzahl (BPM, Beats per Minute) drückt das Tempo eines Stücks als Anzahl der Taktschläge (Viertelnoten) pro Minute aus. Je höher der BPM-Wert, desto schneller das Tempo.
ell zurücksetzen, welcher Taktschlag als Start des Taktes gezählt wird. Halten Sie die SHIFT-Taste gedrückt und drücken Sie die TAP/RANGE (ALIGN)-Taste; dieser Moment wird als Anfang eines Taktes festgelegt. Die Taste blinkt in Grün am Anfang des Taktschlags. (Dies ist für 4/4 festgelegt; Grün> Rot> Rot> Rot) HINWEIS: Diese Einstellung richtet auch den Anfang jedes Samples neu aus. Ausschalten von Auto BPM Drücken Sie die Taste AUTO BPM, so dass die Taste erlischt.
Wenn ein Loop-Sample erzeugt wird, beginnt es zu spielen, sobald es aufgenommen ist (die entsprechende Taste SAMPLE BANK leuchtet orangefarben). Sampling 1. Drücken Sie die Taste SAMPLING. In diesem Samplingbereit-Modus blinken die Tasten SAMPLE BANK rot, und das Display zeigt „[16]“ an (der Vorgabewert ist 16 Taktschläge). Zum Beenden ohne Sampling drükken Sie die SHIFT-Taste. HINWEIS: Die automatische Taktzahlfunktion wird automatisch ausgeschaltet. 2.
BANK-Taste, die ein Loop-Sample wird enthält. HINWEIS: Wenn Sie eine SAMPLE BANK-Taste drücken, die ein One-Shot-Sample enthält, können Sie nicht in der Lage sein, andere Einstellungen als den Pegel zu bearbeiten. Startpunkt-Einstellung 1. Die SHIFT-Taste leuchtet, und die festgelegte SAMPLE BANK-Taste wechselt auf grünes Blinken um. Das Display zeigt die LoopStartpunkt-Einstellung an. 2.
Funktionseinstellungen Wenn die SHIFT-Taste gedrückt gehalten wird und eine der Tasten PROGRAM MEMORY 1–8 gedrückt wird, können Sie verschiedene Funktionen ausführen, wie Formatieren einer Karte oder Speichern/Laden von Samples. Verfahren Sie wie folgt, und auf Funktionseinstellungen zuzugreifen und ihre verschiedenen Parameter zu bearbeiten. 1. Halten Sie die SHIFT-Taste gedrückt und drücken Sie eine der Tasten PROGRAM MEMORY 1–8. 2. Wählen Sie mit dem PROGRAM/BPMKnopf ein Zusatzparameter aus. 3.
Dies erlaubt es Ihnen, den KP3 als MIDI-Controller einzusetzen. Die Effekte arbeiten nicht in diesem Modus. Der KP3 sendet die MIDI-Meldungen, die Sie jedem Controller mit dem mitgelieferten PCEditor zugewiesen haben. Beim Touch-Pad können Sie unter acht verschiedenen Zuweisungsmustern für MIDI-Meldungen wählen. Sie können MIDI-Meldungen zu den folgenden Controllern zuweisen: PROGRAM/ BPM-Knopf, PROGRAM MEMORY 1–8, SAMPLE BANK A–D, FX DEPTH, LEVEL SLIDER, PAD (X, Y, TOUCH) und HOLD.
sen Sie sie in der mitgelieferten Schutzhülle, um sie vor Beschädigung durch statische Elektrizität zu schützen. . Lassen Sie eine SD-Karte nicht an einem Ort, wo sie für kleine Kinder erreichbar ist, die sie möglicherweise in den Mund stecken und verschlucken könnten. . Lesen Sie die mitgelieferte Bedienungsanleitung Ihrer SD-Karte sorgfältig durch. Über die Schreibschutz-Einstellung einer SD-Karte SD-Karten haben einen Schreibschutzschalter, der versehentliches Überschreiben der Daten verhindert.
Formatieren der Karte 1. Halten Sie die SHIFT-Taste gedrückt und drücken Sie die Taste PROGRAM MEMORY 1. 2. Wählen Sie mit dem PROGRAM/BPMKnopf „ForM". 3. Drücken Sie den [PROGRAM/BPM]Knopf; das Display zeigt „NO“ an. 4. Wählen Sie mit dem [PROGRAM/BPM]Knopf „yes“ und drücken den PROGRAM/ BPM-Knopf zum Formatieren der Karte. Wenn die Formatierung beendet ist, zeigt das Display „End“ an.
Wenn Sie eine WAVE-Datei oder AIFF-Datei laden, wählen Sie die gewünschte Datei. HINWEIS: Bei WAVE-Dateien oder AIFF-Dateien erkennt der KP3 nur die Dateinamen, die aus zweistelligen Zahlen plus Dateierweiterung bestehen, wie „00.wav“ oder „99.aif”. Wenn .wav- und .aiff-Dateien mit gleichen zweistelligen Nummern vorhanden sind, hat die WAVE-Datei Priorität. HINWEIS: WAVE-Dateien und AIFF-Dateien werden als Loop-Samples geladen.
Verwendung des KP3 als Effektprozessor unter MIDI-Steuerung OUTPUT MIDI OUT LINE IN MIDI IN KORG ELECTRIBE MX MIDI-Kanal wird gezeigt. 3. Ändern Sie mit dem PROGRAM/BPMKnopf den MIDI-Kanal. 4. Drücken Sie die Taste TAP/RANGE (leuchtet orangefargen), um zur MESSAGE-Parameterliste zurückzuschalten. 5. An dieser Stelle können Sie entweder die WRITE-Taste (blinkt) drücken, um die vorgenommenen Änderungen zu speichern, oder Sie können die SHIFT-Taste drücken, um den Vorgang ohne Speichern zu beenden.
meterliste zurückzuschalten. 5. An dieser Stelle können Sie entweder die WRITE-Taste (blinkt) drücken, um die vorgenommenen Änderungen zu speichern, oder Sie können die SHIFT-Taste drücken, um den Vorgang ohne Speichern zu beenden. Anpassen der MIDIMeldungsfilter-Einstellungen 1. Halten Sie die SHIFT-Taste gedrückt und drücken Sie die Taste PROGRAM MEMORY 4 (MIDI FILTER). Das Display zeigt die zu filternden Meldungen. 2. Wählen Sie mit dem PROGRAM/BPMKnopf die zu filternde Meldung.
Datenaustausch zwischen KP3 und Computer Der KP3 ist mit einem USB-Anschluss ausgestattet, und durch direkten Anschluss an Ihren Computer können Sie auf der Karte gespeicherte Sample-Daten und Einstellungsdateien als Backup in den Computer übertragen. Die USB-Verbindung erlaubt es, den KP3 als USB-MIDI-Gerät zu verwenden, das MIDIMeldungen sendet und empfängt, ohne die MIDI-Kabel anschließen zu müssen.
5. Wenn Sie bereit sind, den KP3 von Ihrem Computer abzutrennen, ziehen Sie das Laufwerksymbol vom Desktop in den Mülleimer. Dann drücken Sie die SHIFT-Taste des KP3, um den USB-Modus zu verlassen. HINWEIS: Wenn Sie bereit sind den KP3 von Ihrem Computer abzutrennen, müssen Sie zuerst den USB-Modus beenden und dann das USB-Kabel abziehen.
KP3 Editor Windows XP Unterstützte Betriebssysteme Microsoft Windows XP Home Edition/Professional Edition Service Pack 2 oder höher Kompatible Computer Ein Computer mit einem USB-Port, der die Betriebsanforderungen von Microsoft Windows XP erfüllt. Mac OS X Unterstützte Betriebssysteme Mac OS X 10.3.9 oder höher Kompatible Computer Ein Computer mit einem USB-Port, der den Betriebsanforderungen von Mac OS X entspricht.
ohne digitale Signatur blockiert. Prüfen Sie die Einstellungen Ihres Computers wie in „Freigeben der Installation von nichtsignierten Treiber“ beschrieben. 5. Wenn Sie die Installation des KORG USBMIDI-Treibers fertiggestellt haben, beenden Sie den Installer. Wenn Sie gefragt werden, ob Sie Ihren Computer neu starten wollen, wählen Sie [Yes], um den Computer neu zu starten. Einzelheiten zu Installation, Setup oder Deinstallation des KORG USB-MIDI-Treibers siehe Installationsanleitung (HTML).
• KORG USB-MIDI-Treiber Ordner „KORG USB-MIDI DRIVER“ ➝ KORG USB-MIDI DRIVER.pkg • KP3 Editor Ordner „KP3 Editor“ ➝ Editor.pkg 3. Folgen Sie den Bildschirmanweisungen zur Installation des KORG USB-MIDI-Treibers oder der KP3 Editor-Software. HINWEIS: Sie dürfen den KORG USB-MIDITreiber nicht in Ihrem Computer installieren, wenn Sie KP3 Editor über USB installieren wollen. 4. Wenn Sie die Software installiert haben, beenden Sie den Installer.
IMPORTANT NOTICE TO CONSUMERS This product has been manufactured according to strict specifications and voltage requirements that are applicable in the country in which it is intended that this product should be used. If you have purchased this product via the internet, through mail order, and/or via a telephone sale, you must verify that this product is intended to be used in the country in which you reside.