Table of contents Introduction............................................2 monologue Key Features................................ 2 Block Diagram..................................................... 3 Controls and Connections.....................4 Front Panel Controls......................................... 4 Rear Panel Connections................................... 5 Turning the monologue On and Off........... 6 Playing Programs and Sequences.........9 Selecting and Playing a Program.................
Introduction monologue Key Features • The monologue is a monophonic synthesizer, which features an analog synthesizer circuit based on the design of the popular minilogue. • The VCF has been tuned for use in mono synths. Also, a drive circuit allows you to produce more aggressive sounds. • The monologue is compact and lightweight, and can be powered by batteries, letting you enjoy making sound wherever you go. • Instant recall of 80 factory presets plus 20 additional user programs.
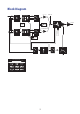
Block Diagram PITCH VCO 1 WAVE SHAPE VCO 1 level SAW LFO TRI EG SQR AUDIO IN VCF PITCH VCO 2 WAVE SHAPE OUTPUT RING MOD OSC SYNC VCO 2 level SAW LFO TRI EG NOISE VCA velocity keytrack NOISE GEN LFO int EG int gate 0% wave shape amount 100% 3 DRIVE
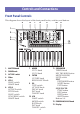
Controls and Connections Front Panel Controls This diagram shows the layout of the front panel knobs, switches, and buttons. 5 7 6 8 9 10 11 1 2 3 4 1. 2. 3. 4. 5. MASTER knob DRIVE knob OCTAVE switch Slider VCO 1 WAVE switch SHAPE knob 6. VCO 2 OCTAVE switch PITCH knob WAVE switch SYNC/RING switch SHAPE knob 12 13 7. MIXER VCO 1 knob VCO 2 knob 8. FILTER CUTOFF knob RESONANCE knob 9. EG TYPE switch ATTACK knob DECAY knob INT knob TARGET knob 10.
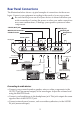
Rear Panel Connections The illustration below shows a typical example of connections for the monologue. Connect your equipment according to the needs of your own system. Be sure that the power on all of your devices is turned off before you make connections. Leaving the power on when you make connections may cause malfunctions, or damage your speaker system and other components.
Connecting to a computer or MIDI devices • To exchange MIDI messages with your computer, connect your computer to the USB B connector on the monologue. • To exchange MIDI messages with an external MIDI device, connect the device to the MIDI IN/OUT connectors on the monologue. TIP For details, refer to “Understanding MIDI” (p.
TIP The monologue can also be used with the separately sold AC adapter connected to the DC 9V jack. 4. Make sure that any external output devices such as powered monitor speakers are turned off before connecting them to the monologue.
Auto Power Off Feature The monologue features an Auto Power Off feature that can automatically turn the monologue off after 4 hours have elapsed with no operation of the knobs, switches, buttons, or keyboard of the monologue. By default, the factory setting for the Auto Power Off is enabled. The Auto Power Off can be disabled using the steps below. 1 5 2, 4 1 2 3 4 5 6 7 8 9 10 11 12 13 14 15 16 3 1. Press the EDIT MODE button.
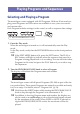
Playing Programs and Sequences Selecting and Playing a Program The monologue comes equipped with 100 Programs. Of those, 80 are ready-toplay preset Programs and 20 locations are available to save your own sounds and custom edits. Each Program includes settings for the sound, as well as sequence data settings. 2 1 Make sure EDIT MODE button is unlit. 1. Enter the Play mode. When the monologue is turned on, it will automatically enter the Play mode.
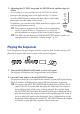
3. Adjusting the OCTAVE range and the DRIVE knob, and the using the Slider. As you play, you can use the five-way OCTAVE Switch to transpose the playing area of the keyboard by ± 2 octaves. Turn the DRIVE knob to adjust the drive effect, which adds harmonics and distortion to the sound. In addition, you can move the Slider from left to right to add real-time performance control. TIP The parameter assigned to the slider will vary depending on the Program. Rrefer to “Program List” (p.
TIP The Sequencer tempo is set for each Program in the SEQ EDIT mode and saved as part of the Program, but you can adjust the tempo from 56.0 to 240.0 BPM (Beats Per Minute) by turning the TEMPO knob. 3. Press the PLAY button once more to end the Sequencer playback.
Programs Program Architecture Each monologue Program includes settings for the Oscillators, Mixer, Filter, EGs and LFO, as well as a 16-Step Sequencer plus Effects. Try editing each related parameter, and enjoy changing the sounds of the monologue.
Creating Sounds Editing a program means changing the Program’s parameters to alter its sound. There are two way to create sounds on the monologue. • Select an existing Program that’s close to the sound you want, and edit that Program’s parameters to achieve your own custom sound. • You can also initialize all the Program parameters or use the Panel Load function to create your own sound from scratch. Editing an Existing Program 1.
Saving a Program We recommend that you save your Program on the monologue after editing the sound. Any edits that you make to the current program will be lost if you turn off the power or recall a different program before saving. 1. Edit the program in Play mode. For details, refer to “Basic Parameter Editing” (p. 15). 2. Press the WRITE button; the monologue will enter the Write standby mode, and the WRITE button will blink. The message “Where to write?” will appear in the display. 3.
Basic Parameter Editing In this section, we’ll explain the basic parameters that make up a program. The basic parameters are assigned to the knobs and switches on the front panel. VCO 1, VCO 2 VCO: Voltage Controlled Oscillator There are two oscillators in the monologue. Oscillator Parameters include the settings for the pitch of the sound (OCTAVE, PITCH) and the waveform (WAVE, SHAPE). The PITCH for VCO 1 is locked to the main OCTAVE switch.
SHAPE knob [0...1023] This knob will determine the final shape, complexity, or duty-cycle (Square) of the selected waveform. 0 1023 VCO 2 OCTAVE switch [16’, 8’, 4’, 2’] The pitch of Oscillator 2 can be set in octave steps. PITCH knob [−1200...+1200] The pitch, or tuning, of the Oscillator 2 can be set using onecent steps. TIP Turning the PITCH knob while holding the SHIFT button will change the tuning by semitones (100 cents). WAVE switch [ , , ] This sets the waveforms for Oscillator 2.
RING/SYNC switch [OFF, ON] This switch turns the Oscillator sync and ring modulator on or off. When the switch is in the center position, both the oscillator sync and the ring modulator will be turned off. SYNC: With this type of modulation, the phase of Oscillator 2 is forcibly synchronized to the phase of Oscillator 1. This adds harmonic overtones to the frequency of Oscillator 2, making a complex waveform.
MIXER The mixer is used to set the relative levels of Oscillators 1 and 2. VCO 1 knob [0...1023] VCO 2 knob [0...1023] These knobs control the output levels of Oscillators 1 and 2. FILTER VCF: Voltage Controlled Filter The low-pass filter shapes the tone by selectively filtering certain parts of the harmonic spectrum of the sound generated by the Oscillators and the Noise generator. CUTOFF knob [0...1023] This knob is used to set the cutoff frequency.
EG EG: Envelope Generator You can make time-based changes to the VCA, pitch or cutoff by using the EG. TYPE switch [ , , ] The settings made here will change the VCA and TARGET parameters over time, as shown below. When using GATE, time-based changes cannot be made to the VCA.
INT knob [−511...0...+511] Specifies the intensity of the EG. Turning the knob to the right will increase the intensity. TIP When turning the INT knob while holding down the SHIFT button, the effect will move in a negative direction. TARGET switch [PITCH, PITCH 2, CUTOFF] Selects which parameter will be affected by the EG. PITCH: The EG will affect the PITCH of VCO 1 and VCO 2. PITCH 2: The EG will affect the PITCH of VCO 2. CUTOFF: The EG will affect the CUTOFF of the FILTER.
RATE knob [0...1023 / 1/8, 1/16, 1/32...1/1024, 1/2048 / 4, 2, 1, 0, 3/4...1/64] The rate knob adjusts the speed of the LFO. Turning the knob to the right will increase the LFO speed. The values indicated here depend on the LFO BPM Sync (p.33) settings in the PROGRAM EDIT mode, and the MODE switch, as shown below. LFO BPM Sync Off On On MODE switch FAST SLOW, 1-SHOT 0–1023 1/8, 1/16, 1/32...
Sequencer In this section, we’ll explore real-time recording, step recording, and motion sequence recording, as well as how to edit the recorded sequences (step edit). Real-Time Recording Recording a performance This feature allows you to record your performance on the monologue keyboard in real time. 1, 5 2, 4 1. Press the PLAY button in the SEQUENCER section to play the sequencer. The PLAY button will light. 2. Press the REC button. Real-time recording will begin, and the REC button will light. 3.
Step Recording 1. Press the REC button in the SEQUENCER section while the sequencer is stopped. “STEP REC” and “STEP 1” will be indicated in the display. If the sequence has already been recorded, the note names will be indicated in the display. TIP Select the step you wish to edit. For instance, use button 3 to select step 3. 2. Use the keyboard, REST button and other controls to edit the notes. When you record a note, rest, or tie in step mode, the display will automatically move to the next step.
Mortion Sequence Recording a Motion Sequence Motion Sequencing allows you to record the flipping of switches and the turning of knobs as part of the sequence, and recreate those motions automatically during playback. Four Motion Sequences can be recorded on the monologue, which can includes changes to all knobs and switches (except for the MASTER knob, TEMPO knob, and OCTAVE switches). 1. Press the PLAY button to play the sequencer. 2. Set the MOTION/SLIDE/NOTE switch to MOTION.
Deleting a Motion Sequence If you try to record a fifth Motion Sequence, the message “Motion Full” will be indicated in the display. When this happens, the display will enter MOTION CLEAR in the SEQ EDIT mode, and you will be able to delete one of the previously recorded Motion Sequences. 4 5 3 1 2 3 4 5 6 7 8 9 10 11 12 13 14 15 16 2 1. Check that the monologue is on the MOTION CLEAR function, in the SEQ EDIT mode. “MOTION CLEAR” will be indicated in the display.
Editing sequence data (step edit) With step edit, you can change and adjust notes, slides and motion sequences in the sequence data you record. 2 1 1 2 3 4 5 6 7 8 9 10 11 12 13 14 15 16 2 1. Select the program that includes the sequence data you wish to edit. 2. Edit the sequence data using the MOTION/SLIDE/NOTE switch and buttons 1–16.
When a knob is turned while one button is held down, motion will be recorded for that step. When a knob is turned while multiple buttons are held down, a motion will be recorded for those steps. For example, when turning the INT knob of the LFO to 50% while holding down buttons 3 and 5, the INT 50% setting for the LFO will be recorded on both steps 3 and 5.
Edit Mode Although nearly all of the monologue’s main parameters can be edited using the knobs and switches on the panel, other detailed parameters are accessed using the Edit mode. There are three sub-modes within the Edit mode: PROGRAM EDIT mode, SEQ EDIT mode, and GLOBAL EDIT mode. How to enter the Edit mode 1, 2 4, 6 2, 5 1 2 3 4 5 6 7 8 9 10 11 12 13 14 15 16 3 1. Press the EDIT MODE button. Each Edit mode is shown in the display, and the buttons light. 2.
3. Press one of buttons 1–16 that are lit up. The monologue will enter the respective Edit page, and the parameter names will be indicated on the display. Switch to a different page by pressing the same button in succession. Refer to “Edit Mode Parameter List” (p. 30) for a list of the parameters on each edit page. 4. After you have configured the parameters in PROGRAM EDIT mode and/or SEQ EDIT mode, press the WRITE button to save your changes. The display will indicate the message “Where to write?”.
GLOBAL EDIT mode SEQ EDIT mode PROGRAM EDIT mode Button 1 2 Transpose Master Tune GLOBAL 1 (p.38) 3 6 Sync Out Polarity En Rx Transport Local SW MIDI Route Enable Tx MIDI Enable Rx MIDI Sync In Polarity Clock Source MIDI Ch GLOBAL 4 (p.42) Default Gate Time Parameter Disp GLOBAL 5 (p.43) Motion Clear Step Resolution Swing All Clear Step Length Audio In Sync In Unit GLOBAL 3 (p.41) BPM SEQ PARAMETER (p.35) SEQ CLEAR (p.36) Program Tuning Slide Time BPM (p.
PROGRAM EDIT mode Button 5 (PORTAMENTO) Portamento Time [Off, 0...127] Portamento produces a continuous glide in pitch between notes; this parameter controls the portamento time. Off: No portamento effect is applied. The larger the value, the longer the portamento time. Portamento Mode [Auto, On] Auto: When playing in a legato style (playing a new note before any previously played note is released), portamento will be applied.
LFO RATE LFO INT PORTAMENTO Bend Range + [1 Note...12 Note] If the Slider is set to PITCH BEND, this parameter specifies how much pitch bend will be applied when moving the slider in the plus (right) direction. Bend Range – [1 Note...12 Note] If the Slider is set to PITCH BEND, this parameter specifies how much pitch bend will be applied when moving the slider in the minus (left) direction. Button 7 (PITCH SETTINGS) Microtuning [Equal Temp...Reverse, AFX 001...006, USER SCALE 1...6, USER OCTAVE 1...
USER OCTAVE 1...6: These are user‐programmed scales with settings for each of the 12 notes in an octave. You can set them up in PROGRAM EDIT mode. For details, refer to “Microtuning function” (p. 46). Scale Key [−12 Note...+12 Note] This sets the key for the scale set using microtuning. The preset tunings are in the key of C, but you can use this scale key parameter to change the key to something besides C. For instance, if you want to change the key to “D”, set Scale Key to “+2”.
Cutoff Velocity [0%...100%] Specifies how the velocity (keyboard playing dynamics) will affect the cutoff frequency, allowing louder notes to appear brighter, etc. 0%: Velocity will not affect the cutoff frequency. 50%: Velocity will affect the cutoff frequency, but at only half the amount produced at 100%. 100%: Playing the keys harder will increase the cutoff frequency, while playing the keys softer will decrease the cutoff frequency. Amp Velocity [0...
Button 12 (DUMP) This button initiates a Program dump. Turn the PROGRAM/VALUE knob until “Press WRITE” is indicated in the display. The WRITE button will blink. Press the WRITE button to send a SysEx Program dump from the monologue’s MIDI OUT and USB B connector. The display will indicate the message “Program Dump”. SEQ EDIT mode Button 5 (BPM) BPM [10.0...600.0] This parameter sets the tempo of the Sequencer in Beats Per Minute (BPM).
Button 7 (SEQ CLEAR) This function provides a convenient way to erase all data within a specific sequence. All Clear When using All Clear, all notes and Motion Sequences contained within the sequence data will be deleted. Turn the PROGRAM/VALUE knob until “Press WRITE” is indicated in the display. The WRITE button will blink. Press the WRITE button to delete the data. The display will indicate the message “All Cleared”.
Button 11 (MOTION ENABLE) MOTION ENABLE [OFF, ON] By setting this function to OFF, you can disable a particular motion without deleting the data. Press button 11 to select the Motion Sequence to configure. Turn the PROGRAM/VALUE knob, and select either “OFF” or “ON”. OFF: The Motion Sequence will be disabled, and the parameters will not change (the recorded Motion Sequence will not be deleted).
GLOBAL EDIT mode GLOBAL EDIT functions apply to the entire monologue universally. Button 3 (GLOBAL 1) Common to both Oscillators, these functions control the tuning and transposition of the monologue. Master Tune [−50 Cent...+50 Cent] This adjusts the overall tuning of the entire monologue in one-cent units (semitone=100 cents), over a range of ±50 cents. 0: A4 is equal to 440 Hz when the Microtuning is set to “Equal Temp”. Transpose [−12 Note...
If the parameter value does not change In some cases, the parameter value may not change or Motion Sequence recording may not start, even when you turn the knob. This means that the knob mode is set to “Catch”. In this case, the actual value of the parameter you’re editing (the value shown in the display) will not change unless it matches the position of the knob. In Catch mode, the knob position and the value will be linked only after the knob position reaches the actual value.
Velocity Curve [Type 1...8, Const 127] Changing the Velocity Curve allows you to match the dynamic response of the monologue keyboard to your own playing style and technique. 127 6 5 64 4 3 2 1 8 7 1 Soft Keyboard Strong Type 1 This curve requires you to play strongly in order to produce an effect. Type 2, 3 ... Type 4 This is a typical curve. Type 5 ... Type 6 This curve produces an effect without requiring you to play very strongly.
Button 5 (GLOBAL 3) These parameters relate to the SYNC IN/SYNC OUT jack settings. Sync In Unit [16th Note, 8th Note] The Sync In Units determine how much the Sequencer will advance with each pulse received via the SYNC IN jack. 16th Note: The Sequencer will advance one sixteenth note for each pulse. 8th Note: The Sequencer will advance one eighth note for each pulse.
Button 6 (GLOBAL 4) These parameters relate to the monologue’s MIDI capabilities. MIDI Ch [1...16] In order to communicate, the monologue and your other MIDI devices must be set to the same MIDI channel. This is both the Transmit and Receive channel. Clock Source [Auto (USB), Auto (MIDI), Internal] Many features of the monologue can be sync’d to the tempo or BPM. This parameter allows you to specify whether the clock source is internal, or an external MIDI Clock Source.
Button 7 (GLOBAL 5) These parameters relate to the monologue’s display, and what information is seen there. Parameter Disp [Normal, All] Normal: Only major information such as operating the pitch-related knobs or switching the MOTION/SLIDE/NOTE switch will be displayed. All: When any knob except for the MASTER knob is turned, the value is indicated; and when operating a switch, the setting is indicated. When the MOTION/SLIDE/NOTE switch is set to “MOTION”, the values and settings will not be displayed.
Button 10 (USER SCALE) USER SCALE 1...6 This allows you to set up to six original user scales. The pitches of all of the notes can be changed to create scales with irregular pitches. Pitches can be set in cents by turning the PROGRAM/VALUE knob. Turning the PRO-GRAM/VALUE knob while holding the SHIFT button will change the tuning in semitones (100 cents). For details, refer to “Microtuning function” (p. 46). SysEx data for microtuning can be received while this parameter is being displayed.
Button 13 (SCALE DUMP) USER SCALE 1...6 This transmits the microtuning that was edited using USER SCALE 1–6 as a general SysEx message. Press button 13 to select the microtuning to transmit via SysEx. Turn the PROGRAM/VALUE knob until "Press WRITE" is indicated on the display, and then press the WRITE button. USER OCTAVE 1...6 This transmits the microtuning that was edited using USER OCTAVE 1–6 as a general SysEx message. Press button 13 to select the microtuning to transmit via SysEx.
Other functions Tuning As with all analog instruments, the monologue’s circuitry can drift over time during performance due to changes in environment and temperature. The monologue provides an auto-tuning function that automatically tunes the instrument’s analog circuits on demand, to correct for any analog drift. As you continue to play the monologue for a while right after you’ve turned it on, the pitch and tone may gradually drift.
Let’s now edit USER SCALE 3. 1. Enter GLOBAL EDIT mode by pressing the EDIT MODE button. 2. Press button 10 three times. USER SCALE 3 will be indicated on the display. 3. Play the note you wish to edit on the keyboard. The note name will be indicated on the display. When this screen is displayed, the microtuning currently being edited will be used when playing sound. TIP Up to four notes can be edited at the same time, by pressing up to four keys together on the keyboard. 4.
Restoring the Factory settings You can restore the monologue’s preset Programs and global settings to their original factory-set state at any time. 1. Begin with the monologue turned Off. 2. While holding down the WRITE button and the EXIT button, turn the monologue On. “FACTORY RESET” will be indicated in the display. 3. Turn the PROGRAM/VALUE knob to select the items you wish to reset to the factory default settings.
Shortcuts using the SHIFT button By holding down the SHIFT button as you press other select buttons, you can access a number of convenient features quickly and easily. Function SHIFT button + Load panel infor- When in Play mode: mation PLAY button Loads the state of the front panel switches and knobs into the selected Program. Used to make the sound match the state of the controls on the front panel.
Understanding MIDI MIDI stands for Musical Instrument Digital Interface, and is a worldwide standard for exchanging various types of musical data between electronic musical instruments and computers. When MIDI cables are used to connect two or more MIDI devices, performance data can be exchanged between the devices, even if they were made by different manufacturers. MIDI data can also be exchanged between the monologue and your personal computer using a single USB cable.
Controlling the monologue from an external MIDI device If you want to play or control the monologue from another MIDI keyboard, sequencer, or other device, connect the MIDI OUT connector of the external MIDI device to the monologue’s MIDI IN connector with a MIDI cable.
Connecting the monologue to a computer via USB In order to use a USB connection, you’ll need to install the Korg USB-MIDI driver on your computer. Download the “Korg USB-MIDI driver” from the Korg website, and install it as described in the accompanying documentation. If either the MIDI connection or the USB connection is not working properly, check the settings in button 6 (MIDI Route) of the GLOBAL EDIT mode (“MIDI Route”, p. 42).
Configuring the monologue to transmit and receive MIDI channel messages The monologue can be configured to enable or disable the receiving or transmission of MIDI channel messages. To receive or transmit MIDI channel messages, turn the “Enable Rx MIDI” and “Enable Tx MIDI” settings on using button 6 in the GLOBAL EDIT mode (“Enable Rx MIDI”, p. 42) (“Enable Tx MIDI”, p. 42).
Program List No. 1 2 3 4 5 6 7 8 9 10 11 12 13 14 15 16 17 18 19 20 21 22 23 24 25 26 27 28 29 30 31 32 33 34 35 36 37 38 39 40 Program Name Injection Anfem Lu-Fuki Fake3OSC Arc Lead Scoooping Robot Empire TeeVeeSaw bAss Herd Of Crab Stonecold Dirty Sub Jungle Sub Hoodie Bass StabbyBass DistortedSqr Werq
Specifications Keyboard: Sound Generation: Number of programs: 25 keys (slim keyboard, velocity sensitive) Analog synthesis 100 (80 preset programs, 20 user programs) Each program includes microtuning and sequence data settings Main synthesis parameters MASTER: DRIVE VCO 1: WAVE (SAW, TRIANGLE, SQUARE), SHAPE VCO 2: OCTAVE, WAVE (SAW, TRIANGLE, NOISE), SYNC/RING, PITCH, SHAPE MIXER: VCO1, VCO2 FILTER: CUTOFF, RESONANCE EG: TYPE (A/D, A/G/D, GATE) ATTACK, DECAY, INT, TARGET (PITCH, PITCH 2, CUTOFF) LFO: WA
Power supply: AA alkaline battery x 6 or AA nickel-metal hydride battery x 6 Or AC adapter (DC 9V ) (optional) Battery life: Approximately 6 hours (using alkaline batteries) Approximately 8 hours (using nickel-metal hydride batteries) Battery life will vary depending on the batteries used and on the conditions of use. Power consumption: 2.5 W Dimensions (W x D x H): 350 x 276 x 76 mm 13.78 x 10.87 x 2.99 inches Weight: 1.7 kg/3.78 lbs.
[MONOPHONIC ANALOGUE SYNTHESIZER] Model: monologue Date: 2016.10.1 Version: 1.00 MIDI Implementation Chart MIDI Implementation Chart Function...
© 2016 KORG INC. www.korg.