
User Manual

7
TIP
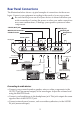
The monologue can also be used with the separately sold AC adapter
connected to the DC 9V jack.
4.
Make sure that any external output devices such as powered monitor
speakers are turned o before connecting them to the monologue.
TIP
If you want to connect a MIDI device or computer to the monologue’s
MIDI connectors or USB B connector in order to use the monologue’s
keyboard and controllers to control an external MIDI tone generator,
or if you want to use another MIDI keyboard or a sequencer to play
the monologue’s sound generator, you will need to congure the set-
tings. For details, refer to “Understanding MIDI” (p. 50).
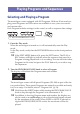
Turning the monologue On
1.
Make sure that both the monologue and any external output devices such
as powered monitor speakers are turned o, and turn the volume of all
devices all the way down.
2.
Hold down the Power switch on the rear panel of the monologue; once
the “monologue” logo appears in the display, take your nger o the
Power switch.
3.
Turn on any external output devices such as powered monitor speakers.
4.
Adjust the volume of your external output equipment, and adjust the
monologue’s volume using the MASTER knob.
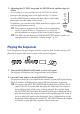
Turning the monologue O
Any Program data in the monologue that has not been saved will be lost when
the power is turned o. Be sure to save any Program and other important data
that you have edited (“Saving a Program”, p. 14).
1.
Turn the MASTER knob of the monologue to the left to turn the volume
all the way down.
Also, turn the volume all the way down on any external output devices
that might be connected, such as powered monitor speakers.
2.
Hold down the Power switch on the rear panel of the monologue; to turn o
the power after the display goes blank, take your nger o the power switch.
Once you have turned the monologue o, wait about 10 seconds be-
fore turning the monologue on again.