Owner’s manual E 1
Precautions Location Using the unit in the following locations can result in a malfunction. • In direct sunlight • Locations of extreme temperature or humidity • Excessively dusty or dirty locations • Locations of excessive vibration • Close to magnetic fields Keep this manual After reading this manual, please keep it for later reference. Keeping foreign matter out of your equipment Never set any container with liquid in it near this equipment.
THE FCC REGULATION WARNING (for USA) This equipment has been tested and found to comply with the limits for a Class B dig‐ ital device, pursuant to Part 15 of the FCC Rules. These limits are designed to provide reasonable protection against harmful interference in a residential installation. This equipment generates, uses, and can radiate radio frequency energy and, if not installed and used in accordance with the instructions, may cause harmful interfer‐ ence to radio communications.
Contents Introduction . . . . . . . . . . . . . . . . . . . . . . . . . . . . . . . . . 2 Features . . . . . . . . . . . . . . . . . . . . . . . . . . . . . . . . . . . . 2 Parts of the MR-2 . . . . . . . . . . . . . . . . . . . . . . . . . . . . . 3 Front and side panels . . . . . . . . . . . . . . . . . . . . . . . . . . . . . . . . . . . . 3 Screens and operations . . . . . . . . . . . . . . . . . . . . . . . 5 Meter/counter screen and menu list (MENU) screen . . . . . . . . . . .
8. Other general operations . . . . . . . . . . . . . . . . . . . . . . . . . . . . . . Changing the meter peak hold . . . . . . . . . . . . . . . . . . . . . . . . . . . . Editing the project/file name . . . . . . . . . . . . . . . . . . . . . . . . . . . . . . Conserving battery power . . . . . . . . . . . . . . . . . . . . . . . . . . . . . . . Setting the date and time . . . . . . . . . . . . . . . . . . . . . . . . . . . . . . . . Protecting a project . . . . . . . . . . . . . . . . . . . . . . . . . .
Introduction Thank you for purchasing the Korg MR‐2 high‐resolution mobile recorder. To take full advantage of your new equipment, please read this manual carefully and use the product as directed. When you have read the manual, keep it safe for future reference. Features The MR‐2 is an ultra‐high audio quality stereo portable recorder that can record and play back formats such as CD (16‐bit/44.1 kHz), DVD audio (24‐bit/192 kHz), and SACD (Super Audio CD) (1‐bit/2.8 MHz).
Parts of the MR-2 Front and side panels 11 5 1 6 6 2 12 16 3 7 13 4 14 8 9 15 10 Battery case cover HOLD switch (to avoid accidental operation) 16 1. MIC IN external microphone input jack (stereo mini jack; Plug‐In‐Power compatible) 2. LINE IN jack (stereo mini jack) 3. Headphone jack (stereo mini jack) 4. INPUT LEVEL button 5. Built‐in microphone (X‐Y directional stereo microphone) 6.
7. Display The display shows the level meters and counter during recording and playback, and can also show information about the project (see page 10) or file, and parameter settings. 8. Menu button This button accesses the menu list (MENU) screen, allowing you to choose the information or parameters that will be displayed. Each time you press this, you will alternate between the meter/counter screen and the menu screen.
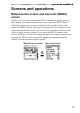
Screens and operations Meter/counter screen and menu list (MENU) screen When you turn on the power to the MR‐2, it displays an opening screen, then displays the meter/counter screen. If you press the MENU button while the meter/counter screen is displayed, the recorder displays the menu list (MENU) screen, which lets you proceed to various types of set‐ tings or informational screens. You will use the controller buttons on this screen to make various settings.
Selecting parameters and setting values On the MR‐2, you can select parameters and set values by pressing the controller buttons. When you select an item on the screen using a control‐ ler button, the selection icon “ ” or “ ” will move to the selected item. Icon “ ” indicates that an additional setting screen will appear when you press the Confirmation button (the center controller button).
Basic operation 1. Before Using the MR-2 Inserting or Replacing Batteries The MR‐2 requires two AA‐size batteries. We recom‐ mend that you use nickel‐metal hydride batteries, but you may also use alkaline batteries (LR6). Serial number The performance of alkaline batteries differs signif‐ icantly between manufacturers. To ensure that the MR‐2 operates in a stable manner, please use bat‐ teries from a reputable manufacturer (see page 58).
If the battery charge is getting low, you can supply USB bus power to the recorder using a USB cable to continue operating the recorder without any power interruption. Before you disconnect a recorder that is running on USB bus power, turn off the power to the recorder first, then remove the USB cable. If the recorder is switched to the battery operation while the recorder’s power is on, the recorder may be reset or turned off if the battery charge gets too low.
About the available recording tim Available recording time per card varies with the recording format setting (see page 14). The following table shows the approximate recording time available in each format per 1GB of memory card capacity. Format Recordable time Format Recordable time MP2 48kHz/192kbps 660 minutes 25 minutes MP3 44.1kHz/192kbps 600 minutes WAV 96kHz/24bit WAV 176.4kHz/24bit 15 minutes WAV 44.1kHz/16bit 90 minutes WAV 192kHz/24bit 13 minutes WAV 44.
4. The meter/counter screen When you turn on the power, the meter/counter screen is shown in the display. When the menu list (MENU) screen is shown, you can also access the meter/counter screen by pressing the menu button. This screen shows information such as the MR‐2’s operating status and recording/playback format.
Repeat indicator This icon appears when you program repeat playback. No indicator appears here if repeat playback is not programmed (see page 35). Recorder status The current status of the recorder is shown using symbols such as record ( ), play ( ), or stop ( ). Project/file playback position indicator This bar graph indicates the approximate playback position of the current counter value in relation to the overall length of the current project/file.
Remaining battery charge/USB bus power indicator This icon indicates the remaining battery charge. If the MR‐2 is powered via USB bus, the “ ” icon will appear instead. Sufficient charge If “ Low charge ”, the batteries are almost exhausted. Replace them immediately. 5. Recording When you record on the MR‐2, date and time information is automati‐ cally added to the file so that you can manage your projects more easily.
Mounting the recorder using the camera tripod The MR‐2 features two 1/4‐inch threaded sockets that enable you to mount the unit on a camera tripod. These sockets are located on the bottom panel and rear panel respectively. Using the tripod makes it easy to set up the recorder in a position suitable for recording.
About automatic input source detection The MR‐02 automatically scans to determine whether or not the MIC IN or LINE IN jack is connected. If the unit detects a connected jack, it will automatically assign the jack as the input source. Therefore, do not con‐ nect anything to jacks other than the one you want to use for audio input. If multiple jacks are connected to external devices, the unit will select a jack according to the following input priority list.
3. If you checked WAV (BWF), use the controller buttons to select and confirm the desired Wav Format: fs/bit setting (bit depth and sampling frequency), and stereo (Stereo) or mono (Dual Mono). If you selected “176.4kHz/24bit” or “192kHz/24bit” for the fs/bit setting, “Stereo” will automatically be selected. If you checked MP2 or MP3, use the controller buttons to select and confirm the desired MP2/3 bit rate: bps setting, and stereo (Stereo) or mono (Mono).
1. Press the REC button to enter record‐ready mode. The REC indicator will blink. 2. Press the INPUT LEVEL button on the left side panel to display the INPUT LEVEL screen, then adjust the input level. 3. Adjust the gain so that the level will not exceed “0”. 4. Release the INPUT LEVEL button to return to the previous screen. You can view the input level in the REC SETTING screen (see page 22).
Project recording format (New Project Type) MP2, MP3 These audio file formats are a patented digital audio encoding format that employs a form of lossy data compression. The high compression rate is achieved by reducing the detail of certain parts of the sound that are deemed beyond the auditory resolution ability of most people. MP2 and MP3 are abbreviations for MPEG‐1 Audio Layer 2 (extension .mp2) and Layer 3 (extension .mp3) respectively.
6. Playing back a project/file When you power on the recorder, it will display in the upper part of the meter/counter screen the name of the project/file that was recorded, played back, or selected most recently (refer to “Selecting a project/file to play back” on page 19). Starting playback Press the Play ( ) button. The displayed project/file will play Pausing During playback, press the play button ( ) to pause at that location.
7. Other playback/record operations Selecting a project/file to play back You can use the controller buttons to select the project/file that you want to play. When you turn on the power to the recorder, the most recently selected project/file will be selected. Sorting projects/files By default, the projects/files in the folder on the library select screen are sorted chronologically. However, you can sort them alphabetically.
Alternatively, in the meter/counter screen press the Confirma‐ tion button (the center controller button) to display the library select (LIBRARY) screen. 2. In the library select (LIBRARY) screen, use the controller buttons to select and confirm “Recording.” The dated folder select screen (the list of dated folders) will appear. Push If you selected and confirmed “Playback” or “PLAYLIST,” skip Step 3. 3.
2. Use the controller buttons to select and confirm the desired parameter item. You can save these parameter settings as a preset setting (refer to “Save Setting” on page 23). Mic Sens Use this parameter to set microphone sensitivity. This parameter setting is valid only when the built‐ in or an external microphone is used for recording. High: Select this high sensitivity option when you record low level audio. Mid: Select this option for normal level audio.
PlugInPower Activating Plug‐In‐Power will supply power to the MIC IN jack. If this parameter is set to “On,” be sure to connect a condenser‐type microphone that supports Plug‐In‐Power. If you connect another type of microphone (such as a dynamic microphone or a microphone with a built‐in battery), the microphone may be damaged. Monitor Set this parameter to “Off” to avoid feedback or save the battery power. This parameter setting is invalid during playback.
REC Start Mode This parameter enables you to set the recording start timing. Normal SW: Recording starts immediately when you press the REC button. Pre(SW)/1S: Recording starts immediately when you press the REC button. Input audio of one second in duration prior to the recording start point will also be recorded. Post(SW)/0.5S: Recording starts in 0.5 seconds after you press the REC button.
3. If you want to change the preset name, select and confirm “No Name” (default). The recorder will display the rename screen. Please, refer to “Editing the project/file name” on page 29 for more information on changing the name. 4. After you change the name using the controller buttons, select and confirm “OK.” The recorder returns to the REC SETTING screen. 5. Select and confirm “Save Setting: Save.” 6. The recorder will display the Save Setting screen.
You can edit the loaded preset settings in the REC SETTING screen. How‐ ever, when you turn off the power to the recorder, the edits will be lost. If you want to save the edits to the preset recording settings, save the preset as a user preset by changing the preset name.
3. On the project/file edit screen, use the controller buttons to select and confirm “Mark List.” The mark list (Mark List) screen will appear. Project/file edit screen Push Mark list screen Push Push Locating marked points While the recorder displays the meter/counter screen during playback, press the rewind ( ) or fast‐forward ( ) button to jump to the previ‐ ous or next marked time location.
Editing the time location of a mark 1. Use the controller buttons to select the time indication in the top line. 2. Press the Confirmation button (or press the right ( ) controller button). The selection icon will change from to , and the first digit will be highlighted. 3. Use the left/right controller buttons ( , ) to move to the digit that you want to edit, and use the up/down controller buttons ( , ) to change the value.
2. Use the controller buttons to select and confirm “Yes.” The recorder will indicate “Working...” on the screen and start deleting the mark, then indicate “Completed.” when the deletion is complete. If you decide not to delete the mark, use the controller buttons to select and confirm “No” (or press the MENU button). The recorder will display the mark edit select (Mark Edit) screen. 3.
8. Other general operations Changing the meter peak hold 1. Press the MENU button to display the menu list, then use the control‐ ler buttons to select and confirm “METER.” The Meter screen will appear. Push Push 2. Use the controller buttons to select and confirm “Meter Peak Hold” (peak indicator hold time). A check mark will appear in the hold time check box you selected (0 second, 4 seconds, 10 seconds, (always)).
4. Use the controller buttons to select and confirm “Rename.” The name editing screen will appear. 5. Use ( ) and ( ) to select (highlight) the character you want to edit, then press the Confirmation button. Project/file edit screen Push 6. The character will be selected and highlighted. Use the controller but‐ tons to select and confirm the desired character. DEL–Deletes the currently highlighted character and moves the subse‐ quent characters toward the left.
Backlight setting You can turn the backlight off if you’re using the MR‐2 in a brightly lit loca‐ tion, or make it automatically turn off a set period of time after the most recent operation. If this parameter is set to “Off,” the backlight will not turn on. If this parameter is set to “On,” the backlight will always remain on.
5. When you’ve finished making settings, press the MENU button or use the controller left/right buttons ( , ) to move to the selection icon at the left edge. The selection icon will change from to . If you leave the MR‐2 for two or three days without batteries or with no battery power, the date and time setting will be reset to the default. In this event, after replacing the batteries, set the date and time again. The time will continue to stay while you’re setting it.
Deleting a project/file Here’s how to delete a file. Once you’ve deleted a file, it cannot be recov‐ ered, so use this operation with care. You can’t delete a project that’s protected. 1. Press the menu button, and in the menu list (MENU) screen, use the controller buttons to select and confirm “LIBRARY.” The library select (LIBRARY) screen will appear. 2.
The file edit screen will appear, with the name of the currently selected file in the top line. 3. Use the controller buttons to select and confirm “Details.” Details about the project/file will be displayed. Push 4. When you’ve finished viewing the details, press the menu button to return to the project/file edit screen. Using the tuner The MR‐2 features a built‐in tuner. The tuner function is disabled during recording or playback. 1.
Other functions Play mode The MR‐2 provides two play modes, as well as shuffle and repeat play settings. To select these mode, use “PLAY MODE” in the menu list (MENU) screen. Single (play only one project/file) In this mode, only the single project/file you select will play (refer to “Selecting a project/file to play back” on page 19). When the selected file has finished playing, playback will stop automatically.
2. Use the controller buttons to select and confirm the desired play mode. A check will appear in the check box of the play mode you selected and confirmed. Push Push 3. If you want playback to repeat, set “Repeat” to “On.” 4. If you want to use shuffle play, set “Shuffle” to “On.” If the play mode is “Single,” this setting will be invalid. 5. Press the MENU button to return to the menu list. 6. When you press the Play button in the meter/counter screen, playback will begin using the mode you selected.
Play list (PLAYLIST) Creating a play list After creating a play list, you can select “PLAYLIST” as the play mode, and the projects/files will be played in the order specified by the list. The repeat and shuffle settings of the Play Mode can affect the playback of the Play List. You can store up to one hundred play lists. Here’s how to create a play list. 1. Press the menu button, and in the menu list (MENU) screen, use the controller buttons to select and confirm “LIBRARY.
6. Press the Confirmation button (or press the menu button) to return to the library select (LIBRARY) screen. 7. If you want to add another project/file, press the menu button and repeat steps 2–6. You can also use this procedure to add a project/file to a play list you cre‐ ated earlier. Viewing a play list Here’s how to view the contents of a play list. 1. Press the menu button, and in the menu list (MENU) screen, use the controller buttons to select and confirm “LIBRARY.
2. Use the controller buttons to select and confirm “ChangeOrder”. Play list edit screen Push Push Push 3. The Move icon will appear in the play list (PLAYLIST) screen. 4. Use the controller buttons to move the project/file to the desired position, to confirm. The play list (PLAYLIST) screen will show the new order. If you press the menu button before you confirm, you will return to the play list edit screen. Remove from List Here’s how to remove the selected project/file from the play list.
If you decide not to remove the project/file, use the controller but‐ tons to select and confirm “No” (or press the menu button), and you will return to the play list edit screen. 4. Press the Confirmation button (or press the menu button) to return to the play list (PLAYLIST) screen. 5. If you want to remove another project/file, press the menu button and repeat steps 1–4. Remove All Here’s how to remove all projects/files from the lay list. This will not delete the projects/files themselves. 1.
System settings (SYSTEM) Here you can make various system settings for the MR‐2 itself. Press the menu button to access the menu list (MENU) screen. Then use the controller buttons to select and confirm “SYSTEM” and make the desired settings. The “Back Light,” “AutoShutDown,” and “LED” set‐ tings are explained in “Conserving battery power” (see page 30), and the “Clock” setting is explained in “Setting the date and time” (see page 31). LCD Contrast Here you can set the LCD contrast.
Factory Reset This function initializes the recorder to factory default settings. 1. Press the menu button, and in the menu list (MENU) screen, use the controller buttons to select and confirm “SYSTEM.” The system setting (SYSTEM) screen will appear. 2. Use the controller buttons to select and confirm “Factory Reset.” A dialog message of “Parameters will be reset. Are you sure?” will appear in the screen. 3. Use the controller buttons to select and confirm “Yes.” The screen will indicate “Working...
2. Use the controller buttons to select and confirm “SD Format.” A dialog message of “All data will be cleared. Are you sure?” will appear in the screen. 3. Use the controller buttons to select “Yes”, and continue holding it for three seconds or longer. The screen will indicate “Working...”, and when formatting is finished the indication will change to “Completed.” 3 seconds or longer.
Update procedure You must use the USB bus to power the recorder during this update procedure. Otherwise, an error message will be displayed and you will be unable to update software. If a power failure or similar accident occurs while loading the sys‐ tem, the MR‐2 may become inoperable. If this occurs, please con‐ tact Korg distributor. 1. Press the menu button, and in the menu list (MENU) screen, use the controller buttons to select and confirm “SYSTEM.” The system setting (SYSTEM) screen will appear.
Using the MR-2 with your computer You can use the MR‐2 as a USB 2.0 mass storage class device. This lets you copy files from the MR‐2 to your computer, or copy files (MP2, MP3, WAV, DSDIFF, etc.) from your computer into the MR‐2. There are limitations on the audio files that the MR‐2 can recognize (see page 47). USB mode In this mode, the MR‐2 will be detected by your computer as an external disk. The MR‐2 won’t operate as a recorder while it is in USB mode. Entering USB mode 1.
When you connect the MR‐2 to your computer for the first time, the device driver will be installed automatically. 3. Save data on your computer. When you open the “Local disk (*:)” (or “Unspecified name”) that appeared on your computer in step 2, the contents of the MR‐2’s memory card will be displayed. Copy the desired data onto your computer. You can also copy data from your computer into the MR‐2’s memory card. Don’t disconnect the USB cable while a file is being transferred. Exiting USB mode 1.
To restore data that you previously backed‐up, copy the files into the appropriate Recording or Playback folder. If you want to transfer audio data (.mp2/.mp3/.wav/.dff/.dsf/.wsd) cre‐ ated on your computer or other devices to the recorder, copy it into the Playback folder. Memory card structure and files Supported audio files Stereo files are used for all recording formats that can be selected on the MR‐2 (see page 17) Supported folders and file names FAT32 file system format.
Recording folder When you use the MR‐2 for recording, a dated folder will be created inside this folder, and a project folder will be created inside the dated folder. Up to 400 project files can be recognized within a folder. If there are more than 400 project folders, they can be recognized by con‐ necting a computer in USB mode. The maximum number of project folders that can be created will be limited by the space remaining on the memory card. Do not use your computer to delete or rename the folders.
Files inside the DFF_0001 folder (project folder) Do not use your computer to rename the audio data files inside this folder. Otherwise, the MR‐2 will no longer recognize the files. DFF_0001.prj (project settings file) This is a file specific to the MR‐2, containing information (protect setting, mark data, etc.) for each recorded project. Only one file with this extension (.prj) can exist in each project folder. DFF_0001_001.dff (audio data file: dff) These are stereo audio data files. The extension (.
Using the AudioGate software The audio files of a project recorded on the MR‐2 can be copied to your computer. Then you can use the “AudioGate” audio format conversion application on the included CD to convert the audio file format; as well as edit, divide, or join audio files. For details, install the software from the included CD and refer to the AudioGate operating manual (PDF). Installing AudioGate Contents of the Install CD The included Install CD contains the following items.
Mac OS X Supported operating systems Mac OS X 10.4 or later Supported computers CPU: Apple G4/800 MHz or better, Intel Mac is supported RAM: 256MB or higher (512MB or higher recommended) A USB port that meets the operating requirements of Mac OS X A writable CD/DVD drive is required in order to create audio CDs or DSD discs. Windows users In order to install or uninstall software in Windows, you must have Administrator privileges. For details, consult your system administrator. 1.
Appendix Troubleshooting The power does not turn on • The batteries may be exhausted. • Make sure that the USB bus power is connected correctly. Nothing appears in the display • Is the contrast adjusted correctly? (see page 41) Display is dark • Is the backlight set to “Off”? (see page 31) The LEDs do not turn on • The “LED” setting may be set to “Off.
USB Your computer does not detect the MR-2 • Is the USB cable connected correctly? (see page 45) Re‐connect the cable.. Can’t release the MR-2 from your computer • The procedure will depend on the operating system of your com‐ puter.
Card Error. • An error occurred during access to the memory card. Use USB mode to connect the MR‐2 to your computer and exe‐ cute the Check Drive command. If this error message is dis‐ played again, format the memory card. Card Full. • The memory card does not have sufficient free space. Delete unneeded projects/files. Card too busy.
Please enter name. • There is no project name (the name consists only of spaces). Please enter a valid project name (one or more alphabetical char‐ acter, numeral, or symbol). Project Name Error. Delete illegal folder. • An identically named project/file already exists. Rename the project/file. Alternatively, use USB mode to delete the project/file and the directory of the same name. Protected Project. • The operation cannot be executed because the project is protected.
Specifications Operating conditions: 0–+40 °C (no condensation) Main sections < Recorder section > Number of tracks : 2 tracks 2 tracks simultaneous playback / 2 tracks simultaneous recording Recording formats : Compressed audio format MP2 format (extension .mp2) 48 kHz@128, 192, 256, 320 kbps MP3 format (extension .mp3) 44.1 kHz@128, 192, 256, 320 kbps PCM audio format WAV format (extension .wav), BWF compliant 44.1 kHz @ 16/24‐bit, 48 kHz @ 16/24‐bit 88.2 kHz @ 24‐bit, 96 kHz @ 24‐bit 176.
Supported cards : SD and SDHC cards with a capacity of 512MB–32GB (SDHC card of class 4 or higher recommended) < General > Display : 128×128 pixel, LCD with backlight Power supply : AA nickel‐metal hydride battery x 2 or “AA/LR6” alkaline battery x 2 USB bus power Power consumption : 1.5 W Dimensions : 60 x 133x 28 mm / 2.36 x 5.24 x 1.1” (W x D x H) (including protrusions) Weight : 135 g / 4.
Connector: : 3.5 mm stereo mini phone jack Input impedance : 75 kohms Nominal level: : −10 dBV Maximum level : +2 dBV Connector: : 3.5 mm stereo mini phone jack Maximum level: : 20 mW+20 mW @16 ohms Connector : Type mini‐B Format : USB 2.0 compliant, USB mass storage class Supported operating systems: Windows 2000, or later Mac OS X 10.
Index Screen MENU LIBRARY 19 PLAY MODE 35 REC FORMAT 14 REC SETTING 20 PRESET SETTING 24 METER 29 USB MODE 45 TUNER 34 SYSTEM 41 2010/04/15 31 LCD Contrast 41 Back Light 31 A.
Owner’s manual 2010 KORG INC.