
Operation Manual


Recording the Styles and Pads |261
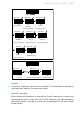
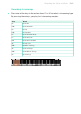
Reading the fingerboard diagram
You can see how a chord is composed on the fingerboard diagram. Here is
the meaning of the various symbols:
Symbol Meaning
Red dot Fingered string (i.e., played note).
White dot Fifth, playing on the D#2 key.
X Non played or muted note.
Light grey bar Barré (a finger crossing all the strings, like a mobile capo).
Dark grey bar Capo.
Choosing a Key/Chord
The Key/Chord parameter pair works in a different way on Guitar tracks
than on other track types. While with other tracks this is always the refer-
ence key used for NTT transposition, with Guitar tracks there is a differ-
ence, whether you are recording a Chord Variation contained in an Intro 1
or Ending 1 Style Element, or a Chord Variation contained in any other Style
Element (or a Pad):
▪ On Intro 1 and Ending 1, this chord will be used as the reference key for the
chord progression.
▪ On all the other Style Elements (or Pad), this chord will be used only for
listening during recording. During playback, the chord will follow chord rec-
ognition.
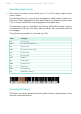
With Intro 1 and Ending 1 (both Chord Variation 1 and 2) you may also want to
enter a chord progression, to be played on the lowest MIDI octave (from C-1
to B-1). Chord types are inserted by using velocity values, as shown in the
following table:
Vel. Chord Type Vel. Chord Type
1 Major 2 Major 6th
3 Major 7th 4 Major 7th flatted 5th
5 Suspended 4th 6 Suspended 2nd
7 Major 7th suspended 4th 8 Minor
9 Minor 6th 10 Minor 7th
11 Minor 7th flatted 5th 12 Minor major 7th
13 Dominant 7th 14 7th flatted 5th
15 7th suspended 4th 16 Dimished