Table of Contents Introduction ........................................................................................ 1 Main features ..........................................................................................................1 Please note before use ...........................................................................................1 PS60 Editor and PS60 Plug-In Editor operating requirements .............................1 Installation ................................................
Selecting a parameter and editing the value............................................................................. 26 Selecting and executing utility functions ................................................................................... 26 Writing (store/saving) ................................................................................................................ 27 Utility commands...................................................................................................
Introduction Thank you for purchasing the Korg PS60 Performance Synthesizer. To help you get the most out of your new instrument, please read this manual carefully. Main features The PS60 Editor and the PS60 Plug-In Editor are applications for Macintosh or Windows that allow you to edit the PS60’s programs, performance, effects, and global settings. The PS60 Editor is a stand-alone editor. The PS60 Plug-In Editor is an editor that is compatible with the VST, Audio Units, or RTAS formats.
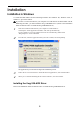
Installation Installation in Windows To install the PS60 Editor and the PS60 Plug-In Editor into Windows XP, Windows Vista, or Windows 7, proceed as follows. If you want to connect the PS60 to your computer via USB and use the PS60 Editor and the PS60 Plug-In Editor, you must install the Korg USB-MIDI Driver. (Refer to the Installation Guide for details on how to install the Korg USB-MIDI Driver.) 1 2 Insert the included CD-ROM into your computer’s CD-ROM drive.
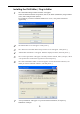
Installing the PS60 Editor / Plug-In Editor 1 2 3 4 5 The “PS60 Editor/Plug-In Editor Installer” will appear. Select and install all desired compoments, such as, the Editor (Standalone), Plug-In Editor (VST), and/or Plug-In Editor (RTAS). For example if you want to install the stand-alone version, click [Install Standalone Application]. The PS60 Editor screen will appear. Click [Next>]. The “Welcome to the PS60 Editor setup wizard” screen will appear. Click [Next>].
8 9 If the installation was successful, click [Close]. The “PS60 Editor/Plug-In Editor Installer” will appear. Next you will install the plug-in version(s) that you want to use. Using the procedure described above, begin with step 1 and install the plug-in version(s) that you want to use. If you don’t want to install the VST plug-in version or RTAS plug-in version, click [Exit Setup] to end the installation.
Installation in Mac OS X To install the PS60 Editor and PS60 Plug-In Editor into Mac OS X, use the following procedure. You must install the KORG USB-MIDI Driver if you want to connect the PS60 to your computer via USB and use the PS60 Editor or the PS60 Plug-In Editor. (For details on installing the KORG USB-MIDI Driver, refer to the Install Guide.) 1 2 3 4 5 Insert the included CD-ROM into your CD-ROM drive. Start up the installer by double-clicking on “PS60 Editor Installer.
6 7 8 9 A screen where you can “Select a Destination” will appear. Select the installation destination of your choice and click [Continue]. The “Standard (Easy) Installation” dialog box will appear. Click [Install]. An authentication dialog box may appear at this point, depending on the version of your operating system. If so, type your password and click [OK]. Depending on the version of your operating system, you might see a dialog box stating “Your computer must be restarted after installation.
Setup PS60 Setup If you want to use the PS60 Editor with the PS60 connected to your computer via USB, you must make sure that you’ve finished installing and setting-up the KORG USB-MIDI Driver before you start up the PS60 Editor. 1 2 Use a USB cable to connect the PS60’s USB connector to the USB port of your computer. In the PS60’s Global mode, make sure that MIDI Filter “SysEX” is on (the check box should be checked). (The factory setting is off.
Setting up the PS60 Plug-In Editor If you want to use the PS60 Editor with the PS60 connected to your computer via USB, you must make sure that you have finished installing and setting-up the KORG USB-MIDI Driver before you start up the PS60 Editor. This section explains how to set up the PS60 Plug-In Editor in your host application and adjust the settings so that it will function correctly. About the PS60 Plug-In Editor Parameter data is sent and received between the PS60 Plug-In Editor and the PS60.
Using an external mixer to control the PS60’s audio signal If you want to mix the PS60’s audio signals with the audio signals sent from your host application via your audio interface, or with audio signals from another sound module, you can make connections as shown below.
Host application settings The following material explains how to start up the PS60 Plug-In Editor in your host application and select the appropriate settings for it to function properly. Please proceed to the specific explanation for the system you’re using. Apple – Logic Pro 9 1 2 Start up Logic Pro 9. Create a Software Instrument Track, and initialize the “PS60 Plug-In Editor.
Steinberg – Cubase 5 1 2 3 4 5 Start up Cubase 5 and create a project. In the VST Instruments window, start up the “PS60 Plug-In Editor.” Create a MIDI track. In the output section of that MIDI track, choose the “PS60 Plug-In Editor” which you started up in the VST Instruments window. To route the PS60’s audio signal to Cubase 5, create an audio track. On the input section of the audio track, select the audio interface input where you’ve connected the PS60’s audio signal.
Ableton – Live 8 1 2 3 4 5 Start up Live 8, and choose “View” →“Session View.” From the plug-in device browser, drag and drop the “PS60 Plug-In Editor” onto the session view. This will create a MIDI track with the “PS60 Plug-In Editor” started up. Verify that the “PS60 Plug-In Editor” is running in the MIDI track view. Press the arm button so that the MIDI input from the external source will be sent to the “PS60 Plug-In Editor.
MOTU – Digital Performer 7 1 2 Start up Digital Performer 7. Create an instrument track. Start up the “PS60 Plug-In Editor.” Instrument Track 3 Create a MIDI track. Choose the “PS60 Plug-In Editor” as the output of that MIDI track. Tracks Windows – MIDI Track 4 To route the PS60’s audio signal to Digital Performer 7, create an audio track or an AUX track. On the input section of that track, select the audio interface input where you’ve connected the PS60’s audio signal.
Digidesign – Pro Tools LE 8 1 2 3 4 Start up Pro Tools LE 8, and open a session. Create an audio track (stereo), and start up the “PS60 Plug-In Editor.” Audio Track Create a MIDI track. Choose the “PS60 Plug-In Editor” as the output of that MIDI track. MIDI Track To route the PS60’s audio signal to Pro Tools LE 8, create an audio track or an AUX input track. On the input section, please select the audio interface input where you’ve connected the PS60’s audio signal.
5 If you’re routing the PS60’s audio signal to an audio track, arm the REC button so that you can hear/monitor the audio signal. If you are routing the PS60’s audio signal to an AUX input track, this setting is not necessary.
Cakewalk – SONAR8/8.5 1 2 3 4 5 Start up SONAR 8/8.5, and open a project. From the Synth Rack, choose the “PS60 Plug-In Editor,” and create an instrument track at the same time. An instrument track with the PS60 Plug-In Editor assigned to it will be created. If you want to input the PS60's audio signal to your host application, first create an audio track. For the input of that audio track, select your audio interface's input where the PS60's audio signal is being input.
Other host applications 1 2 3 4 5 Start up your host application. Start up the “PS60 Plug-In Editor” as a plug-in instrument. Create a MIDI track. Choose the “PS60 Plug-In Editor” as the output of that MIDI track. To route the PS60’s audio signal to your host application, create an audio track. On the input section of that audio track, select the input where the PS60’s audio is connected. Enable the monitor function on the audio track that will be receiving the audio signal from the PS60.
Basic functions and operation Start-up PS60 Editor • From the “KORG”–“PS60” folder, start up the “PS60 Editor.” Note: When you start up the editor, the PS60 programs and other settings can be loaded automatically. (See p.31 “Software Setup (Initial settings for the PS60 Editor)”) Don’t touch the keyboard or the mouse of your computer while data is being sent or received. Windows XP / Windows Vista / Windows 7 Access the “KORG” folder from the taskbar via [Start] – [All Programs].
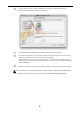
Items in the screen A screen like the following will appear when you start up the editor. (This illustration here shows the Performance mode screen.) Performance (Program) Number, Name Split Setting Performance Control Easy Setup Timbre Selector Effect (MFX1 / MFX2 / EQ) Mode Edit Pages Tabs Keyboard Connection indicator (KORG logo) This indicates the connection status between the PS60 Editor/PS60 Plug-In Editor and the PS60.
Mode (PERF, PROG EDIT, GLOB) / Utility (UTILITY): Here you can select performance, program edit, or global mode. UTILITY lets you view and select the utility commands that are available for the page you’ve selected. This is where you can save data. Performance (Program) Number, Name: This indicates the number and name of the performance or program.
Editor operation - Performance mode 1 All performance parameters that can be edited from the PS60 itself can be edited using the various pages in the editor's performance mode. Click the PERF mode button, and then click the [Overview] tab of the edit page tabs. If SPLIT SETTING (located to the left of the panel center in the upper part of the screen) is set to SUB OFF, the CTRL setting located beside it will automatically be set to MAIN.
2 The six EASY SETUP knobs and the six timbre selector buttons correspond to the six knobs and buttons of the PS60 itself. However, unlike when using the PS60 itself, it is not possible to simultaneously press multiple buttons in the editor. For this reason, if you want to turn on just one timbre, you'll need to turn off each of the other timbres. If you want to turn on multiple timbres, click each one consecutively.
4 If you click the [Main Timbres] tab located below the [Overview] tab, the settings of the main timbres will appear. The timbre names shown to the left correspond to the timbre selectors. You can click these to turn them on/off. Main timbres are shown in red if the timbre is on, and sub timbres are shown in blue.
Editor operation - Program edit mode 1 2 3 In the editor, click the PROG EDIT button to enter Program Edit mode. The method of selecting the timbre you want to edit is the same as when operating the PS60 itself. If two or more timbres are turned on, the timbre selector button of each timbre that is currently on will blink when you click the PROG EDIT button. Click the timbre selector button of the timbre that you want to edit.
4 5 The upper part of the Quick page is the overview area which shows the current value of the most important parameters in program edit mode. This overview area displays the parameters organized by section. By clicking the name of each parameter section (such as “Pitch EG” or “Filter 1 EG”), you can jump to the page/tab for editing those parameters. The [Basic] tab and subsequent edit pages allow you to edit all of the parameters that cannot be edited from the PS60 itself.
Selecting pages and tabs When you want to perform detailed editing, you can switch to other pages and tabs to access the desired parameters. Global mode is divided into separate pages where you can edit category names, and scales (temperaments). Select the desired page (or tab), and proceed to edit the settings. • To select a page, click the tab for the desired edit page. • To move between tabs within a page, select one of the tabs located in the center of the window.
Writing (store/saving) If you want to keep any of the edits you have made, you must write (store/save) them. The Write operation will save the edited settings on the PS60. If you select a different program or close the application before saving, the content you had been editing will be lost. The same applies to the performance.
3 Specify the program name, category, and save destination, and click the [OK] button. Note: If you select an existing program as the save-destination, it will be overwritten. If you want to add the program as a new program, select the user program “INIT.” With the factory settings, D056-D127 are user programs. Note: If you use a menu command (such as Copy IFX) on the PS60 itself, the data in the Editor and the data in the PS60 may lose synchronization.
Utility commands Load Loads editor data that was previously saved on the computer. Save Saves data from the editor to your computer as a file. Note: These functions load or save the data as dedicated files for the editor application. Store Performance, Write Program These commands send the current data that was modified in the editor to the PS60 itself, and writes the data into internal memory. Initialize Performance This command initializes the settings of the performance that’s currently selected.
Note: These utilities can be selected only in the editor’s global mode Software Setup page. Select Auto Load File In the Software Setup tab, use “Load data file automatically” to select the desired file. Note: Refer to “Load data file automatically” ()p.31). All Sound Off Depending on the host application, “hung” notes may occur while operating the host's functions. If this symptom occurs, please use the “All Sound Off” command.
Software Setup (Initial settings for the PS60 Editor) Global mode Software Setup lets you specify the default settings that the PS60 Editor will use when it starts up. This setting is saved when you use the UTILITY command Save as Default, and will be remembered the next time you start up. Total Recall & Data Sync Settings Here you can specify the editor data that will be saved and loaded as part of the song data by your DAW software. This setting lets you save only the data you need.
MIDI IN Port / MIDI OUT Port This selects the connection port for the PS60 and the PS60 Editor. The name of the MIDI port that’s currently connected is shown. You won’t need to change this setting if the PS60 and the PS60 Editor are connected correctly, since the PS60 Editor will search for the PS60 when it starts up, and will specify the MIDI port automatically.
Cautions USB connection If you lose data synchronization with the PS60 when starting up the editor, please check the following points. • If you’re using USB-MIDI, you must use the KORG USB-MIDI Driver. The default driver provided by the operating system may have an extremely slow data transfer rate, or may not communicate correctly. • If you’re using a USB hub, try connecting the PS60 directly to a USB port on the computer itself to see whether it will work.