Thank you for purchasing the Korg TRITON proX, TRITON pro, or TRITON music workstation/sampler. To ensure trouble-free enjoyment, please read this manual carefully and use the instrument as directed. About this manual The owner’s manuals and how to use them The TRITON proX, TRITON pro, and TRITON come with the following owner’s manuals. • Basic Guide • Parameter Guide • Voice Name List Basic Guide First read this manual carefully to gain a basic understanding of the instrument and to learn basic operation.
Table of Contents About this manual . . . . . . . . . . . . . . . . . . . . . . . . . . . iii Data handling . . . . . . . . . . . . . . . . . . . . . . . . . . . . . . . iii Introduction . . . . . . . . . . . . . . . . . 1 Introducing the TRITON . . . . . . . . . . . . . . . . . . .1 Main features . . . . . . . . . . . . . . . . . . . . . . . . . . . . . . . .1 Overview of the modes . . . . . . . . . . . . . . . . . . . . . . . .3 Front and rear panel . . . . . . . . . . . . . . . . . . . . .
P3: Edit-Filter Filter settings . . . . . . . . . . . . . . . . . . . . . . . . . .48 P4: Edit-Amp Amplifier settings . . . . . . . . . . . . . . . . . . . . . .49 P5: Edit-Common LFO LFO settings . . . . . . . . . . . . . . . . . . . . . . . . . . .50 P7: Edit-arpeggiator Arpeggiator settings . . . . . . . . . . . . . . . . . . . .51 P8: Edit-Insert Effect Insert Effect settings. . . . . . . . . . . . . . . . . . . . .51 P9: Edit Master Effect Master Effect settings . . . . . . . . . . . . . . . . . . .
Effect settings for the AUDIO INPUT . . . . . . .109 About dynamic modulation (Dmod) . . . . . . . . . .110 MIDI applications . . . . . . . . . . . . . . . . . . . . . .111 About MIDI. . . . . . . . . . . . . . . . . . . . . . . . . . . . . . . .111 Connecting MIDI devices/computers (MIDI connectors) . . . . . . . . . . . . . . . . . . . . . . . . . . . . . . .111 Controlling an external MIDI tone generator from the TRITON . . . . . . . . . . . . . . . . . . . . . . . . . . .
Introduction Introduction Introducing the TRITON Overview The TRITON is a music workstation/sampler that features the HI (Hyper Integrated) synthesis system as its tone generator. It provides high-quality preset multisamples/programs/combinations and an effect section, and functionality such as sampling, sequencer, song play, dual polyphonic arpeggiator, RPPR, and two audio inputs and six audio outputs.
grams together with effects and two arpeggiators, in order to create complex sounds that could not be produced by a program. You can also make settings that include external tone generators. Sampling The TRITON provides 48 kHz 16 bit linear mono/stereo sampling functionality. 16 Mbytes of memory are provided as standard, allowing approximately 2 minutes 54 seconds of mono sampling (or approximately 1 minute 27 seconds of stereo sampling).
Program mode • Select and play programs You can choose programs from rewritable banks A, B, C, D, E and F which contain a total of 768 programs, and non-rewritable bank G (256 programs compatible with the GM2 standard, and nine drum programs). (The 128 programs of bank F can be selected only if the EXB-MOSS option has been installed.) • Edit a program Make settings for the oscillator, filter, amp, EG, LFO, effects, and arpeggiator.
• You can use a cue list to set up consecutive playback of multiple songs, and specify the number of repeats for each song. • You can use a maximum of 20 cue lists, 200 songs, and 100 preset patterns. One song can use as many as 100 patterns. • The TRITON can be used as a 16-track multitimbral tone generator. • Perform using the RPPR (Realtime Pattern Play/ Recording) function, and make settings for it.
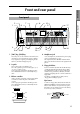
Introduction Front and rear panel Front panel 6 1 9 4 5 3 12 13 1. [SW1] key, [SW2] key These keys are on/off switches for the functions to which they were assigned in Program, Combination, Sequencer, Song Play, and Sampling modes. When on, the LED will light (☞p.25). 2. Joystick This controls pitch or modulation, etc. Move the joystick up/down or left/right (+Y, –Y, –X, +X) to control (☞p.25). Various program parameters and effect parameters will determine what is controlled by the joystick. 3.
6. [VOLUME] slider This adjusts the volume that is output from the OUTPUT jacks (L/MONO, R) and the headphone jack. [S.PLAY] key In Song Play mode you can playback Standard MIDI Files from a floppy disk or external SCSI device (when the separately sold EXB-SCSI option is installed), and play along with the playback. [GLOBAL] key In Global mode you can make settings that affect the TRITON’s entire system. In this mode you can also create drum kits and arpeggio user patterns. [DISK] key 7.
. LCD screen The TRITON features a Touch-View system that uses a touch-panel LCD screen. By pressing objects that are shown in the LCD screen, you can select pages, tabs, and parameters, and set values (☞p.10). 12. [EXIT] key When in P (page) 1–9 of each mode, pressing the [EXIT] key will move to P (page) 0 of that mode. When a dialog box is open, this key, will cancel the settings made in the dialog box and close the dialog box (corresponds to the Cancel button).
[VELOCITY] knob This adjusts the velocity (playing strength) of the arpeggio notes. At the center position (12 o’clock), the velocity will be the same as the “Velocity” parameter of the arpeggiator. Rotating the knob toward the left will weaken the velocity, and rotating it toward the right will strengthen the velocity. [ON/OFF] switch This switches the Arpeggiator function on/off. When on, the LED will light. 17. [BANK] keys These keys are used to switch Program/Combination banks. Rear panel 1.
1 2 3 4 5 A separately sold on/off foot switch such as the Korg PS-1 foot switch can be connected here (☞p.16). Its function can be assigned in Global mode, allowing you to use the foot switch as a modulation controller, to select programs or combinations, or to start/stop the sequencer (☞p.125). 10. ASSIGNABLE PEDAL jack A separately sold Korg EXP-2 or XVP-10 expression pedal can be connected here (☞p.16).
Names and functions of objects in the LCD screen The TRITON’s LCD screen features a Touch View system that uses a touch panel. By pressing objects displayed in the LCD screen, you can select pages, set parameter values, rename programs and combinations, write data, and perform many other operations. References in the TRITON’s owner’s manual to the “... button” or “... tab” refer to objects displayed on the LCD screen. References to the “[...] key,” “[...] knob,” “[...] dial],” or “[...
After some commands are executed, the previously-locked page menu will be unlocked automatically, and the page menu will be closed. * • “Category/Program Select,” “Category/ Combination Select”: Select programs or combinations by category To close the tabbed popup menu, press the OK button or Cancel button. Text edit button When you press this button, a text edit dialog box will appear. Here you can rename text (such as the name of a program, combination, or song etc.) (☞p.38).
Basic operation of the TRITON 1. Selecting modes In Disk mode there is only one page, so the page jump menu will not appear. ● In order to use a particular function on the TRITON, you must first select the appropriate mode. Press one of the front panel mode keys ([COMBI] key – [DISK] key) to enter the corresponding mode. [COMBI] key: [PROG] key: [SEQ] key: [SAMPLING] key: [S.
[BANK] keys 5 To move to another page or tab, press the [MENU] key and repeat the procedure from step 2. The [BANK] keys are used in Program mode to select the program bank and in Combination mode to select the combination bank. In Combination mode, they are also used to select the program bank for each timbre of the combination. In Sequencer and Song Play modes, these keys are used to select the bank of the program used by each track of the song. [BANK] key 3.
G001 Acoustic Piano g(1) 001 Acoustic Piano w g(2) 001 Acoustic Piano d g(3) 001 *Acoustic Piano g(4) 001 *Acoustic Piano Popup buttons and popup menus You can press a popup button to access a popup menu, and then set parameter values (☞p.10). : g(9) 001 *Acoustic Piano g(d) 001 STANDARD Kit G001 Acoustic Piano : [COMPARE] key Use this key when you wish to compare an edited program or combination sound with the un-edited original (i.e., the sound that is written into memory).
● Connect the AUDIO OUTPUT (MAIN) L/MONO and R jacks to the INPUT jacks of your powered monitor system, etc. L/MONO and R are the main outputs. If you are outputting in stereo, make connections to the (MAIN) L/MONO jack and the R jack. If you are outputting in monaural, make connections to the (MAIN) L/MONO jack. We recommend that you playback in stereo if possible. 1.
Play mode and output the sound from the OUTPUT jacks, connect a mic or an external audio source to the AUDIO INPUT 1 and 2 jacks. ● For details on connections when sampling in Sampling mode (☞p.78). ● For details on connections when outputting from the OUTPUT jacks in other modes (☞p.109). 4. Connecting pedals etc. Foot pedal connections A foot pedal controls etc. Connect a separately sold Korg assignable pedal such as the XVP-10 or EXP-2 to the rear panel ASSIGNABLE PEDAL jack.
Quick Start 1. Turning the power on 1 Press the TRITON’s [POWER] switch to turn on the power. The LCD screen will display the name of your model (TRITON, TRITON pro, or TRITON proX), and the software version. (The following graphic shows the factory-set LCD screen of the TRITON. The version number is subject to change without notice.) 2 Turn on your powered monitors or stereo amp. 3 Raise the TRITON’s [VOLUME] slider to an appropriate level, and adjust the volume of your powered monitors or stereo amp.
Listening to a demo song Here’s how to listen to a demo song on the TRITON. Contents of the disks The TRITON series comes with two floppy disks (TNFD-00P and TNFD-01P). PRELOAD.PCG • Preloaded data (programs, combinations, drum kits, arpeggio patterns, global settings) • Program data (programs using the sampling function) used by the demonstration songs When you load PRELOAD.PCG, it will be written into internal memory. This data is preserved even if the power is turned off. When you load PRELOAD.
The “Select .KSC Allocation” radio buttons specify how the sample data will be loaded into sample memory. For this example, select Clear. 2. Selecting and playing a demonstration song in Sequencer mode B Press the [SEQ] key (the LED will light). C Press the [MENU] key. If you load with “Select .KSC Allocation” set to Clear, the sample data will be loaded from the beginning of the sample memory area. If you load with “Select .
3. Playing a cue list Here’s how to playback the demonstration cue list. A cue list allows you to playback multiple songs in succession, and specify the number of times that each song will be repeated. 1 Press the [MENU] key. The LCD screen will show a list of the pages in Sequencer mode. 2 Press either “P1: Cue List” or numeric key [1]. The P1: Cue List page will appear. 3 Press the [START/STOP] key. 4 To stop playback, press the [START/STOP] key once again.
Selecting and playing a program Quick Start make a selection. Selecting a program 1 Press the [PROG] key (the LED will light), and you will enter Program mode. 2 Make sure that P (page) 0: Play is selected in the LCD screen. If this page is not selected, press the [MENU] key to access the page jump menu, and either select “P0: Play” in the LCD screen or numeric key [0] to display P0: Play. If you press the [.
Selecting programs from Category/Program Select Program banks of the TRITON You can select programs from a list organized by category. With the factory settings, the programs are classified into sixteen categories of instrument (keyboard, organ, bass, drums etc.). The TRITON contains program banks A–G. 1 Press the Category popup button. A tabbed “Category/Program Select” popup menu will appear. In the above graphic, category 10: FastSynth is selected.
Selecting a combination 1 Press the [COMBI] key (the LED will light), and you will enter Combination mode. 2 Make sure that P (page) 0: Play is selected in the LCD screen. If this page is not selected, press the [MENU] key to access the page jump menu, and either press “P0: Play” in the LCD screen or numeric key [0] to display P0: Play. Category popup button Combination Number: name 5 Use numeric keys [0]–[9] to input the combination number, and press the [ENTER] key.
Selecting combinations from Category/Combination Select You can select combinations from a list organized by category. With the factory settings, the combinations are classified into sixteen categories of instrument (keyboard, organ, bass, drums etc.). Here the combinations are divided into sixteen categories. 1 Press the Category popup button. A tabbed “Category/Combination Select” popup menu will appear. Other ways to select a combination Using a connected switch to select combinations (☞p.
Using controllers to modify the sound The TRITON provides a variety of controllers that can be used to control the tone, pitch, volume, effects, and arpeggiator etc. in realtime while you play. +Y −X +X −Y JS(+X): Move the joystick toward the right to apply an effect. Normally this is used to control the pitch (bend up). JS(–X): Move the joystick toward the left to apply an effect. Normally this is used to control the pitch (bend down). JS(+Y): Move the joystick away from yourself to apply an effect.
4 To release the locked condition, press the [SW1] key once again. 3 Even when you apply further pressure to the keyboard, the sound at the moment you pressed [SW1] key will be held. This is the “locked” condition. 4 To release the locked condition, press the [SW1] key once again.
By adjusting the filter resonance level, you can increase or decrease the resonance level to add a unique character to the sound. B mode controls By adjusting the cutoff frequency of a high pass filter, you can modify the brightness of the sound. Level LPF HPF In each preset program, appropriate functions are assigned to the B-mode knobs. The functions that are assigned can be viewed in the LCD screen. The B-mode function settings are made for each individual program, combination, or song.
Note Number An effect can be applied by the note number (keyboard location) that you play. Normally this is used to control volume, tone (cutoff frequency), LFO sensitivity, and EG sensitivity etc. This can be used as a source for alternate modulation or effect dynamic modulation, to control program parameters or effect parameters. Foot pedals Damper Pedal A separately sold Korg switch-type damper pedal such as the DS-1H can be connected to the TRITON.
Using the arpeggiator while you play In addition to this, the TRITON’s arpeggiator is a polyphonic arpeggiator that is able to produce a variety of chordal transformations or phrases based on the pitch or timing of the notes you play on the keyboard. These functions let you use the arpeggiator to play a wide range of patterns including drum or bass phrases, and guitar or keyboard backing riffs.
Adjusting the length of the arpeggio notes Rotate the ARPEGGIATOR [GATE] knob to adjust the length of the arpeggio notes. Rotating the knob toward the left will shorten the notes, and rotating it toward the right will lengthen the notes. At the center position (12 o’clock), the note length will be as specified by the program parameter “Gate” (Program P7: Arpeg. Setup tab). ● Press “Pat” (Pattern Select).
Sounding both the arpeggio notes and the notes you play ● Press the “Keyboard” check box to make this setting. Checked: The notes you play on the keyboard and the notes played by the arpeggiator will both sound. Unchecked: Only the arpeggio notes will sound. Other settings for the arpeggiator You can also set “Gate,” “Velocity,” “Swing,” and “Scan Zone.” These parameters are set in Program P7: Arpeggiator (☞p.97).
Arpeggiator-A, Arpeggiator-B For each arpeggiator A and B, you can make settings for “Pattern Select,” “Resolution,” “Octave,” “Sort,” “Latch,” “Key Sync,” and “Keyboard.” (☞p.96) Other settings for the arpeggiator You can also set “Gate,” “Velocity,” “Swing,” and “Scan Zone.” These parameters are set in Combination P7: Arpeggiator (☞p.99).
In this section, we will explain how to load an RPPR demo song, and play it. As described in steps 1–8 of “Listening to a demo song” (☞p.18), load PRELOAD.SNG and PRELOAD.PCG. Shutdown Key *: When you play a key in the range of C–1 – C2, the currently-playing pattern will stop. Pattern Assignable**: A pattern and track can be assigned to each of the 72 keys in the range of C#2–C8. If you do not assign a key, it can be used to play as usual.
Simple program editing Program sounds can be modified and created in Program P1: Edit-Basic–P9: Edit-Master Effect. However, you can also use the “Performance Editor” to perform simple editing in Program P0: Play as well. You can also use REALTIME CONTROLS [1]–[4] knobs to modify the sound. The sound that you edit using the Performance Editor or using REALTIME CONTROLS knobs [1]–[4] in A-mode (or B-mode if CC#70–79 are assigned) can be saved by writing the program.
Simple combination editing 3 Press the Prog. Select tab. When a timbre’s “Status” is turned Off, the program assigned to that timbre will not sound. If the “Status” is set to INT, the program will sound. Try setting timbres 1 and 2 alternately to INT and Off, and listen to the result. Only timbre 1 will sound An example of editing As an example, here’s how to do some simple editing on combination Bank A064: ModernPiano. Only timbre 2 will sound 1 Press the [COMBI] key to enter Combination mode.
● If you wish to select a different program from the same category, press the desired program. That program will be highlighted. Press the scroll bar to see other programs in the same category. 8 Press timbre 2 “Pan” (it will be highlighted). Use the numeric keys [0]–[9], [ENTER] key, [VALUE] slider, [VALUE] dial, or [ ][ ] keys to modify the value. With a setting of C064 the sound will be located in the center. A setting of L000 places the sound at the far left, and R127 at the far right.
Basic functions Saving data Writing to internal memory The following data that you edit can be written into internal memory. • Program settings Programs 0–127 in banks A–F (However, bank F is available only if the separately sold EXB-MOSS option is installed.
The System Preference page will appear. Writing a program or combination A program or combination that you create by editing its settings in the Performance Editor or in the various Edit pages can be saved in internal memory. This procedure is called Program Write or Combination Write. If you wish to use the edited settings again after turning the power off, be sure to write the settings into memory. There are two ways to write a program or combination.
The category you specify here can be selected in the Category/Program Select menu, the Category/ Track Program Select menu, or the Category/Timbre Program Select menu (when choosing a program), or in the Category/Combination Select menu (when choosing a combination). 4 Use “To Program” and “To Combination” to specify the writing destination program/combination number. Use the [ ][ ] keys, [VALUE] slider, [VALUE] dial, numeric keys [0]–[9], or [ENTER] key to make your selection.
The example shown is for Write Arpeggio Patterns Saving on external media For details on the data that can be saved on external media (floppy disk etc.) (☞p.37 “Types of data that can be saved”). 2 To execute the Write operation, press the OK button. To cancel, press the Cancel button. When you press the OK button, the display will ask “Are you sure?” Press the OK button once again to write the data. Using the [REC/WRITE] key to write 1 In the following pages, press the front panel [REC/ WRITE] key.
To move to a lower directory level, press the Open button. To move to a higher level, press the Up button. 6 Press the page menu button, and then press the “Save All” page menu command. .SNG file Sequencer songs, cue lists, and user patterns .KSC file A file which lists the multisamples and samples used Directory A directory containing the multisamples (.KMP files) and samples (.KSF files) that are listed in the .KSC file 7 Use the text edit button to input a name (☞p.38).
Restoring the factory settings The factory setting data is referred to as the “preload data”, and you can restore the factory settings for the TRITON’s programs, combinations, and global settings by loading this preload data. This will rewrite any data that had been written before loading. If you do not wish to lose this data, you must first save it on a floppy disk or (if the separately sold EXB-SCSI option is installed) on external SCSI media (☞p.40). 6 If “Load PRELOAD.
Program mode ● For details on how to access these pages or modes, refer to “Basic operation of the TRITON” (☞p.12). P0: Play Select a program, use the Performance Editor to perform simple editing, and select and set arpeggio patterns. P1: Edit-Basic Set basic program parameters such as oscillator and multisample. Set scale and controllers. P2: Edit-Pitch Settings related to the pitch, including the pitch EG. P3: Edit-Filter Settings related to the filter (tone), including the filter EG.
modify using the performance editor, you must turn off memory protect in Global mode (☞p.37), and write the program (☞p.38). How a program is organized A program consists of the many parameters of P1–P9. The diagram below shows the structure of a program. The Arpeggio tab Sound has three aspects: pitch, tone, and volume. On the TRITON, the Pitch, Filter, and Amplifier blocks which make up a program correspond to these three aspects of sound.
Basic program editing Program Basic tab Program editing refers to the process of modifying the parameters that make up a program to vary the sound or to set controllers etc. General program editing can be performed using the performance editor of Program P0: Play, or using the REALTIME CONTROLS knobs [1]–[4], but detailed editing is performed in Program P1–P9. If you wish to save an edited program into internal memory, be sure to Write the program. (☞p.
If you press the popup button, all multisamples of internal ROM will be displayed, grouped into fifteen categories. Use the tabs at left and right to select a category, and select the desired multisample. When “Oscillator Mode” = Drums About High/Low You can specify two multisamples for an oscillator, and use velocity (keyboard playing dynamics) to switch between the two multisamples. This capability is called “velocity multisample switching.” 1 Select different multisamples for “High” and “Low.
Here you can specify how the pitch of the multisample selected for the oscillator will change. Pitch EG and LFO settings allow the pitch to varied over time. When the “OSC Mode” is Single or Drums, only the OSC1 P.Mod. tab is available. An LFO can be used to cyclically modulate the pitch (the “vibrato” effect). “LFO Intensity” specifies the amount of pitch change that the LFO will produce. With a setting of +12.00, vibrato will produce a maximum of ±1 octave of pitch change.
High pass filter P3: Edit-Filter Filter settings The filter allows you to diminish or emphasize specified frequency areas of the multisample selected for the oscillator. The tone of the sound will depend significantly on the filter settings. The TRITON lets you choose between two types of filter for each oscillator. Filter 1 is used for OSC1, and Filter 2 is used for OSC2. If “OSC Mode” is Single or Drums, only Filter 1 will be available.
Filter EG Adjust the effect produced by the filter EG, whose settings are made in the Filter 1 EG tab. • “Velocity to A” and “Velocity to B” adjust the effect that velocity will have on the filter EG depth. • “Intensity to A” and “Intensity to B” adjust the depth of the filter EG. • “AMS Int to A” and “AMS Int to B” adjust the effect that AMS will have on the filter EG depth. These three settings will determine the depth of the tonal change produced by the filter EG.
Use DKit Setting This is valid when “OSC Mode” is set to Drums. If this is checked, the pan location specified by the Drum Kit for each drum sound will be used. If this is unchecked, all drum sounds will sound at the same location. Preset drum kits are set to stereo settings. Normally you will leave this checked. sample, you can produce a sound with a character unlike a typical organ. Piano Organ Amp1 Mod.
P8: Edit-Insert Effect Insert Effect settings Here you can select insert effects and make settings for them. You can also specify the oscillator routing (the signal sent to the insert effects, master effects, and independent outputs) (☞p.107). P9: Edit Master Effect Master Effect settings Here you can select master effects and make settings for them. The master EQ is also set here (☞p.108). Alternate Modulation is a type of modulation that can be used to control various aspects of the sound.
Combination mode Pages in Combination mode In Combination mode you select combinations and edit them. Combination mode consists of pages P0–P9. To play a combination, select P0: Play. In P1–P9 you can edit the parameters of the combination that was selected in P0. ● For details on accessing each page or modes (☞p.12 “Basic operation of the TRITON”). P0: Play Select a combination; select a program for each timbre; set the status, pan, and level; select and set the arpeggio pattern.
Mixer tab Here you can adjust the pan and level of each timbre 1– 8 (☞p.35). (☞p.31 in the Parameter Guide) How a combination is structured A combination consists of a variety of parameters that can be accessed in P1–P9. The diagram below shows how a combination is structured. Parameters for each timbre are found in P1–P4. Here you can bring programs together to create the basic combination. Finishing touches can be added to the combination by using insert effects, master effects, and the master EQ.
If you wish to keep a combination that you edited, you must Write it (☞p.38). Layer, split, and velocity switch Within a combination, you can use keyboard location and velocity to change the program that sounds. The programs assigned to each timbre can sound in three ways: as a layer, a split, or a velocity switch. A combination can be set to use any one of these methods, or to use two or more of these methods.
OSC tab P2: Edit-Trk Param Settings for status, MIDI channel, and playing mode MIDI Channel tab Select a “Status” of INT for all timbres that you wish to use. Select Off for unused timbres. Timbres that are set to INT will sound the TRITON’s internal tone generator. Timbres set to Off, EXT, or EX2 will not sound. Timbres set to EXT or EX2 can control an external tone generator connected via MIDI.
Other tab Delay [ms] Specify the timing of the delay before each timbre sounds. Select the preset combination A127: One FingerTVShow, and play a single note. Timbres will sound consecutively, according to their Delay setting. If you select KeyOff for this parameter, the timbre will sound when the note is released. P3: Edit-MIDI Filter MIDI filter settings For each MIDI Filter item, you can specify whether or not the corresponding MIDI message will be transmitted and received.
Vel (Velocity) Zone tab (Velocity zone settings) Controller Setup tab For each timbre, you can specify a range of velocities for which it will sound. The range of velocities for which a timbre will sound is called the Velocity Zone. By setting a velocity zone, you can set up a timbre which will be sounded only by notes played at a certain strength, and not by stronger or weaker notes. By combining timbres that have differing velocity zone settings, you can create velocity switched combinations.
Sequencer mode The TRITON contains a 16-track MIDI sequencer. This sequencer is the center to which the TRITON’s numerous functions are integrated, allowing it to be used in a variety of situations including music production and live performance. When you turn off the power, the settings made in Sequencer mode and the song data, cue list data, and user pattern data that you recorded are not backed up.
The following two types of song data can be loaded from floppy disk or other external media into the TRITON’s sequencer. • Song data saved in the TRITON’s own format This data cannot be loaded by another device, but the playback will faithfully reproduce the detailed settings unique to the TRITON. We recommend that song data intended for playback on the TRITON be saved in this format.
About each page in Sequencer mode The structure of Sequencer mode Sequencer mode consists of the following pages. ● For details on how to access each page or modes, refer to “Basic operation of the TRITON” (☞p.12). P0: Play/REC Play and record songs, and make related settings. Select the program for each track, and set pan and level. P1: Cue List Play, create, and make settings for cue lists. P2: Trk Param Parameter settings for each track of a song. MIDI, OSC, Pitch, etc.
If you copy (“Copy to Track”) a pattern to a track of the song, the playback data will be recorded on the track just as if you had recorded it onto the track in the first place. This will occupy more memory than if you use “Put to Track,” but you will be able to edit each location of data independently without affecting other locations, just as when editing normal track data. ** Musical data (MIDI RPN data) can be used to change the starting settings during playback.
Playback the “mute” function allows you to silence a specified track. Playing a song (Play) Press the track 2 PLAY/MUTE/REC button once. When you wish to playback song data on the sequencer, you must first record song data, or load or dump song data into the TRITON. To load song data from a floppy disk etc., use Disk mode. The display will change, and the playback of track 2 will also be muted. 1 In Sequencer mode, press P0: Play/REC. 2 Use “Song No. and name” to select the desired song (☞p.64).
Recording on a track, and recording on a pattern Recording on a track There are two ways to record on a track: realtime recording and step recording. You can choose from a further six types of realtime recording. In addition, you can use event editing to modify data that has been recorded or to insert data, and use track editing operations such as Create Control Data to insert data such as bend, after touch, and control changes.
5 Press the [REC/WRITE] key. Realtime recording on a track Preparations for recording Before you begin recording, you need to make track settings. Be sure to turn off the Global mode protect setting (☞p.37). Song No. and name Track Select Category Bank/Program The TRITON will enter record-standby mode. The PLAY/MUTE/REC button of the track(s) you specified in step 3 will change from PLAY to REC. The metronome will begin sounding.
5 When you finish playing, press the [START/STOP] key. Recording will end, and the location will return to the point at which you begin recording. At this time if you press the [PAUSE] key instead of the [START/STOP] key, recording will pause. When you press the [PAUSE] once again, recording will resume. When you are finished, press the [START/ STOP] key to stop recording. Overdub 1 Make the necessary settings in “Preparations for recording.” 2 In the Preferences tab “Recording Setup,” select Over Dub.
5 Press the [REC/WRITE] key, and then press the [START/STOP] key. When using multitrack recording, refer also to “Multi Rec” (☞p.50) of the Parameter Guide. Playback will begin. When you reach the starting location you specified in step 3, recording will begin. Play the keyboard and operate controllers such as the joystick to record your performance. When you reach the ending location you specified in step 3, you will return to the starting location, and continue recording.
3 Record a bass phrase on track 2. As an example, we will describe how you can use the Track Play Loop function to efficiently record tracks. This is a convenient way to create a basic rhythm section. Here we will explain the procedure of using the Track Play Loop function to playback a drum track and a bass track, while you record synth phrases. 1 Record a drum phrase on track 1. Select a drum program for track 1.
Copying combination sounds to multiple tracks You can copy a combination sound to multiple tracks to record it. For the copy procedure, refer to “Copy From Combination” (☞p.48) in the Parameter Guide. If you wish to use the arpeggiator settings of a copied combination and record the arpeggiator performance in realtime, use “Track Select” to choose a track that uses the global MIDI channel. When you play the keyboard, it will sound in the same way as for the combination.
The musical data that is recorded will be added to the previously-recorded data. 9 During pattern recording, you can erase unwanted musical data by pressing the [REC/WRITE] key, or by checking the “Remove Data” check box. For details refer to “Loop All Tracks,” step 6 (☞p.66). 0 Press the [START/STOP] key. Pattern recording will end. To use a user pattern that was recorded in this way (or a preset pattern), you can execute “Put to Track” to assign the pattern to a track (☞p.70 in the Parameter Guide).
Editing Track editing Track editing is performed using the page menu commands of P5: Track Edit. Event Edit allows you to modify previously-recorded data or to insert new data. Track Edit commands such as Create Control Data allow you to insert bend, after touch, and control change data, and to delete, copy, insert and move tracks (☞p.62 in the Parameter Guide).
• “Step”: The arrow will indicate the currently playing step. indicates the currently selected “Step.” If you set “Current Step” while stopped, the display will change. • “Measure”: Indicates the starting measure of that step. • “Meter”: Indicates the currently-playing time signature. This cannot be changed. Select S000: Intro for “Step” 01, S001: A for “Step” 02, S002: Bridge for “Step” 03, and S003: Ending for “Step” 04. 5 In “Repeat,” specify the number of times that the song at each step will repeat.
“Assign” check box. (You can make assignments for keys C#2–C8. Keys C2 and below are used for stopping the pattern playback, and cannot be assigned.) RPPR (Realtime Pattern Play/ Recording) function For details on the RPPR function, refer to “Playing with the RPPR function” (☞p.33). Here we will give an example of how to make RPPR settings, and how to playback and record. RPPR settings 4 Select the pattern that will playback when you press the key selected in step 3.
1 In Sequencer mode, select P0: Play/REC. 2 Check the “RPPR” check box. The RPPR function will be turned on. The on/off setting is memorized for each song. 3 Play the keyboard, and patterns will begin playing according to the RPPR settings. Keys to which no pattern is assigned can be used for normal keyboard performance. (When you change “Track Select,” the track played by the keyboard will change.
For example if you are using tracks 1 and 2 for RPPR playback and using track 3 for keyboard performance, you would set REC only for tracks 1, 2, and 3 as shown below. It will not be possible to change the location if you are recording the song for the first time, so proceed to step 5. 5 Press the [REC/WRITE] key, and then press the [START/STOP] key. Recording will begin.
None of the multisample or sample data in Sampling mode is backed up when the power is turned off. If you wish to keep this data, you must save it on a floppy disk or external SCSI device (if the separately sold EXB-SCSI option is installed) before turning off the power. Immediately after the power is turned on, the TRITON will contain no multisample or sample data. If you wish to playback or edit data, you must first load previously-saved data from floppy disk or an external SCSI device.
Pages in Sampling mode ● For the procedure of entering each page or modes, refer to “Basic operation of the TRITON” (☞p.12). P0: Recording Record samples. Select the sample or multisample to record, make various recording settings and AUDIO INPUT settings. View the memory status. In Sampling mode P1: Sample Edit Perform waveform editing etc. on samples that were sampled or loaded in Disk mode.
48 kHz 16 bit sampling is the same quality as in audio devices such as DAT. A CD uses 44.1 kHz 16 bit sampling, which is a slightly lower sampling frequency. Samples and Multisamples Samples The data that is recorded (sampled) into internal memory or loaded from a file is referred to as a sample or sample file. Samples consist of the actual waveform data, and parameters that specify how the data will be played back, such as Start, Loop Start, and End Address.
Sampling (recording a sample) Preparations for sampling Connections and settings for a monaural source When sampling in monaural from a mic, the output of an external audio device or mixer, or an instrumental sound such as guitar or synthesizer, connect the source to the AUDIO INPUT 1 or 2. Guitars etc. with active pickups can be input directly, but instruments with passive pickups (i.e., without internal preamps) cannot be sampled at an appropriate level, due to impedance mismatching.
The AUDIO INPUT [LEVEL] knob adjusts both AUDIO INPUT 1 and 2. Using an insert effect The TRITON’s insert effects can be applied to the sound that is being input from the AUDIO INPUT 1 and 2 jacks, allowing you to record a sample with effects applied. As an example, we will explain the procedure for applying an insert effect to a stereo source and sampling the result. 1 Make the settings of step 1 and 2 in “Connections and settings for a stereo source.
5 In “Sample Select,” select the sample that you wish to record. For this example, select ----: ---No Assign----. Immediately after the power is turned on, this will be set to ----: ---No Assign----. You may sample even in this condition. The sample will be automatically recorded to a vacant sample number. If you wish to first specify a sample number to which the sample will be recorded, use the numeric keys [0]–[9] and [ENTER] key or the popup menu to select the number.
4 Select “Index.” Creating multisample indexes and sampling Index Keyboard & Index Create button “Index” can also be selected by holding down the [ENTER] key and playing a note on the keyboard. For this example, select 001. 5 If you have been sampling previously and one or more samples already exist, use “Sample Select” to select the sample that you wish to assign. Repeat steps 4 and 5 to assign a sample to each index. Complete the multisample in this way.
Loop settings With the default settings after the power is turned on, the sounds you sample will automatically be looped (P0: Recording page Preference tab “Auto Loop On.”) To edit the loop and other playback address settings for the sample, use the P2: Loop Edit page. 1 Select P2: Loop Edit. 3 Use the “Loop On” check box to turn loop playback on/off. When the box is checked, looping will be on.
Editing the waveform data of the sample is done in P1: Sample Edit. You can use commands such as cut, copy, and normalize to edit the waveform data. 1 Select P1: Sample Edit. Keyboard & Index The waveform data of the currently selected sample will be displayed. It will play back when you play the keyboard (in the highlighted region in the “Keyboard & Index”). You can use “Sample Select” to select the sample that you wish to edit.
Multisample editing Editing a multisample consists of creating indexes for the multisample and assigning a sample to each index (these basic settings can also be performed in P0), editing operations such as deleting, copying, and inserting indexes, and detailed settings such as sample level and pitch for each index. Multisample editing is performed in P3: Multisample. Editing the indices To change the number or order of the indexes, use the Insert, Cut, Copy, and Create buttons. 1 Press P3: Multisample.
Song Play mode ● For details on how to access these pages or modes, refer to “Basic operation of the TRITON” (☞p.12). P0: Program/Mix Play SMF data and make settings. Specify the program, pan, and level for each track. P1: Track Make MIDI and scale settings for each track. If the separately sold EXB-MOSS option is installed, set related parameters. P2: Controller Setup Controller settings.
When the “Status” of a track is set to EXT or BTH, the data played back by that track and the data produced by operating the keyboard or controllers of the TRITON will play and control an external tone generator. (The MIDI channel of the external tone generator must match the “MIDI channel” of the TRITON track that is set to EXT or BTH.) With a setting of BTH, the external tone generator and the TRITON’s own tone generator will be played and controlled simultaneously. (☞p.
To move to a directory that contains SMF data, press the [MENU] key, and then press “P3: Select Directory” to display P3: Select Directory. Playback using the Jukebox function The TRITON provides a Jukebox function that can be used to playback SMF data. This function allows you to specify the order in which files in the same directory will be played. A jukebox list you create will be erased when the power is turned off, and can not be recovered.
• Change the directory • Remove the floppy disk • Change drives Saving a Jukebox list Saving procedure 1 Use the procedure described above to create a jukebox list. 2 If the separately sold EXB-SCSI option is installed and you wish to save the list on a hard disk etc., use the P3: Jukebox drive select button to select the drive in which you wish to save the data. 3 In P3: Jukebox, select the “Save Jukebox List” page menu command.
Global mode When you play the keyboard in Global mode, the TRITON will sound as in the previous mode in which you were previously. Be aware that if you moved from Sampling mode to Global mode in a state where the sampling memory contained no data (such as immediately after the power is turned on), playing the keyboard will not produce sound.
Creating a drum kit About drum kits A drum kit assigns a drumsample (PCM waveform data for a drum) to each key, and specifies adjustments in pitch and level etc. for each sample. The TRITON contains 73 drum kit memory areas. With the factory settings, 00–15 (A/B) contain preset drum kits suitable for various styles of music. ROM memory areas 64–72 (GM) contain nine different drum kits compatible with the GM2 sound map. For the factory preset drum kits, refer to the separate Voice Name List.
7 As necessary, repeat steps 4–6 to set the parameters for each key. To change the drum kit name, use the “Rename Drum Kit” page menu command (☞p.38). 8 If you wish to save the edited drum kit into internal memory, be sure to Write the drum kit. If you turn off the power without writing, your edits will be lost (☞p.39). Sample Setup tab Assign Normally you will check this. The settings of each parameter will be valid. If this is unchecked, drumsample parameters will not be assigned to that key.
Disk mode How Disk mode is organized In Disk mode you can use floppy disks or a connected external SCSI device (if the separately sold EXB-SCSI is installed) to save or load various types of data. You can also make settings related to saving and loading functionality. For details on connecting an external SCSI device and setting the ID etc., refer to the owner’s manual for the separately sold EXB-SCSI option.
2 Press the [DISK] key. You will enter Disk mode. internal memory, use “Save All” or “Save PCG” to save it. 6 Press the page menu button, and press the “Load Selected” page menu command. Drive select button A dialog box will appear. The display and settings of the dialog box will depend on the type of file to be loaded. For details on each type of file, refer to p.132 in the Parameter Guide. 3 Press the Load tab.
Loading a .PCG file from the floppy disk included with a separately sold EXB-PCM series option When loading EXB-PCM series programs and combinations, use the following procedure. When doing so, you will specify the loading destination bank (C, D) in step 5. To load the data into bank C, select “C_BANK.PCG.” To load the data into bank D, select “D_BANK.PCG.” When you load “C_BANK.
Cautions when handling floppy disks When handling floppy disks, please observe the following points. Data loss may occur if a floppy disk is handled improperly. Inserting a floppy disk With the label of the floppy disk facing upward, insert it into the disk drive. Press the disk inward until it clicks into place. Malfunctions will occur if you use excessive force to insert the disk. Disks must be inserted gently, and straight in. Floppy disk type and format The TRITON can use 2HD or 2DD 3.
Arpeggiator settings This chapter describes the procedure for making arpeggiator settings in each mode. For details on the arpeggiator function, refer to “Using the arpeggiator while you play” (☞p.29). P000: UP UP Arpeggiator settings for a program Arpeggiator on/off Each time you press the ARPEGGIATOR [ON/OFF] key, the arpeggiator will be switched on or off. When on, the LED will light. When you play the keyboard, an arpeggio will play according to the selected arpeggio pattern.
other arpeggio patterns will be added to U200– U215(C)/U216–U231(D). 4 Make settings for the various parameters. “Octave”: Select the octave range in which the arpeggio will be played. If this is unchecked, the notes of the arpeggio will be sounded in the order in which they were actually played on the keyboard (OFF).
For example, suppose that you set “Pattern Select” to P0: UP, check “Latch,” set “Top Key” to B3 and “Bottom Key” to C–1. The arpeggiator will operate when you play keys in the range of B3 and below. Since “Latch” is on, the arpeggio will continue playing even after you release your hand from the keyboard. You can use the keys above B3 to play normally in realtime, to the accompaniment of the arpeggio. To change the chord that is being arpeggiated, play a different chord in the range below B3.
For this example, set timbres 1–4 to a “Status” of INT, and timbres 5–8 to a “Status” of Off. Set the “MIDI Channel” of timbres 1–4 to Gch. The parameters for A and B are the same as for a program (☞p.97). You can use keyboard ranges or playing velocity to operate the arpeggiator, or to switch between arpeggiators A and B.
channel). When the arpeggiator is on, playing the keyboard will cause arpeggiator A (which is assigned to T7 (Gch)) to run. T8 will be sounded by arpeggiator A. T7 will not sound since its “Status” is Off. • In this example, the “Status” of T7 is Off, so it will not sound regardless of whether the arpeggiator is on or off. It is a "dummy" timbre that is used to make T8 sound only when the arpeggiator is on. Combination B86: [] Select and play combination B86: [].
3 In Global P6: User Arpeggio, select the Pattern Setup tab. These settings can be changed during or after editing (☞p.127 in the Parameter Guide). 5 In “Pattern,” select the arpeggio pattern that you wish to edit. For this example, select an empty user arpeggio pattern. If you have moved from Program mode, the arpeggio pattern selected by the program will be displayed. If a blank pattern is selected, playing the keyboard will not start an arpeggio.
You can also select “Step No.” by using the [ ][ ] keys, the [VALUE] slider, the [VALUE] dial, or the popup menu. 9 When you play the keyboard as shown in the illustration, the arpeggiator will begin playing. Tone 0 corresponds to the pitch of the lowest key of chord you play on the keyboard. (If “Sort” is unchecked, it will correspond to the pitch of the first note you play.) If you turn off the power without writing, the edited contents will be lost.
5 For “Step No.” 05, do not enter a tone. 3 Select the Pattern Edit tab. 6 Set “Step No.” to 06, and press the [1], [2], [3], [4] keys. Set “Gate” to Legato. 7 For “Step No.” 07, do not enter a tone. Return to the Pattern Edit tab of Global P6: User Arpeggio. Set “Flam” to positive (+) values for oddnumbered steps, and to negative (–) values for even-numbered steps. This will simulate the characteristic nuances of guitar chording.
If “Fixed Note Mode” is set to Trigger All Tones, playing a single note on the keyboard will cause the rhythm pattern to play. If “Fixed Note Mode” is set to Trigger As Played, playing a single note on the keyboard will cause only the kick (Tone00) to play. Playing two notes on the keyboard will cause only the kick (Tone00) and snare (Tone01) to play. In this way, the number of keys that you play will be played by the same number of tones. 5 Set the parameters for each step. Use “Velocity” etc.
The note timing of the arpeggiator will depend on the setting of its “Key Sync.” check box. If this is checked, the arpeggiator will operate at the timing that you play the first note-on after having released all notes. If this is unchecked, the arpeggiator will synchronize to the timing of the internal/external MIDI clock. The following paragraphs explain how synchronization occurs when the “Key Sync.” check box is not checked.
Effects settings The effect section of the TRITON provides five insert effects, two master effects, one master EQ (stereo 3band EQ), and a mixer that controls the routing of these components. You can choose from 102 types of full-digital effects for each insert effect, and from 89 types for each master effect. The effects are categorized as follows.
Insert effects 4 Select the Insert Effect tab. Effect settings for a program Routing 1 In Program P8: Edit-Insert Effect, select the Routing tab. 5 For IFX1–5, select the effect type for each insert effect. When you press the popup button, all effects will be displayed, organized into six categories. Use the tabs located at the left to select a category, and select an effect from that category on the LCD screen. Effects 000–089 can be selected for IFX1, 2, 3, 4, 5, and MFX1 and 2.
“Send 1”, “Send 2”: Set the send levels to the master effects. For this example, set this to 127. 8 Select the IFX1–5 tabs, and set the parameters for each of the selected effects. For details on the parameters of each effect (☞p.155 in the Parameter Guide). Master effects The input levels to the master effects are set by the “Send 1, 2” levels (step 3 or 7). If “Send 1, 2” are zero, the master effects will not apply. “Send 1” corresponds to MFX1, and “Send 2” corresponds to MFX2.
has passed through each insertion effect. If effects are chained, the settings after the last IFX in the chain will be used. “Send 1” and “Send 2” adjust the amount of master effect that is applied to the signal that has passed through the IFX. These settings can be made in the same way as for a program (☞p.107). Effect settings for the AUDIO INPUT Even in modes other than Sampling mode, the TRITON’s effects can be applied to the external audio source connected to the AUDIO INPUT 1 and 2 jacks.
to L000). When you are inputting a monaural audio source, you will normally set this to C064. Using Dmod to change the delay level by moving the joystick away from yourself “BUS (IFX/Indiv.) Select”: In the same way as for the oscillator of a program, specify the bus to which the external audio source from AUDIO INPUT jacks 1 and 2 will be sent. 1 Set “Input Level Dmod” to +100.
MIDI applications You can use the MIDI THRU jack to simultaneously control multiple MIDI devices. (This type of connection should be used to connect no more than three devices. If you wish to connect a larger number of MIDI devices, we recommend that you use a MIDI patch bay as shown in the second diagram below.
Incoming MIDI data will be handled with settings equivalent to “Key Transpose” 0, “Velocity Curve” 4, and “After Touch Curve” 3. • When controlling the TRITON’s tone generator from an external MIDI device, select “PostMIDI.” The above-listed settings will affect the MIDI data that is received. These settings will also affect the data that is played back from the internal sequencer.
Connecting an Apple Macintosh PC I/F Baud Rate settings To connect an Apple Macintosh with the TRITON, you will need a separately sold AG-002B connecting kit (cable and Korg MIDI Driver software). 2 Press the [MENU] key, and then press the [EXIT] key to enter P0: Basic Setup. Macintosh computers that do not have a serial port (modem/printer) cannot be connected to the TO HOST connector.
Messages transmitted and received by the TRITON [...] indicates hexadecimal notation MIDI channels MIDI messages can be exchanged when the transmitting and receiving devices are set to the same MIDI channel. MIDI uses sixteen channels, numbered 1–16. The way in which channels are handled will differ depending on the mode. • When you operate the keyboard or controllers of the TRITON, messages will be transmitted on the MIDI channel selected by “Track Select.
Program mode • In Program P0: Play, program change and bank select messages are transmitted and received on the global MIDI channel. These messages are not received in P1: Edit-Basic – P9: Edit-Master Effect. After touch Combination, Sequencer, and Song Play modes When you apply pressure to the keyboard after playing a note, an after touch effect will be applied, and Channel After Touch messages will be transmitted. When these messages are received, an after touch effect will be applied.
• In Combination and Sequencer modes, the P3: MIDI Filter settings allow transmission/reception of control changes to be individually turned on/off for each timbre/track. For the assignable controllers ([SW1], [SW2], REALTIME CONTROLS [1]–[4] knobs, Foot Pedal/Switch), MIDI filter settings will apply to the control change number to which each controller is assigned. “Other Control Change” applies to control changes that are not covered by the items of the other check boxes (P3: MIDI Filter) (☞p.
Controlling panpot (stereo position) Panpot (CC#10) [Bn, 0A, vv] (vv: value, where 00 is far left, 64 is center, and 127 is far right) When the above CC# is assigned to the ASSIGNABLE PEDAL or as the B-mode function of a REALTIME CONTROL knob [1]–[4], operating that controller will transmit Panpot messages, and the panning will change. When this message is received, the result will be the same as when the controller is operated.
• In Combination and Sequencer modes, transmission/reception of this message can be turned on/off independently for each timbre/track (☞p.35, 57 in the Parameter Guide P3: MIDI2 tab “Enable Foot Pedal/Switch”). Ribbon controller (CC#16) [Bn, 10, vv] This message will be transmitted when the TRITON’s ribbon controller is operated. When “Foot controller (CC#04)”–”Foot switch (CC#82)” are operated on the TRITON, the specified alternate modulation or dynamic modulation etc. will be controlled.
• In Combination and Sequencer modes, transmission/reception can be turned on/off independently for each timbre/track (☞p.35, 57 in the Parameter Guide P3: MIDI Filter MIDI2 tab “Enable REALTIME CONTROLS Knob 1, 2, 3, 4”). In Program mode, the corresponding program parameters will be temporarily edited by these messages. You can Write the program to save the modified state (except for certain parameters).
You can use the universal exclusive Coarse Tune message to adjust the overall tuning that corresponds to the Global P0: Basic Setup “Transpose” parameter. (☞p.120 “About system exclusive messages”) Changing the pitch bend range RPN pitch bend range [Bn, 64, 00, 65, 00] This RPN message can be used to adjust the pitch bend range for a program or timbre (in Combination mode) or for a track (in Sequencer or Song Play modes). The procedure is as follows. 1 [Bn, 65, 00, 64, 00]: Select RPN parameter 00.
Master fine tuning [F0, 7F, nn, 04, 03, vv, mm, F7] (A value of 8192 [mm, vv=40, 00] is center, 4096 [mm, vv=20, 00] is -50 cents, and 12288 [mm, vv=60, 00] is +50 cents.) Parameter changes When this is received, the Global P0: Basic tab “Master Tune” parameter will be set. • In Combination mode, parameters other than the combination name can be edited.
Playing the TRITON multi-timbrally from an external device The TRITON can be connected to an external device and played multi-timbrally in the following ways. • MIDI messages from the external device can play a combination (8-part multi-timbral performance). You can change the overall settings (programs, levels, and effects) by using program change messages to switch combinations.
The TRITON supports the GM standard. It also supports the GM2 sound map (including bank select) with 256 programs and 9 drum programs provided in ROM banks G, g(1)–g(9), and g(d). (Banks g(1)–g(9) are GM2 variation programs, and g(d) contains drum programs.) • In Song Play mode when GS/XG part mode exclusive messages Drum or MDrm 1–4 are received, bank g(d) (GM2 drum bank) will be selected for the specified track.
Song Play mode • In Song Play mode, the TRITON can playback SMF data directly from a disk or external SCSI device (if the separately sold EXB-SCSI option is installed); i.e., the data will be played back as it is being read, and does not need to be loaded into memory. • If the SMF data contains a GM System On message, the TRITON will be initialized for GM playback (☞p.102 in the Parameter Guide “GM Initialize”).
Other functions You can also transpose by changing the pitch in semitone steps. To transpose the pitch of the entire TRITON, use Global P0: Basic tab “Key Transpose.” The pitch can be transposed over a range of ±1 octave. Here we will explain how to adjust the tuning and transposition of the entire TRITON. 1 Press the [GLOBAL] key to enter Global mode. 2 After pressing the [MENU] key, and press the P0: Basic Setup. 3 Select the Basic tab. 4 To adjust the tuning, select “Master Tune.
5 Set the “Foot Switch Polarity” to the polarity of the foot switch you have connected. If you have connected a Korg PS-1 pedal switch, set this to (–) KORG Standard. If the polarity is not set correctly, the pedal will not function appropriately. If you want this setting to be preserved after the power is turned off, save the setting (☞p.39). 6 Either press the [PROG] key to enter Program P: Play, or press the [COMBI] key to enter Combination P0: Play.
The functions of the [SW1] and [SW2] keys are set independently for each program, combination, and song. In Sampling mode and Song Play mode, the functions of these keys are set for the entire mode. You can specify the function that will be performed by the [SW1] and [SW2] keys, and can also select between Toggle (when the function will be switched on/off each time the [SW1] or [SW2] key is pressed) and Momentary (when the function will be on only while you continue holding the [SW1] or [SW2] key).
Shortcuts [MENU] key + numeric keys [0]–[9] • Access the pages within a mode [ENTER] key + numeric keys [0]–[9] • Access the page menu commands in each page (up to ten items) [ENTER] key + keyboard • Input note number values or velocity values • Select “KEY” in Global P5: Drum Kit, Sequencer P5: RPPR Setup tab • Select base key and index in Sampling mode [ENTER] key + [LOCATE] key • In Sequencer mode and Song Play mode, set the current location as the “Location” (equivalent to the “Set Location” page menu c
Appendices Installing and setting up the Korg MIDI Driver Installing the Korg MIDI Driver into Windows 95/98 and making settings In response to “Do you want Windows to search for your new hardware?” be sure to select “No,” and then click [Next>]. If your application (sequencer) is Windows-compatible, using the Korg MIDI Driver will allow you to use a Korg tone generator connected to the serial port (COM, RS-232C) as a MIDI device. 3 Select “Sound, video, and game controllers,” and click [Next>].
Click the [OK] button, and then click [OK] again. 2 “KORG PC I/F MIDI Port Properties” will appear. Click the [Settings] button. 6 Make settings as described in “Setting up the Korg MIDI Driver” (below), and click the [OK] button. 3 Make settings as described in “Setting up the Korg MIDI Driver” (below), and click the [OK] button. If you change the settings, you must restart Windows. 7 Be sure to restart your computer so that the new driver becomes effective.
4 When you finish making settings, click the [OK] button. Alternatively, if you wish to cancel the changes you made, click [Cancel]. If you have made changes, you must restart Windows. Setting up the Korg MIDI Driver (Macintosh) 1 Start up PatchBay. Time Port MIDI In Port MIDI Out Port Connected Port Modem Port Printer Port If you are using a MIDI application that does not use Apple MIDI Manager, it is not necessary to install the Korg MIDI Driver.
To use the Apple MIDI Driver, you must first delete or move the Korg MIDI Driver if it exists in your system folder. Then start up PatchBay, double-click the Apple MIDI Driver icon that appears, check Enabled for the Port to which the TRITON is connected, set Interface Type to [1 MHz], and close the dialog box. In PatchBay, drag the mouse from the OutPort of the MIDI application (sequencer) to connect it to MIDI Out.
Troubleshooting • Is the power cable connected to an outlet? .......☞p.15 • Is the [POWER] switch turned on? Turn on the rear panel [POWER] switch. .........☞p.17 Power is on, but nothing is displayed in the LCD screen • Use the rear panel [Contrast] knob to adjust the contrast of the LCD screen. ...................................☞p.9 Can’t operate the LCD screen correctly • In Global P0: Basic Setup, execute the “Touch Panel Calibration” page menu command to adjust the sensitivity of the touch panel...
with the send setting of the timbre/track. Cannot record a sample • Are one or more SIMM modules installed? ........................................................................ PG ☞p.243 • Is there free RAM area.................................. PG ☞p.81 Select a different RAM memory.................. PG ☞p.81 Delete unneeded samples. ........................... PG ☞p.83 Save important samples before deleting them .......................................................................... PG ☞p.
Specifications and options Modes Combination, Program, Sequencer, Sampling, Song Play, Global, Disk Tone generator HI (Hyper Integrated) synthesis system Polyphony: 62 voices (62 oscillators) in single mode 31 voices (62 oscillators) in double mode Filters: 24 dB/oct LPF with resonance 12 dB/oct LPF + HPF Alternate modulation function Waveform memory 32 Mbyte PCM ROM (425 multisamples, 413 drumsamples) Expandable via PCM ROM option (EXB-PCM series is supported) 16 Mbyte user sampling RAM (SIMM) (expandable
Audio inputs AUDIO INPUT 1, 2 LEVEL [MIC/LINE] switch, [LEVEL] knob Input impedance 10 [kΩ] Nominal level LINE +4 [dBu] @ [LEVEL] knob= min. –30 [dBu] @ [LEVEL] knob= max. MIC –17 [dBu] @ [LEVEL] knob= min. –52 [dBu] @ [LEVEL] knob= max. Maximum level LINE +14 [dBu] @ [LEVEL] knob = min. –20 [dBu] @ [LEVEL] knob= max. MIC –7 [dBu] @ [LEVEL] knob= min. –42 [dBu] @ [LEVEL] knob= max.
[62 notes Music Workstation/Sampler] TRITON proX, MIDI TRITON pro, TRITON Default Changed Mode Memorized Messages Altered Note Number: Transmitted Recognized 1 − 16 1 − 16 1 − 16 1 − 16 × 3 × Remarks Memorized ************** Sequencer and Arpeggiator data can transmit all note numbers 0–127 ************** 0 − 127 0 − 127 ○ 9n, V=1 − 127 × ○ 9n, V=1 − 127 × Aftertouch Polyphonic (Key) Monophonic (Channel) ○ ○ ○ ○ Pitch Bend ○ ○ *C ○ ○ ○ ○ ○ ○ ○ ○ ○ × ○ × ○ ○ × ○ ○ ○ ○ ○ ○ ○ ○ ○ ○ ○
Index Numerics 10’s Hold Combination 23 Program 21 12 dB/oct low pass filter and 12 dB/ oct high pass filter 48 24 dB/oct low pass filter with resonance 48 A After Touch 27, 115 After Touch Curve 126 Lock function 26 Vibrato effect 47 Wah effect 49 Alternate Modulation 51 Amp 44 Amp EG 49, 50 AMS (Alternate Modulation Source) 51 Append 19 Arpeggiator 29 Assign 99 Link, Combination 32, 100 Link, Program 31, 98 Octave 97 on/off 29, 96, 98, 120 Synchronization 105 Tempo 29, 96 Velocity 120 Arpeggio Gate 30, 9
Joystick 25, 116 Amount of pitch change 47 Lock function 25 Vibrato effect 47, 116 Wah effect 49, 116 Jukebox 87 Jukebox list Load 88 Save 88 K Key Sync. 97 Key Zone 56 Keyboard 31, 32, 97 Keyboard & Index 82 Keyboard crossfade 54 Keyboard input 14 Keyboard Track 48 KMP file(.KMP) 93, 94 Korg MIDI Driver 129, 130 KSC file(.KSC) 93, 94 KSF file(.KSF) 93, 94 N Note Number 28 Note on/off 114 L O Latch 97 Layer 54, 56 LCD screen 17 Level Amp Level 34 AUDIO INPUT 109 OSC Balance 34 LFO 47, 48, 50 Load .
Routing AUDIO INPUT 109 Combination, Sequencer, Song Play 108 Program 107 Sampling 109 RPPR 33, 72, 72 Check box 33 Playback 73 Realtime recording 73 Setting 72 Shutdown Key, RPPR stop 33 Stereo source 80 [SW1], [SW2] 25, 47, 57, 118, 127 Sync. Arpeggiator 105, 122 MIDI/Tempo Sync.