Update guide E 1
Table of Contents About this manual............................................. iii Sequencer P5: Track Edit .......................................39 Sequencer P6: Pattern/RPPR ..................................39 Sequencer P8: Insert Effect .....................................40 Introduction ..................................... 1 New functions in version 2.0 ..............................1 Sequencer mode .....................................................1 Disk mode ................................
Loading KARMA Music Workstation or TRITON Le .PCG/.SNG files...............................................54 Parameters that are valid on the KARMA Music Workstation but invalid on the TRITON STUDIO ..... 54 Parameters that are valid on the TRITON Le but invalid on the TRITON STUDIO ......................................... 55 Data compatibility............................................55 Parameters that are valid in version 2.0 but invalid in version 1.0 ................................................
About this manual How this manual is organized This manual explains the new features and functions that have been added in the TRITON Studio operating system version 2.0, and the improvements that have been made over earlier versions of the operating system. Sequencer mode, Disk mode, Global mode, Sampling mode, Combination mode, and Program mode are each covered in separate chapters, and functions that apply to more than one mode are described in the chapter entitled “Other new functions.
iv
New functions in version 2.0 Sequencer mode 1. HD Audio Track function (☞p.5) Two audio tracks (1 and 2) have been added to the existing sixteen MIDI tracks and the sequencer master track. The new audio tracks can be synchronized to the MIDI tracks and master track, allowing you to record up to 80 minutes of external audio - such as a guitar or vocals. You can use punch-in recording on a previously-recorded track, or bounce two recorded tracks down to one track, with no loss of fidelity.
Disk mode Global mode 1. “Advanced Conversion Load” for loading AKAI Programs (☞p.48) 1. “SCSI Mode” parameter (☞p.56) In addition to previously supported keymap-related parameters, version 2.0 also supports parameters such as key groups, key group zones, velocity-switching, oscillators, pitch, filter, amp/pan, and EG. These parameters will be preserved when convert-loading an AKAI program into a TRITON STUDIO program (or programs and combination).
Introduction Installing the system While the system is being updated, do not touch any switches or controls on the TRITON STUDIO and never turn off the power. You can update your TRITON STUDIO system to Version 2.0 via the internal floppy drive, by loading TRITON STUDIO Version 2.0 operating system files from DOS-formatted floppy disks. If you are using a system is earlier than version 2.0.0, follow the procedure described below to install the “TRITON STUDIO Operating System Version 2.
4
Sequencer mode The recorded data is saved as a 48 kHz stereo WAVE file on the internal or external hard drive. You can also select which of the stereo WAVE files saved on disk will be used as audio tracks 1 and 2. About the HD Audio Track function TRITON STUDIO System Version 2.0 adds two audio tracks to the sixteen MIDI tracks and master track of previous versions.
About the audio tracks The audio tracks used by a song (Audio Track 1, 2) are a single stereo WAVE file that is created by recording in synchronization with the MIDI tracks + master track. Audio track 1 is the L channel of the stereo WAVE file, and audio track 2 is the R channel. When you record or edit one track (or any portion of a track) this entire stereo WAVE file is modified; it is not the case that separate WAVE files exist.
5 You use the “Erase Measure” command to erase measures 1 through 4 of audio tracks 1 and 2. This actually overwrites “zero” level sample data, updating the stereo WAVE file as shown in the diagram. The space occupied by the stereo WAVE file is the same as in steps 2, 3, and 4.
Recording an audio track 2 Select the directory (“SNG00”) you created, and press the Open button. 1. Preparing to record an audio track The audio track data that you record is saved on the internal hard drive as a WAVE file. Before you record, you must create a directory (folder) where you will save the WAVE file and song data (.SNG) that will be created when you record the audio track. When song data that includes an audio track is saved as a .
For the audio track, you can also use a WAVE file ripped from a CD or a WAVE file created by resampling to the hard drive in Program mode, etc. (☞p.16 “Sel Dir/WAVE (Audio Track),” ☞p.20 “Put WAVE”) ■ Connect your guitar 9 Connect a guitar to the rear panel AUDIO INPUT 1 jack. Set the AUDIO INPUT [MIC/LINE] switch to the LINE position, and turn the [LEVEL] knob to a position near the center.
Then set the “BUS Select” that follows the insert effect you are using to 1/2. A In the Sequencer P0: Play/REC, Preference page, set “Track Select” to Audio Track 1. B Specify the recording method in “Recording Setup.” “Punch In”: unchecked “Bounce”: unchecked “Source BUS”: Indiv. 1/2 In the “Name” field, specify a name for the WAVE file that will be created. If you intend to record several takes for the same track, check “Take.
I Press the SEQUENCER [START/STOP] key. Recording will begin from the location you specified in “Location.” If you have specified a metronome precount (“Precount [Measure]”), recording will begin after the precount. J Press the SEQUENCER [START/STOP] key to stop recording. If you have already recorded performance data on the MIDI tracks, these tracks can playback, while only the external audio signal coming from the AUDIO INPUT jack will be recorded onto the audio track.
If “Overwrite.WAV” is checked, you won’t have to wait as long for the internal processing to be completed when recording begins and ends, but you will not be able to use the [COMPARE] key to compare the new recording with the previous recording. If “Overwrite.WAV” is unchecked, you’ll need to wait for somewhere between several seconds and several tens of seconds for processing to occur at the beginning and end of recording, but this option is “safer” since the previously-recorded WAVE file will remain.
4 In the Sequencer P0: Play/REC, Preference page, set “Track Select” to Audio Track 1. When you press the SEQUENCER [REC/WRITE] key, you will be prevented from using “Track Select” to switch between MIDI tracks and audio tracks. 8 Press the SEQUENCER [START/STOP] key. Playback and bounce-recording will begin simultaneously. When the audio tracks finish playing back, recording and playback will stop automatically.
In some cases (such as the hard disk being subjected to physical shock), data saved on the hard drive may become unreadable. We recommend that important data be saved frequently to CD-R/RW. For details on how to save the recorded data (.SNG/.WAV), refer to “Collecting song files and WAVE files saved on different directories into a single directory, and copying (backing up) the data to CD” in Disk mode “Collect Audio Track file” (☞p.52).
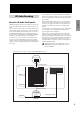
BUS (IFX/Indiv.) Select The 0–7: Sampling page has changed to the 0–7: Sampling/ HD Audio page (the tab has changed from Sampling to Sampling/HD Audio), and audio track playback parameters and page menu commands have been added. 0–7 0–7a 0–7c 0–7b [L/R, IFX1...5, 1...4, 1/2, 3/4, Off] Selects the bus for the audio track. L/R: The output of the audio track will be sent to the OUTPUT MAIN L (MONO)/R jacks. IFX1...IFX5: The output of the audio track will be sent to an insert effect.
2. Auditioning the contents of a WAVE file 0–7: Page Menu Command In the 0–7: Sampling page, the page menu commands “Sel Dir/WAVE (Audio Track),” “Auto Sampling/HD Audio Setup,” “Bounce All Tracks To Song,” and “Copy From Program” (☞p.43) have been added. 1 Choose “Sel Dir/WAVE (Audio Track)” to open the dialog box. “Drive Select” 0–7B 0–7C 0–7D 2 Use “Drive Select,” the Open button, and the Up button to select the drive and directory, and select the WAVE file (44.
0–7C: Auto Sampling/HD Audio Setup This command automatically sets the appropriate parameters to the optimal settings for use with various Sequencer mode sampling and audio operations. 1 Choose “Auto Sampling/HD Audio Setup” to open the dialog box. Sequencer 4 Press the Set button to assign the selected WAVE file to the audio track. Only a 48 kHz stereo WAVE file can be assigned to the audio track. If you select a 44.
Punch In 2 Use “To Song” to select the bounce-recording destination song. 3 Use “WAVE” to specify a name for the WAVE file that will be created by the bounce-recording operation. The save-destination of the WAVE file created by bounce-recording is specified by the page menu command “Sel Dir/WAVE (Audio Track).” (☞p.16) 4 Press the OK button to execute the “Bounce All Tracks To Song” operation. If you decide not to execute, press the Cancel button.
Select Indiv.1/2 if you want to listen to the MIDI track playback while recording only the external audio signal connected to the AUDIO INPUT (or S/P DIF or EXB-mLAN). Set Input “BUS (IFX/Indiv.) Select” (0–7a ☞PG p.56) to 1, 2, or 1/2 so that the external audio signal will be sent to INDIVIDUAL 1, 2, or 1/2 buses. In this case, use INDIV.1, 2 OUT to monitor the audio signal that is being recorded. You will need to connect a mixer to AUDIO OUTPUT MAIN L, R and INDIV 1, 2 to monitor all of these outputs.
Sequencer P5: Track Edit 2 Choose “Put WAVE” to open the dialog box. Audio tracks can now be edited in the Sequencer P5: Track Edit page (☞PG p.68). Accordingly, an audio track display has been added, and page menu commands have been added or modified. A WAVE file cannot be edited to a length greater than 80 minutes. “Drive Select” 3 Use “Drive Select” to select the drive that contains the WAVE file. 4 Select the WAVE file that you want to place in the audio track.
You cannot “put” a WAVE file that is longer than 80 minutes. 5–1S: Normalize/Level (Normalize/Level Adjust) This command applies the same processing as the Sampling mode Sampling P1: Sample Edit page menu command “Normalize/Level Adjust” to a WAVE file. (☞PG p.104 “1– 1l: Normalize/Level Adj.”) The data values (volume) in the “From Measure”–“To Measure” region will be adjusted uniformly. Using “Normalize” will boost the level of the data as high as possible without allowing it to clip.
4 Use “Sensitivity” to set the sensitivity at which noise will be detected. Higher settings will cause even slight noises to be detected. Normally you should execute the command with a setting of 1, and increase the setting if the noise has not been removed. 5 If “Overwrite.WAV” is checked, the results of executing the command will overwrite the WAVE file that is assigned to the audio track.
9 If you press the Stretch button, the Time Stretch dialog box will appear, and you can re-do the time stretch once again. Execute Time Stretch as described in step 5 and 6. 0 Save the time stretched data. Press the Save button to display the Save dialog box. automatically. The automatically created program will be assigned to a MIDI track, and note data will be automatically created on that MIDI track. (See diagram below.
Changes to the page menu commands Support for audio tracks has been added to the following page menu commands, and the dialog boxes have changed accordingly. 5–1C: Erase Track In the page menu command “Erase Track” (☞PG p.70), the dialog box now contains “All MIDI Tracks,” “Overwrite.WAV,” and “Name” items, and there is now an execution procedure for when you have selected an audio track.
5 Press the OK button to execute the command. In the case of “Bounce Track,” the bounce-source track data will be set to “zero”. If you decide not to execute, press the Cancel button. 5–1F: Erase Measure 5–1G: Delete Measure 5–1H: Insert Measure 5–1I: Repeat Measure The items “All MIDI Tracks,” “Overwrite.WAV,” and “Name” have been added to the dialog box of “Erase Measure” (☞PG p.70), “Delete Measure,” “Insert Measure” (☞PG p.71), and “Repeat Measure” (☞PG p.
5–1J: Copy Measure 5–1K: Move Measure The items “All MIDI Tracks,” “Overwrite.WAV,” and “Name” have been added to the dialog box of “Copy Measure” and “Move Measure” (☞PG p.72), and you can now apply these commands to the audio tracks. If executing with “Track Select” set to a MIDI track (Track 01–16) Normally you will execute with “Overwrite.WAV” unchecked. The page menu command “Sel Dir/WAV (Audio Track)” specifies the save-destination for the newly created WAVE file.
5–1Q: Set Song Length Sequencer The items “Overwrite.WAV” and “Name” have been added to the page menu command “Set Song Length” (☞PG p.75). If the song contains an audio track and you execute this command to shorten the length of the song (the “Length” field), the audio track will also be shortened to the same length as the song. If you check “Overwrite.WAV,” the results of executing the command will overwrite the WAVE file assigned to the audio track.
Auto Sampling/HD Audio Setup The page menu command “Auto Sampling/HD Audio Setup” has been added to the Sequencer P0: Play/REC, Sampling/HD Audio page. (☞p.17) This convenient function automatically sets the relevant parameters to the ideal settings for various operations such as Sequencer mode sampling (e.g., In-Track Sampling), recording using the “HD Audio Track,” two-channel mixdown to create an audio CD, or bouncing tracks. (For the automatically-set parameters and their values, refer to p.
3. In-Track Sampling The In-Track Sampling function samples an external audio signal from AUDIO INPUT etc. into sample memory (RAM) in synchronization with song playback, and also automatically creates note data in a MIDI track. The sampled audio data can easily be played from the MIDI track or edited. (☞BG p.115) The “In-Track Sampling” radio button automatically makes the appropriate settings for this function. Use INDIV. 1/2 OUT to monitor the audio signal being recorded.
4. 2ch Mix to Disk 5. HD Audio Track REC As a preparatory step to creating an audio CD from your completed song, you must resample your song to create a two-channel stereo WAVE file on the internal hard drive. (☞BG p.116) The “2ch Mix to Disk” radio button automatically makes the necessary settings for creating this WAVE file. “HD Audio Track REC” automatically adjusts the settings so that you can play back MIDI tracks while you record only an external two-channel audio source on the audio tracks. (☞p.
■ Recording on the audio track(s) 2 Use the radio buttons to select Bounce Audio Track. 7 Set “Location” to the location that you want to record. 3 Use “From” to select the bounce-source track(s), and “To” to select the bounce-destination track(s). 9 Play the musical instrument etc. that is connected to the AUDIO INPUT jack(s) you selected for “Source Audio.” 0 When you have finished performing, press the SEQUENCER [START/STOP] key. (Recording will stop.
Automatically-set parameters and their values Parameter 1. Initialize 2. Resample SEQ Play 3. In-Track Sampling (Analog, S/P DIF, mLAN)*1 (Analog, S/P DIF, mLAN)*1 (Source Audio)*2 Level 127 127 127 Pan L000 Input (Input Source) Input1 Input2 Sampling Setup L000 L000 BUS Select Off Off 1/2 Send1 000 000 000 Send2 000 000 000 Level 127 127 127 Pan R127 R127 R127 BUS Select Off Off 1/2 Send1 000 000 000 Send2 000 000 000 Source BUS L/R L/R Indiv.
Input1 Level Pan Input2 Sampling Setup Recording Setup (Audio Track) 5. HD Audio Track REC 6. Bounce Audio Track (Source Audio)*2 (Analog, S/P DIF, mLAN)*1 127 127 127 L000 *7 L000 (To) L000 BUS Select Off 1/2 Off Send1 000 000 000 Send2 000 000 000 Level 127 127 127 Pan R127 R127 (To)*7 R127 BUS Select Off 1/2 Off Send1 000 000 000 Send2 000 000 000 Source BUS L/R - - Trigger Sequencer START SW - - Save to DISK - - Mode Select Bank & Smpl No.
Support for exclusive events 2 Move to Global mode, and in Global P1: MIDI, MIDI Filter, check the “Enable Exclusive” check box. Recording and playing exclusive events Version 2.0 allows exclusive messages to be recorded and played back, and allows you to edit tracks that contain exclusive events. Exclusive messages (including XG or GS data) received from an external MIDI device, and parameter changes produced by editing track parameters (☞p.35) can now be recorded in realtime on the desired track.
2. Recording exclusive messages received from the TRITON-Rack Here’s how you can connect the TRITON STUDIO and a TRITON-Rack via MIDI, and use the TRITON STUDIO to record exclusive messages received from the TRITON-Rack. 7 On the TRITON STUDIO, select the Sequencer P5: Track Edit page menu command “Event Edit.” In the Set Event Filters dialog box, check Exclusive and press the OK button. 1 Connect the TRITON-Rack’s MIDI connectors (IN/OUT) to the TRITON STUDIO’s MIDI connectors (OUT/IN).
The maximum amount of exclusive message that can be recorded at once is approximately 320 Kbytes. This size will decrease if other events exist within the same measure. You cannot simultaneously record exclusive messages received from an external MIDI device and parameter changes produced by editing.
The page menu command “Put Effect Setting to Track” places effect settings into a track as exclusive events. As an example, we will use the preset template song “Acid Jazz” to explain how to use the “Put Effect Setting to Track” page menu command. In this example we will switch the insert effect for Track 03: Elec.Piano from 023: Stereo Phaser to 020: Stereo Flanger at the beginning of measure 9. We will explain two ways in which you can do this: method 1) and method 2).
2) Using the effect specified by the song itself from the beginning of the song, and inserting the effect settings from another song at the middle of the song 7 Choose “Put Effect Setting to Track” to open the dialog box. For the insert effect (IFX3) used by track 3, we will use 023: Stereo Phaser (specified by the template song) from the beginning of the song, and insert MIDI parameter change system exclusive messages at measure 9 to switch to the 020: Stereo Flanger settings from another song.
Sequencer P6: Pattern/RPPR The Sequencer P5: Track Edit page menu commands “Event Edit” (☞PG p.69) and “Erase Measure” (☞PG p.70) now allow you to view and edit exclusive events. If you want to edit only exclusive events in “Event Edit,” open the “Set Event Filters” dialog box and check the Exclusive box. To erase exclusive events, in the “Erase Measure” dialog box, set “Kind” to Exclusive. The Sequencer P6: Pattern Edit page menu command “Event Edit” (☞PG p.
Sequencer P8: Insert Effect Sequencer P9: Master Effect The “Put Effect Setting to Track” page menu command has been added to Sequencer P8: Insert Effect. Added page menu command Added page menu command The page menu command “Put Effect Setting to Track” has been added to the Sequencer P9: Master Effect page. This command places master effect settings in a track as exclusive events.
Tone Adjust pages have been added to Sequencer P5: Track Edit (☞PG p.68). 5–3: Tone1.2 1–8 (Tone1/2 T01–08) 5–4: Tone1.2 9–16 (Tone1/2 T09–16) 5–5: Tone3.4 1–8 (Tone3/4 T01–08) 5–6: Tone3.4 9–16 (Tone3/4 T09–16) 5–7: Tone5.6 1–8 (Tone5/6 T01–08) 5–8: Tone5.6 9–16 (Tone5/6 T09–16) In the Tone Adjust pages you can make adjustments to the sound of the program assigned to each track. While creating a song, you can make adjustments to the sounds without having to return to Program mode.
Filtr EG A (Filter EG Attack) Filtr EG D (Filter EG Decay) Filtr EG S (Filter EG Sustain) Filtr EG R (Filter EG Release) [–99...+00...+99] [–99...+00...+99] [–99...+00...+99] [–99...+00...+99] These respectively adjust only the filter EG parameters of “F/A EG A,” “F/A EG D,” “F/A EG S,” and “F/A EG R”. Amp EG A (Amp EG Attack) Amp EG D (Amp EG Decay) Amp EG S (Amp EG Sustain) Amp EG R (Amp EG Release) [–99...+00...+99] [–99...+00...+99] [–99...+00...+99] [–99...+00...
“Copy From Program” has been added to the page menu commands of the Sequencer P0: Play/REC page and related pages. 0–1L 0–1L: Copy From Program Copies the settings from a specific program to a track or effect in the currently selected song. 1 Select “Copy From Program” to open the dialog box. • “Status” (2–1(2)a ☞PG p.62) will automatically be set to INT. • If the copy-source is an INT-F bank program, the “Voice Allocation Reserve” (☞EM p.
Auto Song Setup function This function automatically sets up a song by applying the settings from a program or combination. This provides a seamless way for you to transition from playing a program or combination into creating a song, so that if you suddenly have ideas for a phrase or song while you are playing, you can immediately turn your inspiration into a song. The explanation of the Auto Song Setup function given here follows the procedure from Combination mode.
Disk mode Edit Range Start Edit Range End The sample rates of the WAVE files you can edit are the same as the frequencies supported for KSF files. (☞PG p.285) 0–6 0–6a 0–6b 0–6a: WAVE file waveform display, Edit Range Start, Edit Range End, User Zero, Grid, ZOOM WAVE file waveform display This area shows the waveform of the selected WAVE file. The horizontal axis is the address (time axis) and the vertical axis is the level. Disk Only 44.
address will move by one pixel.) In the vertical axis, you can zoom-in through a range of 1x (full range display) to 512x (in the case of stereo, 1024x). Zoom-in/out will start at the most recent address selected for “Edit Range Start,” “Edit Range End,” “LoopS,” or “End” point. If after zooming-in/out you reselect the “Edit Range Start,” “Edit Range End,” “LoopS,” or “End” point, the displayed area will change so that the selected point is visible.
Data with zero-level values (i.e., silence) will be inserted starting at the “Edit Range Start” address. The data that had been at that location will be shifted toward the end of the waveform. This is the same function as the Sampling mode, Sampling P1: Sample Edit page menu command “Insert Zero”; here performed on a WAVE file. (For details on the function and procedure, ☞PG p.103 “1–1H: Insert Zero”). The “Overwrite.
time signature, “Tempo” specifies the destination tempo, and “Program” specifies the program number that will be automatically created. 0–6O: Mono to Stereo This is the same function as the Sampling mode, Sampling P0: Recording page menu command “Sample Mono To Stereo”; here performed on a WAVE file. (For details on the function and procedure, ☞PG p.94) The “Overwrite.WAV” and “Name” fields in the dialog box are as explained in “0–6A: Save WAVE Parameter” steps 2 and 3.
Volume AKAI format program file AKAI format sample file Up Open 29) Load AKAI Volume: This command loads the Program files and Sample files from a volume of an AKAI S1000/3000 format sample CD. 1 In the 0–1: Load page, use “Drive Select” to select the AKAI S1000/S3000 format media. 2 In the directory window, select the desired AKAI S1000/ 3000 format volume. Load PCG (RAM) and Samples “Load PCG (RAM) and Samples” has been added to the page menu commands of the 0–1: Load page.
.KSC files with a name identical to the .PCG file will always be loaded together with the .PCG file. If this file is not found in the current directory or below it, load the file as described in “If a file to be loaded cannot be found, or when loading a file that was saved across media” (☞PG p.157). Content that will be loaded from the .PCG fi le 1. Drum Kit: Drum kits in which RAM is selected for the “High/Low Drumsample Bank” (Global 5–1b/1c ☞PG p.148) of at least one key. 2.
Save Song as Standard MIDI File 2 Use “Drive Select” to select the media to be optimized. 3 Select “Optimize Medium” to open the dialog box. In the 0–2: Save page menu command “Save to Std MIDI File (Save Song as Standard MIDI File),” an “Exclusive” check box has been added to the dialog box. This allows you to save system exclusive events and universal exclusive events included in the song data. 4 Press the OK button to execute the “Optimize Medium” command.
Collect Audio Track file “Collect Audio Track file” has been added to the 0–3: Utility page menu commands. If you execute with Move selected, the WAVE file will be deleted from its original directory. If the deleted WAVE file had been used by another song, you will no longer be able to play back the audio track for that song. 6 Press the OK button to execute “Collect Audio Track file.” If you decide to cancel, press the Cancel button.
4 Select the page menu command “Collect Audio Track file” to open the dialog box. If you want to use the data you copied (backed up) on a different TRITON STUDIO V2, insert that media into the other TRITON STUDIO V2, and in the Utility page select the “NSBKUP” directory and execute the “Copy” page menu command to copy it to the internal hard drive or other storage. We recommend that you keep the .SNG file and WAVE file in the same directory.
Rate Convert A function that converts a 44.1 kHz WAVE file to a 48 kHz WAVE file has been added to the 0–3: Utility page menu command “Rate Convert” (0–3H ☞PG p.171). Select a 44.1 kHz WAVE file in the directory window, and access the “Rate Convert” page menu command dialog box. The rest of the procedure is the same as on previous versions. (☞PG p.171) Loading KARMA Music Workstation or TRITON Le .PCG/ .SNG files Version 2.0 is able to load and simultaneously convert .PCG/.
2. Drum kits Parameters that are valid in version 2.0 but invalid in version 1.0 Drum kits 00–15 (INT) will be loaded into 00–15 (A/B), and drum kits 16–23 (User) will be loaded into 16–23 (E-A). 1. Sequencer mode parameters added in version 2.0 3. Arpeggio patterns • “Tone Adjust,” “Audio Track,” “WAVE File” Arpeggio patterns U000–119 (INT) will be loaded into U000–199 (A/B), and arpeggio patterns U200–215 (User) will be loaded into U200–215 (E-A). 4.
Global mode Use only a recommended SCSI↔USB conversion adaptor. For a list of recommended models, refer to the Korg website or contact your Korg distributor. SCSI Mode/SCSI ID “SCSI Mode” and “SCSI ID” parameters have been added to the Global P0: Basic Setup, System Preference page (☞PG p.137). These parameters allow the TRITON STUDIO’s internal hard drive to be detected by a connected computer as an external SCSI disk.
3 In the Global P0: Basic Setup, System Preference page, set “SCSI Mode” to Target. A dialog box will inform you that you must restart the system in order for the change to take effect. 4 Turn off the power of the TRITON STUDIO. As necessary, check the ID number of the connected external SCSI devices. For details on how to set the SCSI ID number of the connected external SCSI devices, refer to their owner’s manuals. 5 Turn on the power of the external SCSI devices.
Sampling mode Auto Sampling Setup An “Auto Sampling Setup” page menu command has been added to the Sampling P0: Recording page and P4: Selector Setup page. 2. REC Audio Input This automatically makes the appropriate settings for sampling an external audio source. ■ Setup 1 Select “Auto Sampling Setup” to open the dialog box. 0–1O 0–1O: Auto Sampling Setup This command automatically sets sampling-related parameters to the optimal settings for specific Sampling mode operations.
If “Save to” is set to DISK, you can use the page menu command “Select Directory” (0–1N ☞PG p.96) to specify the save-destination for the WAVE file that will be created by sampling. ■ Sampling 8 Press the SAMPLING [REC] key and then the SAMPLING [START/STOP] key. 9 Play the instrument etc. that is connected to the AUDIO INPUT jack you specified in “Source Audio.” 0 When you are finished playing, press the SAMPLING [START/STOP] key.
Automatically-set parameters and their values Parameter 1. Initialize 2. REC Audio Input 3.
You can now use the “Insert,” “Mix,” and “Paste” page menu commands of the Sampling P1: Sample Edit page (☞PG p.102–103) to insert/mix/paste data from a WAVE file stored on the hard drive into a sample in sample memory (RAM). A “From” field has been added to the dialog box of each page menu command. Dialog box of the “Insert” page menu command 5 Select the page menu command “Copy” to open the dialog box. 6 The Range: “Start” and “End” fields will show the region of data that will be copied.
If the insert-source is a stereo WAVE file, use “Save to No. (L)” and “(R)” to specify the save-destinations of the L and R channels. C Press the OK button to execute the Insert command. If you decide to cancel, press the Cancel button. If the data copied into the buffer by “Copy” is empty, a message of “Source sample is empty” will be displayed. For the “Mix” and “Paste” operations, you can use “From” to specify the source data in the same way.
Combination mode Auto Sampling Setup ■ Setup 1 Select “Auto Sampling Setup” to open the dialog box. An “Auto Sampling Setup” page menu command has been added to the Combination P0: Sampling page. 0–5E The settings are automatically made for the most typical applications. After executing the auto setup operation, you can further adjust any of the settings to suit your needs as described in the paragraphs of each section. 1. Initialize This sets sampling-related parameters to their default state.
■ Check the resampled data • If you selected “Save to: RAM” (Convert to Program), move to Program mode, select the newly created program, and play the C2 on the keyboard to hear the resampled result. • If you selected “Save to: DISK,” use the page menu command “Select Directory” to hear the results. (☞PG p.7) If you want to simultaneously sample an external audio source from AUDIO INPUT etc. while you play the combination, go to the Combination P0: Play, Sampling page, and set Input 1, 2 “BUS (IFX/Indiv.
1. Initialize 2. Resample Combination Play 3. REC Audio Input (Analog, S/P DIF, mLAN)*1 (Source Audio)*2 Input1 (Source Audio)*2 Level 127 127 127 Pan L000 Input2 Sampling Setup L000 L000 BUS Select Off Off 1/2 Send1 000 000 000 Send2 000 000 000 Level 127 127 127 Pan R127 R127 R127 BUS Select Off Off 1/2 Send1 000 000 000 Send2 000 000 000 Source BUS L/R L/R Indiv.
Copy From Program “Copy From Program” has been added to the page menu commands of pages such as Combination P0 (0–1 ☞PG p.33). 0–1C 0–1C: Copy From Program This command copies the settings of the specified program to a timbre of the currently selected combination. The effect settings and arpeggiator settings of the specified program can be copied as well, replacing the Combi’s effect and arpeggiator settings. 1 Select “Copy From Program” to open the dialog box.
Program mode Auto Sampling Setup An “Auto Sampling Setup” page menu command has been added to the Program P0: Sampling page. 2. Resample Program Play This automatically makes the appropriate settings so you can play a program and resample your performance. ■ Setup 1 Select “Auto Sampling Setup” to open the dialog box. 0–3E 0–3E: Auto Sampling Setup 1. Initialize This sets sampling-related parameters to their default state. 1 Select “Auto Sampling Setup” to open the dialog box.
■ Check the resampled data • If you selected “Save to: RAM” (Convert to Program), select the newly created program, and play the C2 note of the keyboard to hear the resampled result. • If you selected “Save to: DISK,” use the page menu command “Select Directory” to hear the results. (☞PG p.7) If you also want to simultaneously sample an external audio source from AUDIO INPUT etc. while you play the program, go to the Program P0: Play, Sampling page, and set Input 1, 2 “BUS (IFX/Indiv.) Select” to L/ R.
1. Initialize 2. Resample Program Play 3. REC Audio Input (Analog, S/P DIF, mLAN)*1 (Source Audio)*2 Input1 (Source Audio)*2 Level 127 127 127 Pan L000 Input2 Sampling Setup L000 L000 BUS Select Off Off 1/2 Send1 000 000 000 Send2 000 000 000 Level 127 127 127 Pan R127 R127 R127 BUS Select Off Off 1/2 Send1 000 000 000 Send2 000 000 000 Source BUS L/R L/R Indiv.
Other functionality Tap tempo control A tap tempo control function has been added to Program, Combination, Sequencer, and Song Play modes. While SMF data is playing in these modes, you can control the playback tempo in realtime just by lightly pressing the [ENTER] key several times at the beat of the desired tempo. This function is a convenient way to set the tempo of the arpeggiator, sequencer, or SMF playback to the desired beat in realtime.
Source file is not 44100 Hz or 48000 Hz Exceeded 8 Programs Meaning: During execution of Advanced Conversion Load, the maximum number of eight programs was exceeded. Depending on the structure of the AKAI Program, it may be convert-loaded as multiple programs and one combination. In this case, the number of TRITON programs resulting from the conversion is limited to the maximum number of programs that can used in a combination (i.e., eight programs).
E KORG INC. 2003 KORG INC. 1 15 - 12, Shimotakaido 1 - chome, Suginami-ku, Tokyo, Japan.