
User manual
20
Tip: Before switching on the appliance, prepare all ingredients
in advance in bite size portions and arrange them in bowls or
on a platter, in order for everyone to serve themselves.
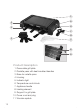
1. Place the raclette grill in the middle of the table.
2. Make sure that the grill plate (1) is properly fitted onto the
support.
3. Apply some oil on the grill plate (1) and the raclette pans (2).
4. Connect it to a properly installed and easily accessible
socket.
5. Switch the appliance on by turning the temperature control
knob (6) to the highest level (MAX). Heat the appliance up
for approx. 10 Minutes. The indicator light (5) lights up. After
this heating up process, adjust the temperature by turning
the temperature control knob (6) to your desired level. The
integrated thermostat will keep the preset temperature at a
constant level. As soon as the respective temperature is
reached the indicator light (5) goes out.
Attention: The temperature control (6) is continuously variable.
6. Fill the raclette pans (2) according to your taste only with
cheese or other foods/trimmings and place them in the
appliance. Remove the pans (2) as soon as the cheese has
melted or the other food is done according to your liking.
7. The grill plate (1) can be used for broiling meat, sausages,
skewers, vegetables, etc.
Attention: Only use the provided wooden spatula (11) or a heat
resistant plastic spatula . Never use any sharp or metal objects
(e.g. knife, metal spatula, etc.) as they would damage the non-
stick coating of the grill plate (1) and the raclette pans (2).
8. After use, always disconnect the appliance from the mains
and let it completely cool down before cleaning.
Attention: The raclette grill cannot be switched off with the
temperature control knob (6). Therefore, switch the temperature
control knob (6) to MIN position and disconnect the appliance
from the mains. Let it completely cool down.