Owner's manual
Manuals
Brands
Kramer Electronics Manuals
Accessories for electrical
Galil 6-CO
1
2
3
4
5
6
7
8
9
10
Table Of Contents
1 Introduction
2 Getting Started
2.1 Achieving the Best Performance
3 Overview
4 Your SPK-C613
5 Installing the Open-back Ceiling Speakers
5.1 Choosing the Best Location
5.2 Cutting the Ceiling Tile
5.3 Mounting the Open Back Ceiling Speakers
5.3.1 Using the Suspended Ceiling Speaker Mounting Kit (Optional)
5.4 Array Installation
5.5 Painting the Speaker
6 Technical Specifications
2.pdf
1 Introduction
2 Getting Started
2.1 Achieving the Best Performance
3 Overview
4 Your SPK-C613
5 Installing the Open-back Ceiling Speakers
5.1 Choosing the Best Location
5.2 Cutting the Ceiling Tile
5.3 Mounting the Open Back Ceiling Speakers
5.3.1 Using the Suspended Ceiling Speaker Mounting Kit (Optional)
5.4 Array Installation
5.5 Painting the Speaker
6 Technical Specifications
1.pdf
1 Introduction
2 Getting Started
2.1 Achieving the Best Performance
3 Overview
4 Your SPK-C613
5 Installing the Open-back Ceiling Speakers
5.1 Choosing the Best Location
5.2 Cutting the Ceiling Tile
5.3 Mounting the Open Back Ceiling Speakers
5.3.1 Using the Suspended Ceiling Speaker Mounting Kit (Optional)
5.4 Array Installation
5.5 Painting the Speaker
6 Technical Specifications
4
SPK
-
C613
-
Your SPK
-
C613
4
Your
SPK-
C613
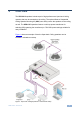
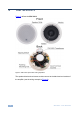
Figure
2
defi
nes the
SPK
-
C613
:
Fig
ure
2
:
SPK
-
C6
13
Open
-
back C
eili
ng Speak
ers
The speaker black and red stereo sockets connect to the black and red sockets of
the amplifier
(see the wiring ex
ample i
n
Figure
9
).
1
...
...
6
7
8
9
10
...
...
20