
User's Manual

KRAMER: SIMPLE CREATIVE TECHNOLOGY
Write the Configuration
58
7 Write the Configuration
Once the configuration is ready, you can write it to the device, via the “Write Configuration”
button.
Note that:
• In Master-Auxiliaries configurations, the configuration file is always written to the Master
• When using a standalone room controller, the configuration file is written to the room
controller
In case you have written a configuration file to a device and it is now connected as an auxiliary
device to another master, you have to define the device as an auxiliary device and upload an
updated configuration file to the Master.
To write a configuration to the device, do the following:
1. Connect the PC to the Master or the standalone room controller.
2. From the Device menu, select Connect to verify proper USB or LAN connection.
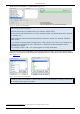
3. If required, from the File menu, select Open Project
1
…
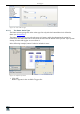
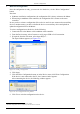
The Open window appears (see Figure 125):
Figure 125: Loading a Configuration
4. Click Open.
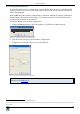
5. Click the Write Configuration button
2
or in the Device menu, click Write Configuration.
If the device is not connected to the PC, the Connect window appears.
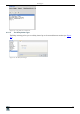
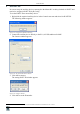
After connecting the device, the following window appears:
Figure 126: New Configuration Warning Window
6. Click Yes to write the configuration to the device.
1
Skip this step if you have the desired configuration loaded
2
The Write Configuration button is enabled only when the device is connected