Kramer Electronics, Ltd.
Contents Contents 1 2 2.1 3 3.1 4 5 5.1 5.2 5.
Introduction 1 Introduction Welcome to Kramer Electronics! Since 1981, Kramer Electronics has been providing a world of unique, creative, and affordable solutions to the vast range of problems that confront the video, audio, presentation, and broadcasting professional on a daily basis. In recent years, we have redesigned and upgraded most of our line, making the best even better! Our 1,000-plus different models now appear in 11 groups 1 that are clearly defined by function.
Getting Started 2.1 Quick Start This quick start chart summarizes the basic setup and operation steps.
Overview 3 Overview The RTBUS-110 is an elegant furniture-mounted, round connection bus, for International and European use. The RTBUS-110 is easily installed into a table or podium top and enables you to connect any equipment to systems installed in a room via cable access or passive interfaces. In addition, the RTBUS-110 includes the following pass-through connectors: • 1 VGA on a 15-pin HD connector • 1 stereo audio on a 3.
Overview 3.1 About HDMI High-Definition Multimedia Interface (HDMI) is an uncompressed all-digital 1 audio/video interface, widely supported in the entertainment and home cinema industry. It delivers the highest high-definition image and sound quality. Note that Kramer Electronics Limited is an HDMI Adopter and an HDCP Licensee.
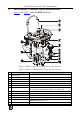
Your RTBUS-110 Round Table Connection Bus 4 Your RTBUS-110 Round Table Connection Bus Figure 1 and Table 1 define the RTBUS-110 unit: Figure 1: RTBUS-110 Round Table Connection Bus Top View Table 1: RTBUS-110 Round Table Connection Bus Features # 1 Feature Black Anodized or Brushed Aluminum Lid Function Covers the connecting surface, leaving the table surface neat and tidy 2 Outer Rim Fits over the table surface 3 Connecting Surface See Figure 2 and Table 2 4 3.
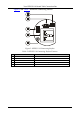
Your RTBUS-110 Round Table Connection Bus Figure 2 and Table 2 define the connecting surface: Figure 2: RTBUS-110 Connecting Surface Table 2: RTBUS-110 Connecting Surface Features # 6 1 2 Feature RJ-45 Connector 15-pin HD Connector Function Connects to a network Connects to a VGA source 3 HDMI Connector Connects to an HDMI source 4 Power Socket Connects to 220V AC power 5 3.
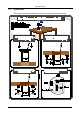
Installing the RTBUS-110 Round Table Connection Bus 5 Installing the RTBUS-110 Round Table Connection Bus To install the RTBUS-110 perform the following steps: 1. Drill a hole in the table (see section 5.1). 2. Insert the unit through the hole and secure the unit to the table (see section 5.2). 3. Connect the cables (see section 5.3). 5.1 Drilling a Hole in the Table To drill an opening in the table: 1. Using any standard cup type drill bit with a diameter ranging from 110mm to 112mm (4.33in to 4.
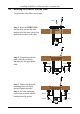
Installing the RTBUS-110 Round Table Connection Bus 5.2 Mounting the RTBUS-110 in the Table To mount the unit, follow these steps: Step 1 Step 1: Insert the RTBUS-110 into the hole cut into the table making sure the outer rim is firm against the surface of the table. Step 2: From underneath the table, slide the mounting brackets into the appropriate slots. Step 2 Step 2 Step 3: Tighten the butterfly mounting screws securely upward against the table.
Installing the RTBUS-110 Round Table Connection Bus 5.3 Connecting the Cables Figure 3 describes how to connect the cables to the underside of the unit: STEP 1 Connect the stereo audio cable to the 3.5mm mini jack. STEP 2 Connect the HDMI cable. STEP 3 Connect the VGA cable to the 15-pin HD connector. STEP 4 Connect the network cable to the RJ-45 connector. STEP 5 Connect the power cable.
Using the RTBUS-110 Round Table Connection Bus 6 Using the RTBUS-110 Round Table Connection Bus Once the RTBUS-110 is installed, you can easily customize it to your own needs by plugging in the required AV equipment, as illustrated in the example in Figure 4.
Technical Specifications 7 Technical Specifications Table 3 includes the technical specifications: 1 Table 3: Technical Specifications of the RTBUS-110 Round Table Connection Bus POWER SOURCE (AC power limits): 220V AC, 50/60Hz, 5A FUSE RATING: T 6.3A 250V DIMENSIONS: 12.2cm x 13.5cm (4.8" x 5.31") Diameter, H DIMENSIONS WITH CLAMPS: 17.5cm x 12.2cmX 14cm (6.89 X4.8" x 5.51") W,D, H WEIGHT: 0.8kg (1.8lbs) approx. 1kg (2.3lbs) approx.
LIMITED WARRANTY Kramer Electronics (hereafter Kramer) warrants this product free from defects in material and workmanship under the following terms. HOW LONG IS THE WARRANTY Labor and parts are warranted for seven years from the date of the first customer purchase. WHO IS PROTECTED? Only the first purchase customer may enforce this warranty. WHAT IS COVERED AND WHAT IS NOT COVERED Except as below, this warranty covers all defects in material or workmanship in this product.
For the latest information on our products and a list of Kramer distributors, visit our Web site: www.kramerelectronics.com where updates to this user manual may be found. We welcome your questions, comments and feedback. Safety Warning: Disconnect the unit from the power supply before opening/servicing. Caution Kramer Electronics, Ltd. Web site: www.kramerelectronics.com E-mail: info@kramerel.