
User's Manual


7
KRAMER ELECTRONICS LTD.
7
INSTALLATION
7.1 Rack Mounting
The PIP-200 can be rackmounted in a standard 19" (1U) EIA rack. The machine does not require any specific
spacing for ventilation above or below the unit. To mount the machine, simply place the unit's ears against the
rack rails of your rack and insert standard screws through each of the four corner holes.
8
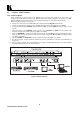
CONNECTING TO VIDEO DEVICES
Video sources and output devices (such as monitors, projectors or recorders) may be connected to the PIP-200
through the BNC or 4P type connectors located on the back of the unit. Please keep in mind that the output
signal format of the parent picture matches that of the input signal format.
9
USING THE PIP-200
9.1 Turning on the Machine
NOTES
1. The machine should only be powered on after all connections
are completed and all source devices have been powered on.
Do not attempt to connect or disconnect any video or control
signals to the machine while it is powered on!
2. The socket-outlet should be near the equipment and should be
easily accessible. To fully disconnect equipment, remove
power cord from socket.
1. Press the toggle switch on the far-left front panel to the up position. The toggle switch will illuminate.
2. Operate the sources and acceptors.
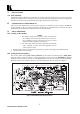
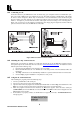
9.2 Setting the Internal Jumpers
The encoder's initial settings (PAL, NTSC, NTSC4.43) can be selected via internal jumpers (JMP1-JMP3)
inside the machine. Only one jumper is inserted to determine which of the three ENCODER pushbuttons
illuminates when the machine is turned on. If the NTSC jumper is inserted, for example, the NTSC pushbutton
illuminates whenever the machine is turned on. The internal jumper locations are presented in Figure 3.
Figure 3: PIP-200 Internal Jumper locations