Kramer Electronics, Ltd.
Contents Contents 1 2 3 4 4.1 4.2 4.3 4.4 4.5 4.6 4.7 4.8 4.9 5 5.1 5.
Introduction 1 Introduction Welcome to Kramer Electronics (since 1981): a world of unique, creative and affordable solutions to the infinite range of problems that confront the video, audio and presentation professional on a daily basis. In recent years, we have redesigned and upgraded most of our line, making the best even better! Our 500-plus different models now appear in 8 Groups1, which are clearly defined by function.
Overview 3 Overview We recommend that you: Have a Philips screwdriver and an Allen screwdriver available Disconnect the mains voltage and all cables connected to each machine that is being mounted in the rack adapter before proceeding with the installation Connect only good quality connection cables, thus avoiding interference, deterioration in signal quality due to poor matching, and elevated noise levels (often associated with low quality cables) Avoid interference from neighboring electrical appliances
Your Kramer Pico TOOLS / TOOLS Rack Adapters 4 Your Kramer Pico TOOLS / TOOLS Rack Adapters This section describes the following rack adapters: RK-1T2PT, see section 4.1 RK-2T1PT, see section 4.2 RK-3T, see section 4.3 RK-6T, see section 4.4 RK-9T, see section 4.5 RK-3TR, see section 4.6 RK-4PT, see section 4.7 RK-T2B, see section 4.8 RK-T2SB, see section 4.
Your Kramer Pico TOOLS / TOOLS Rack Adapters 4.
Your Kramer Pico TOOLS / TOOLS Rack Adapters 4.
Your Kramer Pico TOOLS / TOOLS Rack Adapters 4.
Your Kramer Pico TOOLS / TOOLS Rack Adapters 4.
Your Kramer Pico TOOLS / TOOLS Rack Adapters 4.
Your Kramer Pico TOOLS / TOOLS Rack Adapters 4.
Your Kramer Pico TOOLS / TOOLS Rack Adapters 4.
Your Kramer Pico TOOLS / TOOLS Rack Adapters 4.
Your Kramer Pico TOOLS / TOOLS Rack Adapters 4.
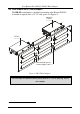
Installing Your Rack Adapter 5 Installing Your Rack Adapter This section describes how to install Kramer TOOLS and Pico TOOLS. 5.1 Installing a Kramer TOOL or a Kramer Pico TOOL When connecting a Kramer TOOL or a Pico TOOL: 1. Remove the side panel screws (one on each side) from the TOOL. 2. Insert the screws provided with the rack adapter kit (one on each side) through the correct holes on the brackets (see Figure 10). 3. If required, remove the blank panels from the rack adapter openings. 4.
Installing Your Rack Adapter Hole for Extrusion TOOLS Hole for TOOLS Hole for Pico TOOLS Figure 10: The Connecting Bracket 5.2 Installing a Kramer Extrusion Type TOOL When installing an extrusion type Kramer TOOL, check if the front panel is protruding. If not, follow the instructions in section 5.1 to connect it to the rack adapter. If the front panel is protruding, do the following: 1. Insert the TOOL through the appropriate front opening of the rack adapter. 1 2 2.
LIMITED WARRANTY Kramer Electronics (hereafter Kramer) warrants this product free from defects in material and workmanship under the following terms. HOW LONG IS THE WARRANTY Labor and parts are warranted for seven years from the date of the first customer purchase. WHO IS PROTECTED? Only the first purchase customer may enforce this warranty. WHAT IS COVERED AND WHAT IS NOT COVERED Except as below, this warranty covers all defects in material or workmanship in this product.
For the latest information on our products and a list of Kramer distributors, visit our Web site: www.kramerelectronics.com, where updates to this user manual may be found. We welcome your questions, comments and feedback. Safety Warning: Disconnect the unit from the power supply before opening/servicing. Caution PN: 2900- 000243 Rev: 3 Kramer Electronics, Ltd. Web site: www.kramerelectronics.com E-mail: info@kramerel.