
Instruction Manual


10
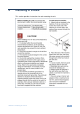
VM-10xl - Connecting the VM-10xl
2. Connect the video LOOP BNC connector of the:
First VM-10xl unit to the VIDEO IN BNC connector of the second
VM-10xl unit
Second VM-10xl unit to the VIDEO IN BNC connector of the third
VM-10xl unit
3. Connect the left and right AUDIO LOOP RCA connectors of the:
First VM-10xl unit to the left and right AUDIO IN RCA connectors of the
second VM-10xl unit
Second VM-10xl unit to the left and right AUDIO IN RCA connectors of
the third VM-10xl unit
4. Connect the 10 VIDEO OUT BNC connectors and the 10 left and right AUDIO
OUTPUT RCA connectors of the:
First VM-10xl unit to the video audio acceptors 1 to 10 (for example,
VCR units)
Second VM-10xl unit to the video audio acceptors 11 to 20
Third VM-10xl unit to the video audio acceptors 21 to 30
5. On the first and second VM-10xl units, release the Term button. On the third
VM-10xl unit, push in the Term button to terminate the line to 75.
6. On each VM-10xl unit:
Connect the power cord to the mains electricity
Release the BAL/ST buttons to select unbalanced stereo audio
operation
Adjust the video trimmer controls for output signal level and/or cable
compensation equalization level, if required
If audio control adjustment is required for left and/or right gain, push in
the Enable/Disable buttons, and then adjust the trimmer controls
The video outputs are arranged in two blocks of 5 outputs (outputs 1 to 5, and
outputs 6 to 10). Each block can be separately trimmed for output level and cable
equalization (EQ.) thus achieving different compensations for different cable
lengths