
Owner's manual


KRAMER: SIMPLE CREATIVE TECHNOLOGY
Operating the VP-16x18AK Locally via the Front Panel Buttons
20
7 Operating the VP-16x18AK Locally via the Front Panel
Buttons
7.1 The Status Display
For a few seconds after being powered on, the unit’s model, machine
number and firmware version are displayed on the Status display.
KRAMER VP-1618AK
MACH.NUM.01 FW.VERS.5645
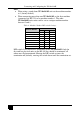
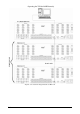
After a few seconds, the display shows which audio
1
or video
2
01
input is
switched to which output, for example, output 1 is switched to input 1,
output 4 is switched to input 11 and output 15 is switched to input 3, as
shown below.
02 03 11 05 06 07 08 09
10 11 12 13 14 03 16 17 18
7.2 Switching Inputs to Outputs
To switch a video/audio input to an output:
1. Press the VIDEO button to select video channels or AUDIO to select
audio channels.
The VIDEO/AUDIO button lights red.
2. Press the required OUTPUT button.
The selected output on the Status display flashes.
3. Press the required INPUT button.
After a few seconds the output on the Status display stops flashing and
the switch is implemented.
To connect a video/audio input to all outputs:
• Press the ALL button followed by the INPUT button corresponding
to the input that is to be routed to all the outputs
To disconnect a video/audio input from a specific output:
• Press the required OUTPUT button followed by the OFF button.
To disconnect all outputs:
• Press the ALL button, followed by the OFF button
1 When the Audio button is lit the audio switching is selected
2 When the Video button is lit the video switching is selected