Kramer Electronics, Ltd.
Contents Contents 1 2 2.1 3 3.1 3.2 4 4.1 4.2 4.
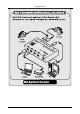
Introduction 1 Introduction Welcome to Kramer Electronics (since 1981): a world of unique, creative and affordable solutions to the infinite range of problems that confront the video, audio and presentation professional on a daily basis. In recent years, we have redesigned and upgraded most of our line, making the best even better! Our 500-plus different models now appear in 8 Groups1, which are clearly defined by function.
Getting Started 2 KRAMER: SIMPLE CREATIVE TECHNOLOGY
Overview 3 Overview Each Kramer TOOLS FireWire Repeater / HUB—the VS-4FW, the VS-6FW, and the VS-8FW—are based on FireWire which: Is a serial bus standard1 that enables quick universal interfacing between video and computer hardware items2 Is simple to use and operates independently of the host system, letting you connect more items than you otherwise could (as a computer only has limited ports available), and for extended distances.
Overview In some ways, you could consider the hub as similar to an audio/video distributor. However, contrary to audio/video one-way signals, a FireWire hub is like a network, with bi-directional signals. The standard defines FireWire as Peer-to-Peer connection; that is why two devices, or a device and a computer can talk to each other. It is important to note that everything depends on your computer’s software, and the firmware of the devices.
Your FireWire Repeater / HUB Include built-in protection from electrostatic discharge (ESD)1, by suppressing all transient high voltages down to the allowed level.
Your FireWire Repeater / HUB 4.
Your FireWire Repeater / HUB 4.
Your FireWire Repeater / HUB 4.
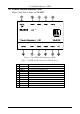
Using the FireWire Repeater / HUB 5 Using the FireWire Repeater / HUB To use the VS-8FW1 FireWire Repeater / HUB, as the example in Figure 4 illustrates, do the following2: 1. Connect FireWire devices to some of the eight 6 pin ports, for example: PORT 1 to a laptop, PORT 2 to a hard drive, PORT 5 to a video camcorder, PORT 6 to a video camcorder, and PORT 8 to a PC. 2. Connect the 12V DC power adapter to the power socket and connect the adapter to the mains electricity (not shown in Figure 4).
Technical Specifications 6 Technical Specifications Table 4 includes the technical specifications: Table 4: Technical Specifications1 of the VS-4FW, VS-6FW and VS-8FW PORTS: TRANSFER RATE: STANDARDS: POWER SOURCE: DIMENSIONS: WEIGHT: ACCESSORIES: VS-4FW: Four 6-pin serial 1394 Ports VS-6FW: Six 6-pin serial 1394 Ports VS-8FW: Eight 6-pin serial 1394 Ports 100/200/400 Mbps Fully supports the provisions of the IEEE 1394-1995 Standard for High Performance Serial Bus and the P1394a Supplement; Fully inte
11
For the latest information on our products and a list of Kramer distributors, visit our Web site: www.kramerelectronics.com, where updates to this user manual may be found. We welcome your questions, comments and feedback. Safety Warning: Disconnect the unit from the power supply before opening/servicing. Caution Kramer Electronics, Ltd. Web site: www.kramerelectronics.com E-mail: info@kramerel.