
User's Manual


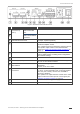
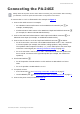


Table Of Contents
- Introduction
- Defining the PA-240Z 240W Power Amplifier
- Connecting the PA-240Z
- Operating the PA-240Z
- Using the Embedded Web Pages
- Technical Specifications
- Protocol 3000

Kramer Electronics Ltd.
PA-120Z, PA-240Z – Connecting the PA-240Z
6
Connecting the PA-240Z
Always switch off the power to each device before connecting it to your PA-240Z. After connecting
your PA-240Z, connect its power and then switch on the power to each device.
To connect the PA-240Z as illustrated in the example in Figure 4:
1. Connect the audio sources. For example:
▪ An unbalanced stereo audio source to the AUDIO IN 1 3.5mm mini jack (for
example, an MP3 player).
▪ A balanced stereo audio source to the AUDIO IN 2 5-pin terminal block connector
(for example, the Kramer VP-444 Switcher/Scaler).
2. Connect the LINE OUT balanced stereo audio 5-pin terminal block connecter to a
balanced stereo input (for example, an additional PA-240Z device).
3. Connect the Hi-Z OUT or Lo-Z OUT 4-pin terminal block connector as follows:
▪ For Hi-Z connection: connect Hi-Z and COM terminal blocks to the + and – terminals
of a mono speaker (for example, the Galil 8-C ceiling speakers, daisy chained).
The speakers either output the left side (L+, L-) of the audio input or the stereo input
reduced to a mono signal (see Selecting Hi-Z Mono Settings on page 18).
▪ For Lo-Z connection: connect the L+ and L- connectors to the left-side speaker and
the R+ and R- connectors to the right-side speaker (for example, the Yarden 6-O
speakers).
4. Set the DIP-switches :
▪ For Hi-Z operation: Set DIP-switch 1 to Hi-Z and then set DIP-switch 2 to 70V or
100V.
▪ For Lo-Z operation: Set DIP-switch 1 to Lo-Z.
5. If required, connect:
▪ A PC via RS-232 , see Connecting to PA-240Z via RS-232 on page 8.
▪ The ETHERNET port , see Connecting PA-240Z via the Ethernet Port on page 9.
6. Connect the power cord (not shown in Figure 4).