Wireless Network Adapter 54Mb USB Pen User’s Manual Cod. KR.XC www.kraun.
User’s Manual Contents Package contents 3 1. Introduction 3 2. Installation Guide 3 2.1.1 2.1.2 2.1.2 3 3 4 1.1 1.2 1.3 Overview of the product Features LED Status 3 3 3 2.1 System Requirements 2.2 2.3 Hardware Installation Uninstall Software 6 6 2.3.2 Uninstall the utility software from your PC 6 2.3.1 Overview Software Installation for Windows 2000 Software Installation for Windows Vista Uninstall the driver software from your PC 3 6 3. Configuration 3.1 Profile 6 2.1.
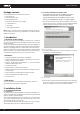
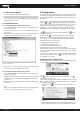
User’s Manual Package contents The following contents should be found in your box: • One Kraun KR.XC • One USB extension cable • Quick Installation Guide • One Kraun KR.XC Resource CD, including: • Utility and Drivers • User Guide 2.1.2 Software Installation for Windows 2000 1. Insert the Resource CD into your CD-ROM drive, click the Start button and choose Run. In the field that appears, enter F:\KR.XC\Win9x_2k_XP_X64\Setup.exe (if “F” is the letter of your CD-ROM drive). Figure 2.1 should then appear.
User’s Manual 7. After installing the software, Please plug the adapter into your PC. If you need instructions as to how to do this, please refer to section 2.2 Hardware Installation. If you have plugged it into you PC already, please un-plug it and plug it back in. The OS will automatically detect the adapter and automatically setup the driver for the adapter. If it does not, please follow the setup steps to finish the driver installation.
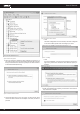
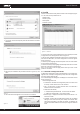
User’s Manual Figure 2.10 Select the driver software ) Note: Vista X86 is designed for the Vista of 32bit, Vista X64 is designed for the Vista of 64bit, please select according as you need. 6. After that, the installation will proceed as shown in 2.11. Figure 2.8 Driver management 4. Select the method to update the driver software (see Figure 2.9). If you want the system to search the software automatically, select the first type.
User’s Manual 2.2 Hardware Installation 1. Connect one end of the USB cable to the Adapter. 2. Connect the other end of the USB cable to the USB port on your computer. Because the Adapter gets its power from the host, there is no external power supply. The LED should light up when the Adapter is plugged in and the PC is on. 2.3 Uninstall Software 2.3.1 Uninstall the driver software from your PC 1. On the Windows taskbar, click the Start button, point to Settings, and then click Control Panel. 2.
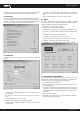
User’s Manual 3.1 Profile Click the Profile tab of the utility and the Profile screen will appear, figure 3.7. The Profile screen provides tools to: • Add a profile • Delete a profile • Edit a profile • Activate a profile Figure 3.3 3. To continue, click Connect Anyway. Click the Cancel button to end the Installation. Figure 3.7 Profile Tab Figure 3.4 4. After that, the installation will proceed as shown in Figure 3.5, click close.
User’s Manual • RTS Threshold - Default is 2347 . • Fragment Threshold - Default is 2346 . • Ad-hoc mode - Displays the wireless mode, either Only 802.11B or 802.11B/G mode. • Channel - Shows the current channel in use. This field determines which operating frequency will be used. enter 10 hexadecimal digits (any combination of 0-9, a-f, A-F) or 5 ASCII characters for 64-bit (also called 40bits) encryption.
User’s Manual Click the Rescan button to refresh the list at any time. Highlight an SSID and click the Connect button to connect to an available network. 3.4 Statistics The Statistics tab shows receiving and transmitting statistical information for the following receive and transmit diagnostics for frames received by or transmitted to the wireless network adapter. Click the Reset Counter button to reset the count of the statistics information.
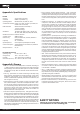
User’s Manual Appendix A: Specifications Normal Interface Standards Operating System Transmission Distance A-type USB 2.0 Connector IEEE802.11b; IEEE802.11g Windows 98Se, Me, 2000, XP, Vista In door up to 100m, out door up to 300m (it is limited to the environment). Radio Data Rate 54/48/36/24/18/12/9/6Mbps or 11/5.5/3/2/1Mbps (Auto Rate Sensing) Modulation 1M DBPSK; 2M DQPSK; 5.