Wireless Access Point 54MB Single Port User’s Manual Cod. KR.XJ www.kraun.
User’s Manual Contents Package contents 3 1. About this Guide 3 2. Introduction 3 2.3.1 3 1.1 1.2 1.3 Purposes Conventions Overview of this User Guide 3 3 3 2.1 2.2 2.3 Overview of the AP Features Panel Layout 2.3.2 The Rear Panel 4 3. Connecting the AP 4 4. TCP/IP Configuration 4 5. Configuring the AP 5 5.4.1 5.4.2 5.4.3 5.4.4 5.4.5 6 8 8 9 9 3.1 3.2 3.3 The Front Panel System Requirements Installation Environment Requirements Connecting the AP 3 3 3 4 4 4 5.1 5.2 5.3 5.
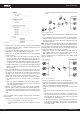
User’s Manual Package contents The following contents should be found in your box: • One Wireless Access Point 54MB Single Port • One AC power Adapter for Wireless Access Point 54MB Single Port • One Resource CD for Wireless Access Point 54MB Single Port, including: • This Guide • Other Helpful Information Note: If any of the listed contents are damaged or missing, please contact the retailer from whom you purchased the Wireless Access Point 54MB Single Port for assistance. 1.
User’s Manual 2.3.1 The Rear Panel The rear panel contains the following contents (Viewed from left to right in figure 2-2): • Wireless antenna • Reset button • There are two ways to reset the AP’s factory defaults: 1) Use the Factory Defaults function on System Tools -> Factory Defaults page in the AP’s Web-based Utility. 2) Use the Reset button: First, turn off the AP’s power. Second, press and hold the default reset button then turn on the AP’s power, until the system LED lights up (about 3 seconds).
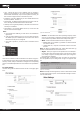
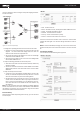
User’s Manual If the result displayed is similar to that shown in figure 4-1, the connection between your PC and the AP has been established. System Tools. On the right of the Web-based utility, there are the detailed explanations and instructions for the corresponding page. To apply any settings you have altered on the page, please click the Save button. There are the detailed explanations for each Web page’s key functions below. 5.
User’s Manual • Type - Choose the type for the IP Address: Static IP, Dynamic IP (DHCP). If you choose Static IP, you need to configure the IP Address, Subnet Mask and Gateway. If you choose Dynamic IP (DHCP), you don’t need to configure the other information any more. • IP Address - Enter the IP address of your AP in dotted-decimal notation (factory default: 192.168.1.1). • Subnet Mask - An address code that determines the size of the network. Normally use 255.255.255.0 as the subnet mask.
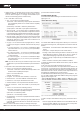
User’s Manual • Set AP3 to Repeater mode with the MAC address of its root AP (AP2). Figure 5-8: wireless repeating 2. Verify the wireless security parameters for all access points, if needed. Figure 5-6b: Wireless Settings for No Region Option • Disable Wireless - The wireless of this AP can be enabled or disabled to allow wireless stations access. If disabled, wireless stations will not be able to access the AP.
User’s Manual Here is an example of how to configure multi-point bridging. Please follow the instructions: Figure 5-11: Site Survey • SSID - The SSID of the AP. • BSSID - The BSSID of the AP, usually also the MAC address of the AP. • Signal - The signal received from the AP. • Channel - The channel the AP works in. • Security - The AP communicates in privacy. • Choose - Choose one AP from list to connect to. Press one of Connect in list to select an AP to connect to.
User’s Manual • Disable Security - The wireless security function can be enabled or disabled. If disabled, the wireless stations will be able to connect to the AP without encryption. It is strongly recommended that you choose one of following options to enable security. • WEP - Select 802.11 WEP security. you have select the Reboot checkbox. 5.4.
User’s Manual 2. Enter a simple description of the wireless station in the Description field. For example: Wireless station A. be able to access the AP, however, other wireless stations that are not in the list will be able to access the AP. 3. Privilege - Selects the privileges for this entry, one of Allow / Deny / 64-bit / 128-bit / 152-bit.
User’s Manual • DHCP Server - Enable or Disable the DHCP server. If you disable the Server, you must have another DHCP server within your network or else you must manually configure the computer. • Start IP Address - This field specifies the first of the addresses in the IP address pool. 192.168.1.100 is the default start address. • End IP Address - This field specifies the last of the addresses in the IP address pool. 192.168.1.199 is the default end address.
User’s Manual There are five submenus under the System Tools menu (shown in figure 5-22): Firmware, Factory Defaults, Reboot, Password, and Log. Click any of them, and you will be able to configure the corresponding function. The detailed explanations for each submenu are provided below. 5.7.1 Firmware The page (shown in figure 5-23) allows you to upgrade the latest version of firmware for the AP. Click the Restore button to reset all configuration settings to their default values.
User’s Manual 5.7.5 Log This page (shown in figure 5-27) allows you to query the Logs of the AP. Appendix B: Configuring the PCs In this section, we’ll introduce how to install and configure the TCP/IP correctly in Windows 95/98. First make sure your Ethernet Adapter is working, refer to the adapter’s manual if needed. 1. Install TCP/IP component 1) On the Windows taskbar, click the Start button, point to Settings, and then click Control Panel.
User’s Manual 3) Click on Properties. The following TCP/IP Properties window will display and the IP Address tab is open on this window by default. 4) Now you have two ways to configure the TCP/IP protocol below: • Assigned by DHCP Sever a. Select Obtain an IP address automatically, as shown in the figure below: Figure B-6: DNS Configuration tab • Setting IP address manually a. Select Specify an IP address on IP Address tab, as shown in the following figure. If the AP’s LAN IP address is 192.168.1.
User’s Manual c. On the DNS Configuration tab, click Enable DNS radio, and type your computer name in to the Host field and a Domain (such as szonline.com) into the Domain field. In the DNS Server Search Order field you can type the DNS server IP addresses, which has been provided by your ISP, and click Add button.
User’s Manual Integrity Protocol (TKIP). TKIP addresses the encryption weaknesses of WEP. Another key component of WPA is built-in authentication that WEP does not offer. With this feature, WPA provides roughly comparable security to VPN tunneling with WEP, with the benefit of easier administration and use. This is similar to 802.1x support and requires a RADIUS server in order to implement. The Wi-Fi Alliance will call this, ‘WPA-Enterprise.
User’s Manual 17 www.kraun.