I N S TA L L AT I O N MA N UA L Cirrus 4” Centerset Basin Faucet FUS-13102 www.kraususa.com I toll free: 1.800.775.0703 I © 2014-2015 Kraus USA Inc.
Thank you for purchasing Kraus We would like to take this opportunity to thank you for your business with Kraus USA. It is our sincere hope that you are completely satisfied with your experience. We welcome any questions or comments you may have, and will be glad to assist you in the future. For more information about Kraus products, please visit our website at: www.kraususa.
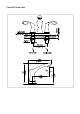
(257mm) (21mm) ∅ 1 15/16” (∅ 50mm) 1 3/8” (35mm) ∅ 1 3/4” (∅ 45mm) ∅ 1 15/16” (∅ 50mm) Prior to Installation: • Make sure you have all necessary parts by checking the diagram and parts list. If any part is missing or damaged, please contact Kraus Customer Service at 800775-0703 for a replacement 1 1/4-18UNF-2A 9/16”-18UNEF • Turn off the hot and cold water supply at the angle stops and turn on the old faucet to release any built up pressure. Remove existing faucet.
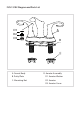
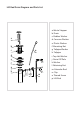
FUS-13102 Diagram and Parts List A D1 D2 D3 B C A. Faucet Body D. Aerator Assembly B. Putty Plate D1. Aerator Washer C. Mounting Nut D2. Aerator D3.
Faucet Dimensions
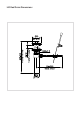
Lift Rod Drain Diagram and Parts List a. Waste Stopper b. Drain c. Rubber Washer a d. Concave Washer e. Plastic Washer b f. Mounting Nut c g. Tailpipe Washer p h. Tailpipe d i. Top Hat Washer e o f j. Drain Off Pole k. Washer l. Retaining Nut g h i j n k l m m. Extender Rod n. Clip o. Thumb Screw p.
Lift Rod Drain Dimensions
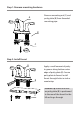
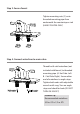
Step 1: Remove mounting hardware Remove mounting nut (C) and A putty plate (B) from threaded mounting pipe A B B tt s Pu er mb y Plu C C Step 2: Install faucet A B tt s Pu ber y Apply a small amount of putty to groove along bottom outer edge of putty plate (B). Secure putty plate to faucet.
B Step 3: Secure faucet utt rs P y be m Plu C C Tighten mounting nuts (C) onto threaded mounting pipe from underneath the countertop or sink (HAND-TIGHTEN ONLY) C D1 Step 4: Connect waterlines to main valve D2 D3 Thread hot & cold waterlines (not included with faucet) to threaded mounting pipe. (A. Hot Side: Left B. Cold Side: Right). Secure other end of waterlines to angle stops. Tighten both ends with adjustable wrench until snug.
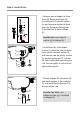
Step 5: Install Drain • Remove waste stopper (a) from drain (b). Remove tail pipe (h), mounting nut (f ), plastic washer (e), and concave washer (d) from drain (b).b Remove retaining nut (l) and washer (k) from tailpipe c (h) d a b c d e f g i k e l Installerf tip: Leave top hat washer (g) in tailpipe (h) h • Install drain (b), with rubber washer (c) attached, into the drain hole.
6 7 d e f Step 5: Install Drain 9 11 12 8 • Insert waste stopper (a) into drain (b). Make sure slot at end of waste stopper (a) is facing the rear of the sink a b b c b d e f • Insert lift pole rodg(p) through the p o hole in the back of the faucet body. h Loosen thumb screw (o) and attach extender rod (m) to lift pole rod (p). Tighten thumb screw (o) n m D1 h D2 D3 j k • Insert shortest end of drain off p o n h j k l pole (j) into drain off pole opening p of tailpipe (h).
Step 5: Install Drain • Place one end of clip (n) on drain p o 12 n j m D2 off pole (j). Insert drain off pole (j) D3 through desired hole of extender rod (m). Place other end of clip (n) on drain off pole (j) Installer Tip: You may adjust the extender rod (m) to a desired height Step 6: Flush Faucet D1 D2 D3 D1 Remove aerator assembly (D). Loosen aerator cover (D3) with adjustable wrench. Remove aerator (D2) and aerator washer (D1). Turn water on for 1 minute to remove any debris.
Replacement Part List - FUS-13102 3 1 6 4 7 5 8 9 2 10 13 11 12 1. Metal Handle – HOT 2. Cartridge – HOT 3. Aerator Washer 4. Aerator 5. Aerator Cover 6. Metal Handle – COLD 7. Cover Button 8. Set Screw 9. Decorative Ring 10. Cartridge – COLD 11. Putty Plate 12. Mounting Nut 13.
Replacement Part List - Lift Rod Drain 1. Waste Stopper 2. Drain 1 3. Rubber Washer 4. Concave Washer 5. Plastic Washer 2 3 6. Mounting Nut 16 7. Tailpipe Washer 4 8. Tailpipe 9. Top Hat Washer 5 15 6 10. Drain Off Pole 11. Washer 7 12. Retaining Nut 8 9 10 1112 14 13 13. Extender Rod 14. Clip 15. Thumb Screw 16.
Trouble - Shooting If you have followed the instructions carefully and your faucet still does not work properly, take the following corrective steps: PROBLEM CAUSE ACTION Leakage under handles Hot or cold cartridge (2 or 10) may be loose Remove cover button (7). Loosen set screw (8) with hex wrench (13). Remove metal handle (1 or 6).
Push Open Left Hot Water Care & Maintenance *To keep the product clean & shining, follow the steps below: 1. 2. 3. 4. Rinse with clean water & dry with a soft cloth Do not clean with soaps, acid, polish, abrasives, or harsh cleaners Do not use cloth with a coarse surface Unscrew the aerator and clean when necessary *This installation manual is subject to change without further notice.
Codes/Standards Applicable: NSF/ANSI 372 GREEN LEAD FREE IA P MO R& T NSF/ANSI 61 ASME A112.18.1M 1.5GPM 5.7L/min maximum TM Water Efficiency KRAUS LIMITED LIFETIME WARRANTY This product has been manufactured and tested to the highest quality standards by Kraus USA Inc. (“Kraus”). We offer our customers thoughtfully crafted fixtures & accessories, engineered for enduring performance over years of use. WHO IS COVERED BY THE WARRANTY This warranty extends to the original purchaser only.
C. Kraus recommends installing all Kraus products with a licensed, professional plumber. Kraus will not be held responsible for any damage or product failure due to improper installation, misuse, or failure to use a licensed professional. Please read your care and maintenance documentation to determine the limits of proper use. D. Commercial use will automatically void this warranty. E. This warranty is not applicable to Kraus products purchased from an unauthorized seller.
www.kraususa.
www.kraususa.