
Instructions / Assembly

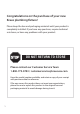


5
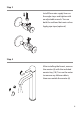
Step 1
Remove rubber washer (8A),
metal washer (8B), mounting
nut (8C), and mounting
screws (8D). Keep the base
trim ring (7A) and rubber
washer (7B) on the base of
the faucet
6 5/8”
5 4/5”
3/8”
(10mm)
7/8”
19.7
º
(22mm)
8 5/16”
1 1/4-18UNF-2A
(21mm)
10 1/8”
(257mm)
1 3/8”
(35mm)
3 3/4”
(168mm)
(147.3mm)
(96mm)
∅ 1 3/4”
(
∅ 45mm)
∅ 1 15/16”
(
∅ 50mm)
9/16”-18UNEF
27mm ~ 41.3mm
1 1/16” ~ 1 5/8”
∅ 1 15/16”
(
∅ 50mm)
12 7/16”
(316mm)
1 5/8”
(42.5 mm Max)
7A
8B
8C
8D
8A
7A
8B
8C
8D
8A
Step 2
6 5/8”
5 4/5”
3/8”
(10mm)
7/8”
19.7
º
(22mm)
8 5/16”
1 1/4-18UNF-2A
(21mm)
10 1/8”
(257mm)
1 3/8”
(35mm)
3 3/4”
(168mm)
(147.3mm)
(96mm)
∅ 1 3/4”
(
∅ 45mm)
∅ 1 15/16”
(
∅ 50mm)
9/16”-18UNEF
27mm ~ 41.3mm
1 1/16” ~ 1 5/8”
∅ 1 15/16”
(
∅ 50mm)
12 7/16”
(316mm)
1 5/8”
(42.5 mm Max)
7A
8B
8C
8D
8A
7A
8B
8C
8D
8A
Install the faucet through the
1-3/8” predrilled hole in the
countertop. Attach rubber washer
(8A), metal washer (8B), mounting
nut (8C), and mounting screws
(8D) on the threaded mounting
pipe. Tighten the mounting nut
(8C) until snug. Tighten screws
(8D) on the mounting nut (8C)
with a Phillips head screw driver
until snug