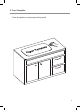
I N S TA L L AT I O N MA N UA L Kraus Stainless Steel Undermount Kitchen Sink KBU10 / KBU11 / KBU12 / KBU14 / KBU15/ KBU16 / KBU17 / KBU21 / KBU22 / KBU23 / KBU24 / KBU25 / KBU26 / KBU27 / KBU28 / KBU29 www.kraususa.com I toll free: 1.800.775.0703 I © 2016 Kraus USA Inc.
Thank you for your purchase We would like to take this opportunity to thank you for choosing Kraus. We hope that you are completely satisfied with your purchase, and enjoy it for years to come. If you have any questions, or require technical assistance, please contact us at 800.775.0703 and one of our representatives will be happy to help. For more information about Kraus products, please visit: www.kraususa.
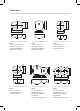
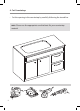
Prior to Installation: • Make sure that you have all necessary parts by checking the parts list.
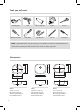
I J Adjustable wrench Phillips screwdriver Hex wrench Silicone Sealant Safety Goggles Drill Phillips Screwdriver Putty Knife Silicone Sealant Silicone Adhesive Jig Saw B Hex wrench Scissors Phillips screwdriver Adjustable wrench Tape Measure Pencil Screwdriver Tools You Will Need J F Tools you will need: NOTE: Specialized tools may be necessary to install Kraus Stainless Steel Undermount sinks with countertop materials other than wood, marble, or granite I Dimensions × × D × × KBU1
Dimensions × × × × KBU16 KBU14 16-1/2” 419mm 18-1/2" 470mm 13” 330mm 17-3/4” 450mm 31-1/2” 800mm 19-3/4” 500mm 15” 381mm 7” 181mm 9” 229mm 10” 255mm KBU14 31 1/2” x 18 3/8” x 10” Min Cabinet Size: 36” Matching Grid: KBG-14 Drain Model #: BST-1 KBU15 19 3/4” x 20 1/2” x 9” Min Cabinet Size: 24” Matching Grid: KBG-15 Drain Model #: BST-1 KBU16 15” x 18 1/2” x 7” Min Cabinet Size: 18” Drain Model #: ST-1 × × × Ø Ø89 Ø Ø89 KBU22 10” 254mm 7” 178mm 9” 228mm Ø Ø89 KBU21 29 1/8” x 19 1/2”
KBU23 KBU23 11” 280mm 18-1/2” 18-1/2” 471mm 471mm 17-3/4” 17-3/4” 449mm 449mm 15-3/8” 15-3/8” 391mm 391mm 14” 355mm 8” 203mm KBU29 31.5” x 18.
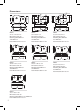
DETERMINE REVEAL TYPE 1.
Step1 2.
Step2 3.
Step3 4.
Determine location for mounting brackets; space 3/8”POSITIVE 1/8”NEGATIVE ZERO Centerline 5. Set up Mounting Brackets • Turn countertop over and align sink with countertop. Decide location for mounting brackets • Mounting holes should be ½” from edge of sink Step5 Step6 1/2" (13mm) Step5 6.
7. Install Anchors Step6 • Insert anchors into drilled holes and lightly tap with a hammer until flush 1/2 Step7 8. Secure Sink to Countertop • Use a bead of silicone (or preferred adhesive) around the rim of the sink. Check the alignment of the sink to the cutout in the countertop.
9. Attach Mounting Hardware Step8 • Attach mounting hardware to secure bowl.
10. Install Plumbing Fixtures • Connect drain to sink. Connect trap to drain.
Codes/Standards Applicable: HELP LINE Our customer service hours are Monday – Friday, 9am – 8pm EST. Be sure to visit our website at www.kraususa.com If you are a HOMEOWNER please contact a Kraus Customer Service Representative at: Kraus USA, Inc. 12 Harbor Park Drive Port Washington, NY 11050 Toll-free 800-775-0703 Customerservice@kraususa.com If you are a PLUMBING CONTRACTOR OR TRADE PROFESSIONAL please contact a Kraus Pro Representative at: Kraus USA, Inc.
R E G I S T E R Y O U R P R O D U C T T O D AY Receive Proof of Ownership Access Customer Care & Installation Help Get Exclusive Kraus Offers & Promotions Scan to Register Online or visit http://www.kraususa.com/registration We’re always looking for ways to improve. Please take a moment to share your experience. Visit http://www.kraususa.com/review to let us know what you think about your new Kraus product. Contact Us to Learn More 1.800.775.0703 / www.kraususa.com / customerservice@kraususa.